
Install NVIDIA GPU drivers on the head and compute nodes.
Warewulf 4 – GPUs
In the previous Warewulf 4 article, I added the Network Time Protocol (NTP) to the cluster for precise time keeping and a resource manager, Slurm, so you could queue up jobs.
Accelerators in system nodes are now extremely common. Of these accelerators, the vast majority are graphical processing units (GPUs). Understanding how to boot compute nodes with GPUs in Warewulf 4 is key to using them to run applications. For this article, I use NVIDIA GPUs (see the "Disclaimer" box).
Disclaimer
I work for NVIDIA. I did not write this article at their behest or at the behest of anyone else. All work for this article was done during non-work hours on hardware that I purchased.
In general, you have to contend with the head/login node(s) and the compute nodes. I’ll treat installing the NVIDIA GPU drivers and tools on the head node as you would a workstation or desktop. The compute nodes are treated differently because they don't have an attached monitor, which means you need to modify the container used for booting compute nodes.
NVIDIA Drivers
A great place to start when installing NVIDIA drivers is with the Quickstart Guide. You have three major options for installing drivers:
- Runfile
- Package managers
- Containerized drivers
You can use any of the three options for installing and maintaining drivers, but you should not mix them – pick just one (i.e., do not cross the streams).
A runfile installer is a single file that can be downloaded and used for installing a specific driver version. It’s not specific to any distribution, so it can be used with almost any Linux installation.
The second option, the package manager, is specific to a distribution, so you can use something like apt, dnf, or yum to install the driver. This method is very similar to installing any other package, and you install, remove, and upgrade the NVIDIA drivers in the exact same manner.
The third option is to use a containerized version of the drivers.
Any of these three options is fine, and I know people who use each of them. Remember, though, DO NOT install the drivers with one method and then try removing or upgrading them with a different method. You can use a method to install a driver and remove it, then use a different method for the next driver, but be sure not to cross those streams.
One danger in using a runfile to install the drivers is that someone could come along and install, remove, or upgrade them from a package manager. If this happens, it is very likely you will have a corrupted set of drivers. However, I do know of Warewulf 4 systems that use the runfile method.
Installing Drivers with a Package Manager
For this article I use the package manager for Rocky 8 (i.e., CentOS 8) to install the NVIDIA drivers. Specifically, I use the directions in the NVIDIA Quickstart Guide for CentOS 8. Before following the directions, though, you need to turn off Secure Boot in the BIOS under UEFI. If you don’t, you’re likely to have problems and the drivers won’t work.
Installing the drivers is a two-part process. The first part is the head node (or a login node or any node with GPUs), and the second part is the set of compute nodes.
Head Node Drivers
Listing 1 shows how to install the drivers on the head node. After all of the steps are complete, reboot the head node and run the command nvidia-smi. You should see output similar to Figure 1.
Listing 1: Installing Drivers on Head Node
sudo dnf install -y tar bzip2 make automake gcc gcc-c++ pciutils elfutils-libelf-devel libglvnd-devel
distribution=rhel8
ARCH=$( /bin/arch )
sudo dnf config-manager --add-repo http://developer.download.nvidia.com/compute/cuda/repos/$distribution/${ARCH}/cuda-$distribution.repo
sudo dnf install -y kernel-devel-$(uname -r) kernel-headers-$(uname -r)
sudo dnf install -y kernel kernel-core kernel-modules
sudo dnf module install nvidia-driver
sudo dnf clean all
sudo dnf -y module install nvidia-driver:latest-dkms
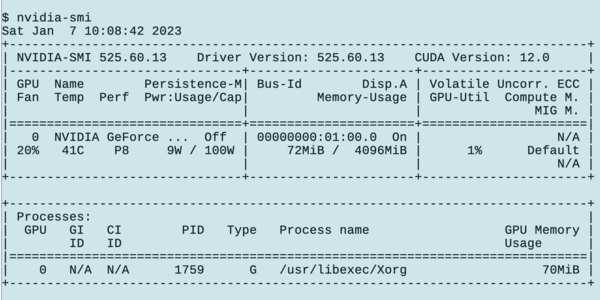 Figure 1: Nvidia System Management Interface Output.
Compute Node GPU Drivers
Before installing the compute node GPU drivers, you should update the compute node image:
sudo wwctl container exec rocky-8 /bin/bash
[rocky-8] Warewulf> dnf update
...
[rocky-8] Warewulf> dnf clean all
Failed to set locale, defaulting to C.UTF-8
48 files removed
[rocky-8] Warewulf> exit
...
The dnf update command in this example updated a total of 139 packages. After updating the container, I booted a compute node and, yes, it booted (yeah verily). I also checked that Slurm worked.
For the compute nodes, I chose to install just the drivers. The installation method for the head node also installed CUDA, but I don’t want to make a giant container that eats up too much memory (despite the huge amount of memory in servers today). Therefore, I followed a different set of instructions from the Rocky Linux forums.
The steps for installing the drivers are:
sudo wwctl container exec rocky-8 /bin/bash
[rocky-8] Warewulf> dnf install elrepo-release
...
[rocky-8] Warewulf> dnf install nvidia-detect
...
[rocky-8] Warewulf> dnf install $(nvidia-detect)
...
[rocky-8] Warewulf> exit
...
The last dnf command installs 207 packages into the container. Next, boot the compute node and run the nvidia-smi command (Figure 2). From the output, you can see that the NVIDIA drivers are installed.
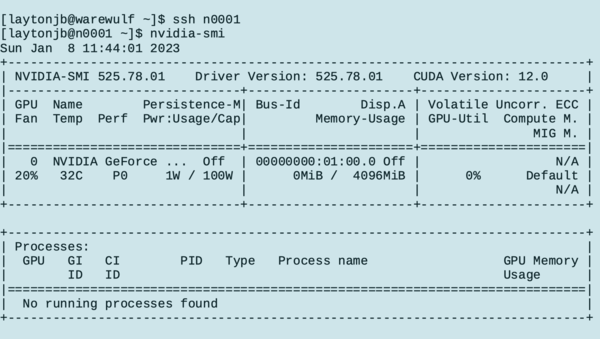 Figure 2: Booting the compute node.
Out of curiosity, I went to the first node (n0001) to determine the size of the container on the compute nodes. Remember that Warewulf is stateless, so the container is in memory.
To get the total size, use the command du -sh on the root directory (/). Recall that /home and /opt are NFS exported to the compute node so the output of the command includes the space for those directories. To get an accurate size, run du -sh on both directories and subtract them from the total.
On my machine, the compute node used about 1.2GiB, which I consider pretty good, especially because it includes the NVIDIA GPU drivers. You don't want a large amount of space (large container) and you don't want a small one either.
Slurm Modifications
My compute nodes are very simple. They are just a desktop with a single GPU card. In the last article I configured Slurm so that users running a job on a node get “exclusive” access to the node, meaning they can use all of the resources without sharing them with other users.
In a homogeneous cluster like mine, any node(s) you get from Slurm will be the same as any other node. However, sometimes the cluster nodes won’t be the same. Some may have different capabilities, such as large amounts of memory or GPUs. When you specify the resources you need, such as large memory or GPUs, Slurm will assign your job to nodes with those resources. For example, in your job script, you can specify that you need a node with two GPUs. Slurm will look to see if it has resources to meet your request. If it does, and the resources are free, it will execute the job. If it has the resources but they are busy, your job is queued for those resources.
The way Slurm supports specific resources such as GPUs is through Generic Resource (GRES) definitions, which are attributes defined for nodes that can then be used for scheduling jobs that request those resources. For example, you can define a compute node as having 512GB of RAM when others only have 32GB, and a job script could then request a node of 512GB. Without a GRES for the node defined with 512GB, Slurm would schedule a job that requested 512GB of memory to the first available node, which might only have 32GB. GRES allows the cluster to define unusual attributes for nodes that have specific capabilities.
A common GRES definition is GPU, for which you need to modify the file /etc/slurm/slurm.conf. Before modifying it, the pertinent section is as shown in Listing 2.
Listing 2: Original /etc/slurm/slurm.conf
#
# COMPUTE NODES
# OpenHPC default configuration
TaskPlugin=task/affinity
PropagateResourceLimitsExcept=MEMLOCK
#JobCompType=jobcomp/filetxt
Epilog=/etc/slurm/slurm.epilog.clean
NodeName=n0001 Sockets=1 CoresPerSocket=4 ThreadsPerCore=2 State=UNKNOWN
PartitionName=normal Nodes=ALL Default=YES MaxTime=24:00:00 State=UP Oversubscribe=EXCLUSIVE
SlurmctldParameters=enable_configless
ReturnToService=2
Before the line beginning with NodeName, you need to insert the line GresTypes=gpu, which is a comma-delimited list of resources (e.g., GPUs, NVIDIA Multi-Process Service (MPS) interface, or others) that tells Slurm the type of GRES attributes used.
Then you need to modify the line beginning with NodeName and add the phrase Gres=gpu:1 to that line (Listing 3). This tells Slurm that this node has only one GRES attribute that is a GPU (the number after the colon indicates how many GPUs are in the node).
Listing 3: slurm.conf for GPUs
#
# COMPUTE NODES
# OpenHPC default configuration
TaskPlugin=task/affinity
PropagateResourceLimitsExcept=MEMLOCK
#JobCompType=jobcomp/filetxt
Epilog=/etc/slurm/slurm.epilog.clean
GresTypes=gpu
NodeName=n0001 Gres=gpu:1 Sockets=1 CoresPerSocket=4 ThreadsPerCore=2 State=UNKNOWN
PartitionName=normal Nodes=ALL Default=YES MaxTime=24:00:00 State=UP Oversubscribe=EXCLUSIVE
SlurmctldParameters=enable_configless
ReturnToService=2
You can define many options in slurm.conf, including specific GPU types and number of GPUs.
The second thing you need to do is add a GRES configuration file, gres.conf, which defines the GRES attributes. This file goes in the same location as slurm.conf (i.e., /etc/slurm/):
# GPU definition
NodeName=n0001 Name=gpu File=/dev/nvidia0
The one line in the file defines the node to which it pertains. You can also use a single line in gres.conf to cover multiple nodes. After the Name is the GRES attribute (of which there are several). This line is then finished by the property File, which is the fully qualified path to the device files associated with that resource.
Other properties in gres.conf are not listed here but are mentioned in the documentation, along with a large number of examples.
After slurm.conf is modified and gres.conf is created on the head node, you can copy them to the container for the compute nodes. (I only have one container.) Just exec into the container while mounting the host node filesystem and copy over the files:
$ sudo wwctl container exec --bind /:/mnt rocky-8 /bin/bash
[rocky-8] Warewulf> cp /mnt/etc/slurm/slurm.conf /etc/slurm/slurm.conf
[rocky-8] Warewulf> cp /mnt/etc/slurm/gres.conf /etc/slurm/gres.conf
When you exit the container it should be saved.
I restarted Slurm on the head node simply by running the command:
sudo systemctl restart slurmctld
Before you can boot and start using the container, you need to make a few more modifications that I learned during testing.
No GPU Device
When I booted the container that I previously saved, the Slurm daemon on the compute node would not stay up. It would start but then fail. In debugging the problem, I found that the GRES resource did not have a device (i.e., it was missing /dev/nvidia0). When the compute node booted, none of the NVIDIA devices were there. However, they were in the container, so I wasn’t sure what happened.
In reading the NVIDIA GPU installation manual, I found a section (8.4) that talked about “Device Node Verification.” That section has a script that checks the existence of the device files and, if they don’t exist, creates them. Aha! I need to use the script when the compute nodes start so the correct device files are present.
Recall that in the previous article on Warewulf 4 about time and resource management, you created a script that is run by systemd when the node starts up to set the correct time zone. This script is in the container for compute nodes, and the fully qualified path is in /etc/systemd/system/run-at-startup.service (Listing 4). Notice that it runs a simple script located in /usr/local/bin/timezone_fix.sh.
Listing 4: run-at-startup.service
[Unit]
Description=Script to set time zone to EDT

[Service]
Type=simple
RemainAfterExit=no
ExecStart=/usr/local/bin/timezone_fix.sh
TimeoutStartSec=0

[Install]
WantedBy=default.target
Unfortunately, systemd in all of its lovely weirdness and obstinacy only lets you have one line starting with ExecStart, so it’s not possible simply to add another script (score another one for SysVinit). My simple fix is to have systemd execute a single script named /usr/local/bin/main.sh that then runs the needed startup scripts (Listing 5). Don't forget that this file is located in the container.
Listing 5: Modified run-at-startup.service
[Unit]
Description=Script to set time zone to EDT

[Service]
Type=simple
RemainAfterExit=no
ExecStart=/usr/local/bin/main.sh
TimeoutStartSec=0

[Install]
WantedBy=default.target
The file main.sh is:
#!/bin/bash

# Set correct Time Zone
/usr/local/bin/timezone_fix.sh

# Create correct NV devices
/usr/local/bin/gpu_device_fix.sh
The script gpu_device_fix.sh checks and creates the devices and was taken directly from the NVIDIA documents and put into the file /usr/local/bin/gpu_devices.sh (Listing 6).
Listing 6: /usr/local/bin/gpu_devices.sh
#!/bin/bash

/sbin/modprobe nvidia

if [ "$?" -eq 0 ]; then
  # Count the number of NVIDIA controllers found.
  NVDEVS=`lspci | grep -i NVIDIA`
  N3D=`echo "$NVDEVS" | grep "3D controller" | wc -l`
  NVGA=`echo "$NVDEVS" | grep "VGA compatible controller" | wc -l`

  N=`expr $N3D + $NVGA - 1`
  for i in `seq 0 $N`; do
    mknod -m 666 /dev/nvidia$i c 195 $i
  done

  mknod -m 666 /dev/nvidiactl c 195 255

else
  exit 1
fi

/sbin/modprobe nvidia-uvm

if [ "$?" -eq 0 ]; then
  # Find out the major device number used by the nvidia-uvm driver
  D=`grep nvidia-uvm /proc/devices | awk '{print $1}'`

  mknod -m 666 /dev/nvidia-uvm c $D 0
else
  exit 1
fi
Be sure all three scripts located in /usr/local/bin are executable. I made them executable by user and group just to be sure. (I really have no idea what systemd is doing, so I like to be cautious.) After creating these files in the container, just exit and the container will be saved.
Testing the Updated Container
You should be able to boot or reboot the compute node and check that slurmd is up and running with the command:
systemctl status slurmd
If you like, you can even run the nvidia-smi command on the compute node to see if it works, but the proof will come from running a job that requests a GPU.
To test that the Slurm configuration modifications and the introduction of GRES properties work, I created a simple Slurm job script in my home directory:
#!/bin/bash
#SBATCH --job=test_gpu_job
#SBATCH --nodes=1
#SBATCH --output=test_gpu_job_%j.log
#SBATCH --gres=gpu:1

srun /home/laytonjb/TEST_GPU/gpu_test.sh
The first few lines are Slurm options, the key line being #SBATCH --gres=gpu:1, which requests only one GRES property that is a GPU.
This script calls another script, gpu_test.sh, that simply runs nvidia-smi:
#!/bin/bash

date
sleep 20
nvidia-smi
date
After the job is submitted you can check the job queue to see if it’s running, and you can check the nodes to see whether one has been allocated.
Listing 7: Checking the Job Queue
$ sbatch run_gpu_test.sh
Submitted batch job 28
$ squeue
             JOBID PARTITION     NAME     USER ST       TIME  NODES NODELIST(REASON)
                28    normal test_gpu laytonjb  R       0:02      1 n0001
$ sinfo -a
PARTITION AVAIL  TIMELIMIT  NODES  STATE NODELIST
normal*      up 1-00:00:00      1  alloc n0001
Once it is finished, you can see the output file name with the command:
$ ls -s
total 12
4 gpu_test.sh  4 run_gpu_test.sh  4 test_gpu_job_28.log
The job ran successfully with the correct output (Figure 3).
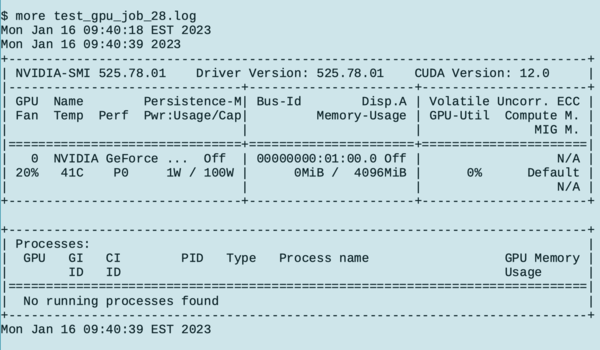 Figure 3: Logfile output.
Summary
This article covered how to get the NVIDIA GPU drivers installed and working on the head node and the compute nodes. I installed the drivers into the default container used by the compute nodes. The container grew a bit in size to about 1.2GB.
For some reason I had some issues getting the NVIDIA devices to appear on the compute node, but a device script from the NVIDIA documentation and a little systemd scripting solved that problem.
Getting the NVIDIA drivers installed and working is only part of the solution to using them for computations. The Slurm configuration was modified to use generic resource (GRES) definitions. I only modified the configuration for NVIDIA GPUs to show the process of adding GRES definitions, but don’t let that stop you from adding others if you like.
I have at least one more Warewulf 4 article that will show how to install or build applications and use Environment Modules to control their usage.