« Previous 1 2 3 4 Next »
Secure microservices with centralized zero trust
Inspired
How often have you been caught out by an application that has suddenly and catastrophically failed, only to discover deep in the logs of some unexciting but critical component a message – such as Unable to connect to https://database.service.local – expired TLS certificate – and smacked your head in frustration at how such a preventable failure mode brought down your carefully crafted microservices-based architecture? With an expired TLS certificate, your database could no longer prove its identity or play a part in a zero trust network (Figure 1).
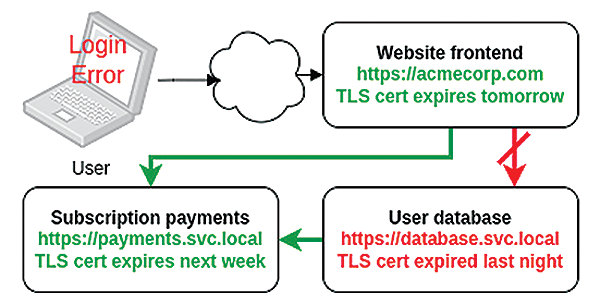 Figure 1: Expiry of a single service's Transport Layer Security (TLS) certificate makes the whole application unusable.
Certificate expiry is just one example of how the human factors involved in identity management can be high maintenance, prone to error, and the source of vulnerabilities. Yet, cast-iron workload identities are, by definition, the foundation of zero trust application architecture. No two workloads should trust each other's legitimacy simply because they both happen to be running on the same physical host or within the same network perimeter. Instead, each TCP session is validated by both participants, and no data is exchanged without each side knowing for sure who is at the
...Buy this article as PDF
(incl. VAT)
Buy ADMIN Magazine
Related content
-
Sustainable Kubernetes with Project Kepler
 Measure, predict, and optimize the carbon footprint of your containerized workloads.
 -
Rancher manages lean Kubernetes workloads
 The Rancher lightweight alternative to Red Hat's OpenShift gives admins a helping hand when entering the world of Kubernetes, but with major differences in architecture.
 -
Rancher Kubernetes management platform
 Rancher has set up shop as an agile alternative to Red Hat OpenShift as an efficient way to manage Kubernetes clusters. In terms of the architecture, a Rancher setup differs significantly from classic Kubernetes.
 -
Zero-Ops Kubernetes with MicroK8s
 A zero-ops installation of Kubernetes with MicroK8s operates on almost no compute capacity and roughly 700MB of RAM.
 -
Containers made simple
 The Portainer graphical management interface makes it easy to deploy containers, relieving you of huge amounts of routine work you would normally have to handle with Docker, Podman, or Kubernetes. However, the licensing structure leaves something to be desired.
Subscribe to our ADMIN Newsletters
Subscribe to our Linux Newsletters
Find Linux and Open Source Jobs
Most Popular
Support Our Work
ADMIN content is made possible with support from readers like you. Please consider contributing when you've found an article to be beneficial.
