
Photo by Alex Kondratiev on Unsplash
Test your containers with the Docker Desktop one-node cluster
Test Lab
Docker makes it easy for developers to deploy applications and ensure that the local development environment is reasonably close to the staging and production environments. Remember the times you found a great app only to discover the installation instructions extended over several pages and involved configuring the database, populating tables, installing many packages and corresponding libraries – and then because of a tiny glitch in the docs, things didn't work as expected?
Thanks to Docker, these days are mostly over. You can develop your app and test it locally and then deploy it to the testing and production environments with few or no changes. But Docker itself is not enough. Modern apps rarely consist of just one container. If you have more than one container, you need a way to organize them that is transparent to your users. In other words, you need a container orchestration platform. The unquestioned leader in orchestration is Kubernetes (K8s for short). It is easy to get started with Kubernetes if you have Docker Desktop installed. Simply go to Settings | Kubernetes and select Enable Kubernetes (Figure 1). Enabling Kubernetes from Docker Desktop gets you a one-node cluster suitable for local testing and experiments.
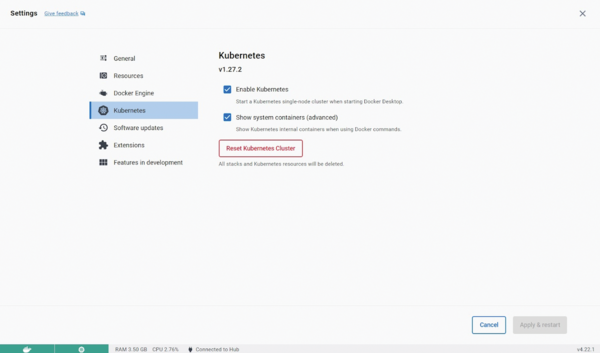 Figure 1: Enabling Kubernetes in Docker Desktop.
Single-node clusters are quite useful for testing, and the single-node Kubernetes cluster bundled with Docker Desktop is pre-configured and ready to use. Along with this single-node cluster (called "Kubernetes server" in Docker docs), Docker Desktop also includes the kubectl command-line tool (called "Kubernetes client"). Because kubectl is already set up to work with the cluster, you can start issuing commands straight away without additional configuration.
About Kubernetes
Many people say they would like to start learning Kubernetes, but they somehow get stuck at the first phase, that is, the installation. The problem is, administering a Kubernetes cluster and developing software that runs on it are two different tasks that are often handled by different teams. Installing, upgrading, and managing the cluster is usually done by the Ops or DevOps team, whereas the development is usually done by developers. Using a single-node cluster, developers can take the first steps with verifying that the containerized application works in Kubernetes before passing it on to Ops for further implementation.
Kubernetes is a complex beast, and it might be confusing to present its architecture in detail, so I'll focus on the essentials. For starters, it's enough to remember two concepts: nodes and pods. Nodes normally correspond to virtual (or, less often, bare metal) machines on which pods are running. Pods, on the other hand, correspond to sets of containers, and they are running in nodes. One node can contain several pods. One pod cannot run on more than one node – instead, you create replicas of the pod using so-called deployments .
A typical Kubernetes cluster has several nodes with one or more pods running on each node. When one node fails, the pods that had been running on it are considered lost and are scheduled by the cluster to run on other, healthy nodes. All this happens automatically when you use a deployment. Kubernetes is therefore a self-healing platform for running containerized apps. Even on the basis of this simplified description, you can understand why Kubernetes took the world by storm.
A Multi-Container Example
A simple example will show how easy it is to test your Docker containers using Docker Desktop's single-node Kubernetes cluster. I will create a docker-compose.yml file that sets up a web application stack consisting of an Nginx reverse proxy, a Python Flask web application, and a Redis database. In the root directory of your project (let's call it my-app), create two folders: nginx and webapp. The nginx directory will contain a Nginx configuration file nginx.conf (Listing 1) with a Dockerfile (Listing 2); the webapp directory will contain a Flask app app.py (Listing 3) and the corresponding Dockerfile (Listing 4). In this way, I will build two images: one containing the Flask app and another with Nginx. The user will connect to a Nginx instance, which will communicate with the Flask app. The app, in turn, will use the Redis in-memory storage tool as a simple store for counting users' visits.
Listing 1
my-app/nginx/nginx.conf
01 events {
02   worker_connections  1024;
03 }
04 http {
05   server {
06     listen 80;
07     location / {
08       proxy_pass http://webapp:5000;
09     }
10   }
11 }
Listing 2
my-app/nginx/Dockerfile
01 FROM nginx:alpine
02 COPY nginx.conf /etc/nginx/nginx.conf
Listing 3
my-app/webapp/app.py
01 from flask import Flask
02 import redis
03 import os
04
05 app = Flask(__name__)
06 redis_host = os.getenv("REDIS_HOST", "localhost")
07 r = redis.Redis(host=redis_host, port=6379, decode_responses=True)
08
09 @app.route('/')
10 def hello():
11   count = r.incr('counter')
12   return f'Hello, you have visited {count} times.'
13
14 if __name__ == '__main__':
15   app.run(host="0.0.0.0", port=5000)
Listing 4
my-app/webapp/Dockerfile
01 FROM python:3.11
02 WORKDIR /app
03 COPY . .
04 RUN pip install Flask redis
05 CMD ["python", "app.py"]
The key part that glues everything together is the docker-compose.yml file (Listing 5). It defines three services and one volume. You might ask why three services since we only prepared two Dockerfiles? The two Dockerfiles are custom images, whereas the Redis image is a standard image (redis:alpine) without any modifications, so you don't even need to create a Dockerfile for it – you can instead use the ready-made image directly with the image directive. Docker Compose makes it easy to start and build the whole infrastructure:
docker compose up --build
Listing 5
my-app/docker-compose.yml
01 services:
02   nginx:
03     build: ./nginx
04     ports:
05       - "8080:80"
06     depends_on:
07       - webapp
08   webapp:
09     build: ./webapp
10     environment:
11       - REDIS_HOST=redis
12     depends_on:
13       - redis
14   redis:
15     image: "redis:alpine"
16     volumes:
17       - redis-data:/data
18
19 volumes:
20   redis-data:
This command will first build the three Docker images (Figure 2) and then run the resulting containers (Figure 3) in the correct order: As you will notice in docker-compose.yml, the redis service, even though defined last, needs to run first because webapp depends on it, whereas nginx has to start last because it depends on webapp already running. The Flask app should be available on localhost:8080 and working as intended (Figure 4). (By the way, you might notice that I am using docker compose, a new command integrated with Docker Desktop, called Compose V2, instead of the legacy Compose V1 command docker-compose. Unless you have a good reason to use V1, you should always use V2 as V1 is not receiving updates.)
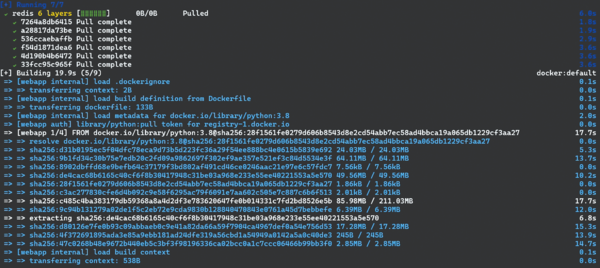 Figure 2: Building images with Docker Compose.
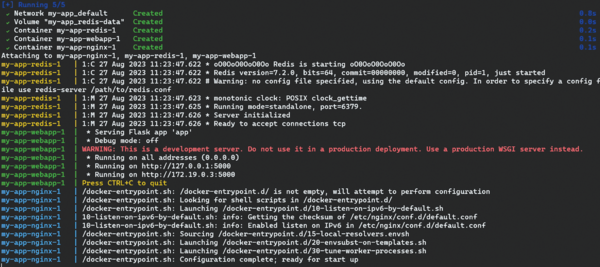 Figure 3: Running containers with Docker Compose.
 Figure 4: The Flask app correctly counting user visits.
As a side note, if you are planning on using the Docker Engine runtime with Kubernetes, see the sidebar entitled "Do I Need cri-dockerd?"
Do I Need cri-dockerd?
Kubernetes was built around the Docker Engine container runtime, and the early versions of Kubernetes were fully compatible with Docker Engine. Docker Engine is a full-featured runtime with many features for supporting end users and developers – and even a system for integrating third-party extensions. In many cases, developers don't need all the functionality provided by Docker Engine and just want a much simpler runtime. Kubernetes implemented the Container Runtime interface (CRI) in 2016 as a universal interface to support other container runtimes. Docker contributed the code for a simpler, more elementary container runtime called containerd, which is compatible with CRI. Containerd is now maintained by the Cloud Native Computing Foundation.
Containerd works for many common scenarios today, but some users still prefer the more robust Docker Engine, with its user interface features and support for extensions. Because Docker Engine was developed before CRI, it does not fit directly with the CRI interface. Kubernetes implemented a temporary adapter called dockershim to support Docker Engine on CRI-based Kubernetes installations. Dockershim was deprecated in Kubernetes 1.20 and removed in version 1.24.
A new adapter called cri-dockerd now provides "fully conformant compatibility between Docker Engine and the Kubernetes system." If you are running Kubernetes 1.24 or newer with containerd, you won't have to worry about compatibility. However, if you want to continue to use the Docker Engine runtime, you might have to replace dockershim with the cri-dockerd adapter. Cri-dockerd is included with Docker Desktop, so you won't need to worry about cri-dockerd to access Docker Desktop's single-node Kubernetes cluster.
Migrating to Kubernetes
This brings me to the main topic: How do I migrate the preceding example to Kubernetes? Because the app is already containerized, the migration should be very easy. In real life, DevOps engineers need to deal with legacy apps written for a monolithic architecture. Although this architecture is not inherently bad, if you want to leverage the power of containers, it becomes an obstacle. Some organizations go to the other extreme and rewrite everything using microservices, which might not be the optimal choice in all cases. What you need are logical components that you can develop and deploy fairly independently and that will still work together well.
The Docker Compose file defined three services, so I need one Kubernetes Service file for each (Listings 6-8). In addition, I also need to create a deployment file for each (Listings 9-11) and a ConfigMap resource for Nginx (Listing 12). Deployments define, among other things, what containers and volumes should run and how many of replicas should be created. A ConfigMap is another type of resource used for configuration.
Listing 6
my-k8s-app/nginx-service.yaml
01 apiVersion: v1
02 kind: Service
03 metadata:
04   name: nginx
05 spec:
06   ports:
07   - port: 8080
08     targetPort: 80
09   selector:
10     app: nginx
Listing 7
my-k8s-app/webapp-service.yaml
01 apiVersion: v1
02 kind: Service
03 metadata:
04   name: webapp
05 spec:
06   ports:
07   - port: 5000
08   selector:
09     app: webapp
@KE
Listing 8
my-k8s-app/redis-service.yaml
01 apiVersion: v1
02 kind: Service
03 metadata:
04   name: redis
05 spec:
06   ports:
07   - port: 6379
08   selector:
09     app: redis
Listing 9
my-k8s-app/ nginx-deployment.yaml
01 apiVersion: apps/v1
02 kind: Deployment
03 metadata:
04   name: nginx
05 spec:
06   replicas: 1
07   selector:
08     matchLabels:
09       app: nginx
10   template:
11     metadata:
12       labels:
13         app: nginx
14     spec:
15       containers:
16       - name: nginx
17         image: nginx:alpine
18         ports:
19         - containerPort: 80
20         volumeMounts:
21         - name: nginx-config
22           mountPath: /etc/nginx/nginx.conf
23           subPath: nginx.conf
24       volumes:
25       - name: nginx-config
26         configMap:
27           name: nginx-config
Listing 10
my-k8s-app/webapp-deployment.yaml
01 apiVersion: apps/v1
02 kind: Deployment
03 metadata:
04   name: webapp
05 spec:
06   replicas: 1
07   selector:
08     matchLabels:
09       app: webapp
10   template:
11     metadata:
12       labels:
13         app: webapp
14     spec:
15       containers:
16       - name: webapp
17         image: YOUR-DOCKER-IMAGE  # This needs to be built and pushed, see instructions below
18         env:
19         - name: REDIS_HOST
20           value: "redis"
21         ports:
22         - containerPort: 5000
Listing 11
my-k8s-app/redis-deployment.yaml
01 apiVersion: apps/v1
02 kind: Deployment
03 metadata:
04   name: redis
05 spec:
06   replicas: 1
07   selector:
08     matchLabels:
09       app: redis
10   template:
11     metadata:
12       labels:
13         app: redis
14     spec:
15       containers:
16       - name: redis
17         image: redis:alpine
18         ports:
19         - containerPort: 6379
Listing 12
my-k8s-app/nginx-configmap.yaml
01 apiVersion: v1
02 kind: ConfigMap
03 metadata:
04   name: nginx-config
05 data:
06   nginx.conf: |
07     events {
08       worker_connections  1024;
09     }
10
11     http {
12       server {
13         listen 80;
14
15         location / {
16           proxy_pass http://webapp:5000;
17         }
18       }
19     }
Kubernetes will not build images. You need to have them already built and pass them to deployments as arguments of the image directive. In the case of Redis, I am not modifying the official image and can use it directly.
With Nginx, things get a bit more complex because I need to adapt the default configuration. Fortunately, I don't have to modify the image this time and can use another Kubernetes resource: ConfigMap. ConfigMap will allow me to manage the configuration independently of the actual Nginx container. This approach has many advantages. For example, I can reconfigure Nginx dynamically, and Kubernetes will propagate changes to all the pods. Also, I can use the same Nginx container in different environments and only the ConfigMap will change. Versioning also works better with a ConfigMap than with a container.
In the nginx-deployment.yaml file (Listing 9), the ConfigMap is mounted into the Nginx container at the /etc/nginx/nginx.conf path. This replaces the default Nginx configuration file with the file defined in the ConfigMap. Using a ConfigMap would make little sense for the Flask app, so I need to build the image first, upload it to a container registry, and then pass its name as image in the deployment. In order to do so, I need to first create an account on Docker Hub or another container registry. Then go to the my-app/webapp directory used earlier with Docker Compose and build the image, for example, as flaskapp:
docker build -t flaskapp .
Now log in to your registry. For Docker Hub, I will use:
docker login --username=your-username
The next stage is tagging:
docker tag flaskapp:latest YOUR_USERNAME/flaskapp:latest
At this point, you can push the image to the registry:
docker push YOUR_USERNAME/flaskapp:latest
In the two last commands, replace YOUR_USERNAME with your actual user name. Now, replace the image: YOUR-DOCKER-IMAGE in Listing 10 with YOUR_USERNAME/flaskapp:latest so that Kubernetes is able pull your container from the Docker Hub and use it for deployment.
At this point, I am ready to apply all the configurations. I will create the necessary infrastructure and run the containers (Listing 13).
Listing 13
Applying the Configurations
kubectl apply -f nginx-configmap.yaml
kubectl apply -f redis-deployment.yaml
kubectl apply -f redis-service.yaml
kubectl apply -f webapp-deployment.yaml
kubectl apply -f webapp-service.yaml
kubectl apply -f nginx-deployment.yaml
kubectl apply -f nginx-service.yaml
When you run the kubectl get pods command, you should see the pods running (Listing 14).
Listing 14
Viewing the Running Pods
NAME                     READY  STATUS    RESTARTS   AGE
nginx-794866d4f-9p5q4    1/1    Running   0          13s
redis-84fd6b8dcc-7vzp7   1/1    Running   0          36s
webapp-b455df999-bn58c   1/1    Running   0          25s
You can also use the kubectl get command to get information on deployments, services, and ConfigMaps. In order to actually use the app, type the following command:
kubectl port-forward svc/nginx 8080:8080
And, as before, visit localhost:8080 – you should see the same Flask app as deployed earlier with Docker Compose, the only difference being that now it is running on Kubernetes.
Congratulations – you have built and deployed your first application on the local one-node Kubernetes cluster! Now, the magic lies in the fact that you can perform the same sequence of kubectl apply commands in the production environment, for example in EKS on AWS, and the app will run exactly as it should. In practice, there are a few differences, such as making the app available to the external world using a load balancer, storing secrets, storage options, and so on, but these are more related to the interaction of Kubernetes with the external environment – the app itself stays the same.
Buy this article as PDF
(incl. VAT)
Buy ADMIN Magazine
Related content
-
Safeguard and scale containers
 Security, deployment, and updates for thousands of nodes prove challenging in practice, but with CoreOS and Kubernetes, you can orchestrate container-based web applications in large landscapes.
 -
Correctly integrating containers
 If you run microservices in containers, they are forced to communicate with each other – and with the outside world. We explain how to network pods and nodes in Kubernetes.
 -
Run Kubernetes in a container with Kind
 Create a full-blown Kubernetes cluster in a Docker container with just one command.
 -
Collecting application logfiles with Kubernetes
 Modern scale-out environments with containers make log collection difficult. We present concepts and methods for collecting application logfiles with a sidecar container in Kubernetes environments.
 -
Exploring Kubernetes with Minikube
 Minikube lets you set up Kubernetes in a local environment, so you can get some practice before rolling it out in a network or cloud setting.
Subscribe to our ADMIN Newsletters
Subscribe to our Linux Newsletters
Find Linux and Open Source Jobs
Most Popular
Focus On Self-Hosting
• Self-Hosted Collaboration with Forgejo
• Self-Hosted PaaS with Coolify
• Build and Host Docker Images
• Self-Hosted Pritunl VPN Server with MFA
• Self-Hosted Chat Servers
Support Our Work
ADMIN content is made possible with support from readers like you. Please consider contributing when you've found an article to be beneficial.
