Ticket Control
User authentication is all about finding out whether users really are who they claim to be. Given that unsuspecting users can fall into the trap of confusing a smartphone with an Internet hotspot, giving the hacker an easy vector for stealing their passwords, relying on usernames and passwords to access confidential information alone, is basically irresponsible. The remedy could lie in the use of additional authentication factors.
Authentication Methods
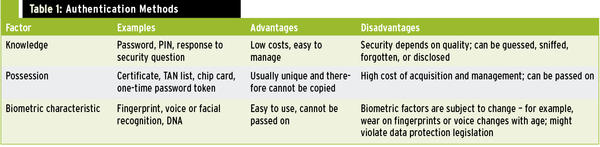
Various authentication methods can be categorized into the groups “knowledge,” “possession,” and “biometrics” (Table 1). These groups, also called factors, constitute the basis of any authentication method.
Despite serious drawbacks, passwords remain the most widely used authentication method. After all, practically any software product offers this method free of charge as a standard procedure. However, admins should bear in mind a rule of thumb for information protection and access rights: The greater the value of the protected information is, the more secure the authentication method needs to be. Many of the problems with passwords can be avoided if a dynamic instead of a static password is used and if the dynamic password can be used only once. Perhaps you cannot prevent passwords from being sniffed, but the authentication information stolen in this way will be worthless for the attacker.
Multifactor Authentication
The security of authentication processes can be increased significantly by a combination of several factors (multifactor authentication). For example, the debit card has always combined the factors of “knowledge” and “possession” because the user needs both possession of the card with a magnetic strip/chip and the associated PIN.
Even more secure is a process in which three factors are used – knowledge, possession, biometrics. For example, “QTrust 2go Smart” combines all three factors, with the user first typing a username in the login screen (knowledge) and then scanning a QR code from the screen with a smartphone, from which the smartphone app then generates a one-time password (possession). For final authentication, the user then needs to perform face recognition with the smartphone camera (biometric feature) and type the one-time password into the login box.
Good Enough
For most security requirements, however, two-factor authentication is more than adequate. The Payment Card Industry Data Security Standard (PCI DSS) – a binding regulatory framework for the processing of credit card payment transactions – calls for a two-factor authentication solution for network access by administrators, staff, and external third parties.
Many two-factor authentication solutions are available on the market (see the “Commercial Two-Factor Authentication Solutions” box). Anyone planning to use such a solution should, therefore, decide in advance whether they want to work with certificates, one-time passwords, or both. Certificate-based two-factor authentication typically uses digital PKI certificates based on the X.509 standard. These are typically stored on a hardware certificate storage medium known as the security token. To authenticate, the user must connect the security token for the device to the service and then activate the saved certificate by entering a PIN or password. Only then can the VPN client, for example, open a connection to the target system.
Special USB sticks or smart cards are typically used for storing electronic certificates and passwords. The practical advantage of USB tokens over smart cards is that the USB port on the local machine can be used, whereas smart cards require an additional card reader.
One-time password generators (OTP tokens) provide an alternative to certificates. OTPs are available in various form factors: hardware, software, grid cards, and “as a service,” which is typically in the form of SMS (see the “Free OTP Systems” box). OTP tokens provide the user with a short-lived one-time password for the login.
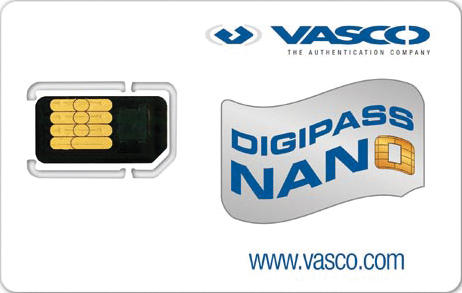 Figure 1: DIGIPASS Nano is a thin film that can be placed, together with the SIM card, into a cellphone, thus turning the phone into a hardware OTP token.
Depending on the manufacturer and the method used, a distinction is made between time-based or time-synchronized tokens, TOTP (time-based one-time password algorithm, as defined in RFC 6238), and event-based tokens, HOTP (HMAC one-time password algorithm, per RFC 4226). Hardware-based, time-based tokens are usually more expensive because they require an accurate clock as a counter, which must be installed in addition to hardware.
Client/Server Model
All OTP systems rely on the client/server model. The front end is the client in the form of the OTP tokens; the back end is a server system that verifies the one-time passwords and authentication information of the users and then passes it to the appropriate application via an interface.
The universal interface is often the RADIUS protocol (Remote Authentication Dial-In User Service), which most applications can handle. Of course, the back end can be a cloud application instead of a dedicated service running on a server. The best known example of this kind of two-factor authentication is probably Google Authenticator.
Two-factor authentication solutions are in principle not limited to specific application scenarios. In practical applications, however, their use has proved valuable in two areas in particular: the authentication of remote access connections and web applications. Especially in web applications, the use of two-factor authentication is almost unavoidable because, unlike VPN and SSH connections, client-side certificates are almost never used to ensure authentication of the client by the server.
In the simplest case, a sniffed password is all it takes to take over the account – for example, by means of a man-in-the-middle attack, a replay attack, or classic network sniffing. Also, the number of web applications is growing so fast that an average user already uses 10 to 15 web applications every day. Just think about the many social networks, webmail, banking applications, e-commerce, and information portals visited every day.
Securing Google Services
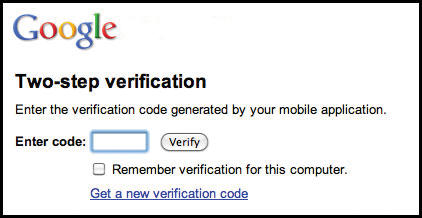 Figure 2: Google has offered two-factor authentication for Google services for some time.
Google primarily developed Authenticator to add strong authentication for access to its applications. This authentication method, also known as “two-step verification,” can alternatively rely on SMS or a voice call (Figure 2). The Authenticator app, however, can also authenticate non-Google services, as I shall describe later.
To enable strong authentication in your Google account, go to https://accounts.google.com/SmsAuthConfig and enter the phone number of your smartphone. Google sends a link to this number that lets you download the Google Authenticator app. Next, in the account settings of your Google account, select the device, such as iPhone , on which you installed the app. In the app, tap the plus sign and choose the Scan Barcode command.
Now scan the bar code displayed in your Google account and type in the code displayed in the app to complete the setup in two steps (Figure 3).
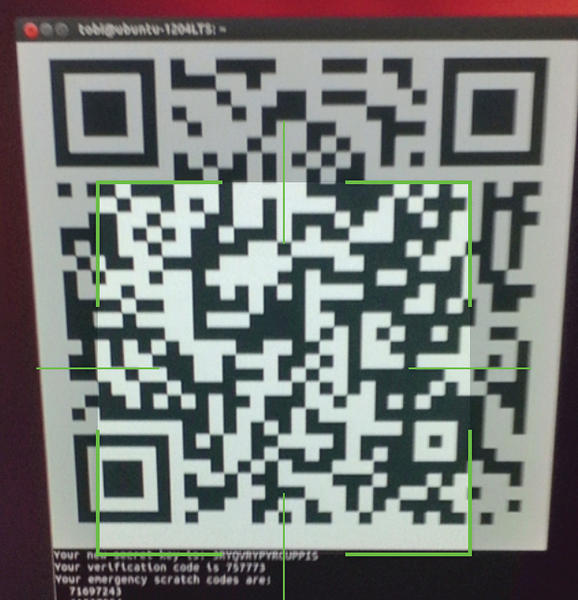 Figure 3: After scanning a QR code from the screen, the Google Authenticator app is then associated with the user account.
To be on the safe side, you should print the substitute codes, which you can use to log in to your Google account if you lose your cellphone.
Dropbox with Google Authenticator
Fewer people will be aware that Dropbox recently introduced support for strong authentication using Google Authenticator. Enabling this feature is similar to setting up the Google account. To begin, log in to your Dropbox account in your browser and select the Security tab. In the Account sign in box , click change in the Two-step verification line. A wizard will take you through the process of enabling two-step verification, via either an app or text messages. If you’re verifying with an app, select Authenticate with Google Authenticator app ; then, in the app again, tap the plus sign and scan the QR code on the screen.
After entering the one-time password, two-factor authentication is enabled (Figure 4), and Dropbox shows you some substitute codes for printing.
 Figure 4: Security for Dropbox accounts can be increased significantly using Google Authenticator.
Securing SSH Servers with OTP
SSH server logins can be well secured with built-in tools. The prerequisite is that the admin sets the PasswordAuthentication directive to No in sshd_config and then rolls out password-protected RSA/DSA keys to all users. Alternatively, authentication on an OpenSSH server can also be protected using the S/KEY one-time password method.
S/KEY has since been replaced by OPIE, thereby adding the option of generating password lists with one-time passwords in advance, which are then used like TAN lists in e-banking. Alternatively, one-time passwords can be generated on demand using an OTP generator – for example, with Opiekey on an Android smartphone.
Today, a much simpler and more elegant approach is to secure sessions with Google Authenticator. The Google Authenticator Project is released under the Apache License 2.0 and is freely available. A PAM module is available for the server; the Google Authenticator client runs on Android, iOS, and BlackBerry devices and can be installed easily from the corresponding app stores.
On the server side, installing the Google Authenticator PAM module on an Ubuntu server is a breeze because a ready-to-install package is available directly from the repositories:
sudo apt-get install libpam-google-authenticator
You can also download the source code and build it for your platform. Once the PAM module is installed, you can log on at the console as the user who will be signing on later with Google Authenticator and then enter google-authenticator .
The program will display a QR code, a secret key, a verification code, and five emergency scratch codes in the terminal. Again, you should print out the emergency scratch codes and keep them in a safe place. With these one-time passwords, you can also log on to the SSH server with Google Authenticator if you do not have your smartphone at hand.
Combating Brute Force
In the Google Authenticator app on your phone, tap the plus sign at the bottom and select the Scan Barcode command. Alternatively, you can add the account manually. To do so, enter the account name in the form user@host along with the corresponding private key.
The questions that follow additionally serve to harden the account. You should ban multiple use of authentication tokens and allow up to three login attempts per 30 seconds, to prevent brute force attacks. Finally, you still need to activate Google Authenticator in the PAM configuration and modify the SSH configuration. To do this, open /etc/pam.d/sshd in an editor, add
auth required pam_google_authenticator.so
to the end of the line, and save the file. In etc/ssh/sshd_config , change the value for ChallengeResponseAuthentication to yes and restart the SSH daemon.
When you log in to your server via SSH in the future, the SSH server will prompt you as usual for your username and password but also for the verification code from Google Authenticator, as displayed on your smartphone.
PayPal and Facebook
eBay subsidiary PayPal has for some time offered the possibility of hardening the registration process with two-factor authentication. Customers who use this facility have, in the past, received a hardware token (Vasco GO 3) from PayPal. If you want to harden the login process for your PayPal account, now your only option is to sign up for text message-based security on the site. For each login process, PayPal sends you a one-time password by text message to the registered cell number.
If a user cannot access his or her mobile phone, PayPal offers the ability to define security questions and answers as a fallback facility. Facebook can now also secure the login process with a one-time password. However, users must have the Facebook app installed on their smartphone and associate the app with their account in the security settings during the activation process.
Mydigipass.com – The Cloud Factor
Administrators always appreciate the ability to harden, for example, administrator login to web applications, blogs, or content management systems by means of a two-factor authentication solution. Mydigipass.com cloud authentication by Vasco is ideal for this (Figure 5).
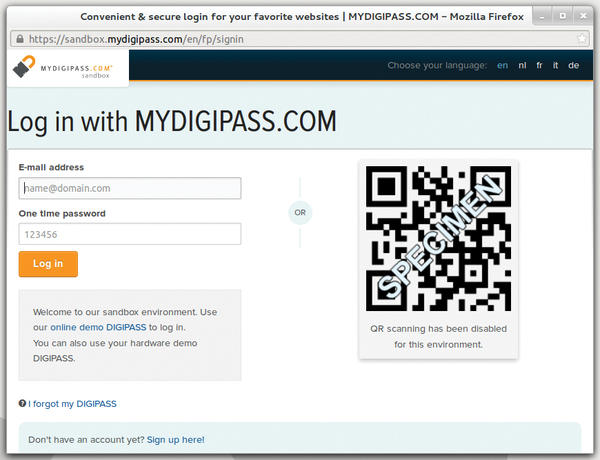 Figure 5: The Mydigipass.com cloud application enriches web applications with two-factor authentication.
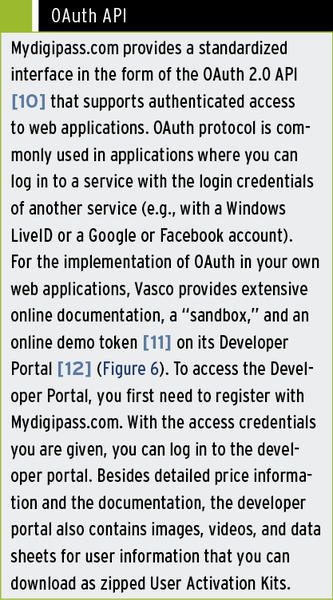
One advantage of this solution is that the administrator does not need to install and operate any back-end software because it is provided by Vasco in the cloud (see also the “OAuth API” box).
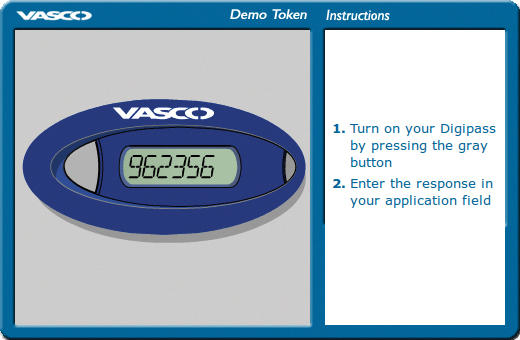 Figure 6: The online demo token by Vasco lets users test secure login on Mydigipass.com.
The front end is a software OTP token for iOS, Android, or BlackBerry smartphones; alternatively, client software with Java support is available for mobile phones. Furthermore, you can integrate hardware tokens, which Vasco distributes to people at IT fairs.
As the first step, users must register and install the free software token via the respective app stores. The Java client software is transferred to your mobile via a URL download link. For smaller community sites with one URL, up to 100 users, and 1,000 authentication transactions per year, Mydigipass.com’s “Starter Edition” is completely free of charge. Larger packages start from US$ 3,000 (EUR 2,000) per year, but include 500 users and 10,000 authentication operations (Premium), or 10,000 users and 250,000 authentication operations (Executive) per year.
Hardening Drupal with Mydigipass
The Mydigipass module can also be used to harden the popular Drupal CMS by adding the Mydigipass login API (Figure 7).
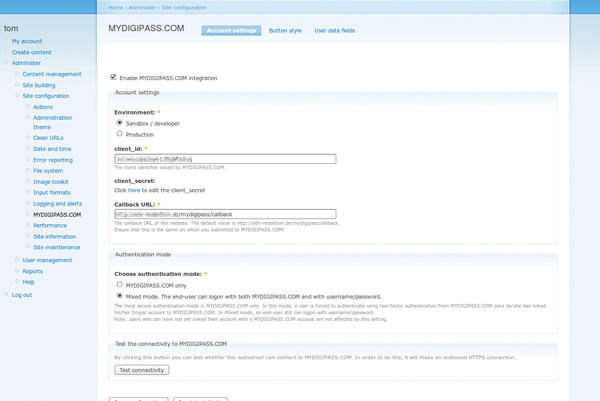 Figure 7: Configuring the Mydigipass plugin is simple using the Drupal module configurator. A special mode allows you to test the setup without immediately being locked out of the CMS.
The following guide explains the installation and configuration based on Drupal 6.27. The main requirement is that the web server can reach the Mydigipass.com web service with an outbound HTTPS connection. If the web server resides behind a firewall, you need to open port 443/TCP on the web server for the mydigipass.com domain.
In our lab, the plugin only worked correctly with “Clean URLs” enabled in Drupal. Clean URLs creates legible URLs without special characters. The Drupal admin can enable them by clicking Administer | Clean URLs | Enabled . Because the web server must also support this feature, the administrator must enable the rewrite module on the Apache web server.
To begin, download the tarball with the plugin and unpack it in the sites/all/modules/mydigipass directory of your Drupal installation (e.g., /var/www/drupal/sites/all/modules/mydigipass ). Next, register for a developer account below https://developer.mydigipass.com , then log in and go to the Sandbox section. From there, click Connect a test site and type an identifier and a display name for your site; they can be identical.
As the Redirect uri , enter http://<Your-Domain>/mydigipass/callback . After creating your site, your client_id and client_secret are displayed on the portal site. Enter these values in the appropriate fields of the Mydigipass module in Drupal (Administer | MYDIGIPASS.COM ). Press the radio button for Sandbox | developer in Environment and enable Mydigipass.com integration.
Mixed-Mode Testing
For your first tests, you will want to enable Mixed mode to be on the safe side. Then, you can continue to log in to your Drupal installation with your username and password if something goes awry with your Mydigipass.com integration attempt. In the course of the module configuration, you can customize the various button styles for the login button and create data fields for your user accounts, if desired.
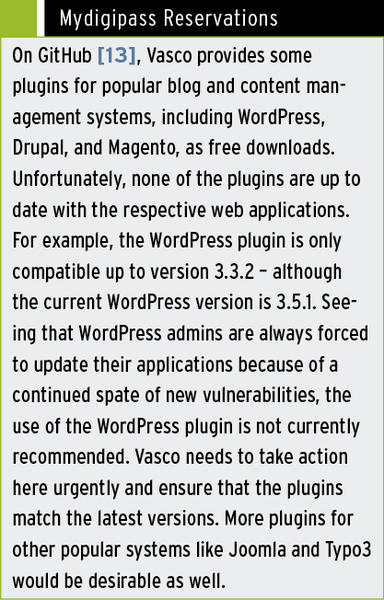
Finally, you must connect your Drupal user account with the user registered at Mydigipass. To do so, select My Account | Edit in Drupal and press the Connect with MYDIGIPASS.COM button. If everything works out, Drupal reports The user has been successfully linked to MYDIGIPASS.COM , and you can log in to Drupal via Mydigipass. Before you can log in to Drupal via Mydigipass for the first time, however, you must first log out of the developer portal and Drupal and close the browser to clear the session cookies. See also the “Mydigipass Reservations” box.
Conclusions
The use of strong authentication solutions is highly advisable, given the large number of successful hacker attacks on access credentials. Prominent victims of the recent past are Sony’s PlayStation Network, Yahoo, and LinkedIn. The cost of implementing and operating a two-factor authentication solution is relatively low, considering the high damage potential of a successful hack against user data. Remote access connections and smaller web applications can be hardened for free with Google Authenticator and Mydigipass.com.
Info
[1] RSA Security
[2] SafeNet
[3] SMS Passcode (in German)
[8] LSE LinOTP
[9] Mobile-OTP
[10] Mydigipass API
[11] Demo token
[12] Vasco
[13] Mydigipass plugins
The Author
Thomas Zeller is an IT consultant and has been involved with IT security and open source for 15 years. He is the author and co-author of the books OpenVPN kompakt and Mindmapping mit FreeMind (both in German). In real life, he is the managing director of a medium-sized IT system integrator, where he is also responsible for the IT security division.
Related content
-
Secure remote access and web applications with two-factor authentication
 Making your systems really secure can be a bit more complicated than resorting to the use of regular passwords. In this article, we provide an overview of authentication solutions and present potential approaches for common use cases.
 -
Multifactor authentication with Google Authenticator
 Google Authenticator provides one-time passwords to smartphone owners for multifactor authentication, or you can integrate it into other applications, such as blogs.
 -
Two-factor authentication for WordPress blogs
 YubiKey promises hardware-based two-factor authentication if the application or library supports it. A WordPress plugin thus safeguards your blog.
 -
Hardware MFA: Death to the password!
 Around since the 1960s, passwords are still the mainstay for authentication. The good news is you have alternatives in hardware multifactor authentication.
 -
Hardening SSH authentication to the max
 Public key authentication further supplemented with one-time password or hardware authentication methods improves SSH security while offering genuine convenience.
Subscribe to our ADMIN Newsletters
Subscribe to our Linux Newsletters
Find Linux and Open Source Jobs
Most Popular
Focus On Self-Hosting
• Self-Hosted Collaboration with Forgejo
• Self-Hosted PaaS with Coolify
• Build and Host Docker Images
• Self-Hosted Pritunl VPN Server with MFA
• Self-Hosted Chat Servers
Support Our Work
ADMIN content is made possible with support from readers like you. Please consider contributing when you've found an article to be beneficial.
