Lead Image © Joe Belanger, 123RF.com

Lead Image © Joe Belanger, 123RF.com

Best practices for KVM on NUMA servers

Tuneup

Article from ADMIN 20/2014
By
Optimizing non-uniform memory access (NUMA) can help you increase the performance of KVM virtual machines. We describe some pitfalls to watch out for.

Non-uniform memory access (NUMA) [1] systems have existed for a long time. Makers of supercomputers could not increase the number of CPUs without creating a bottleneck on the bus connecting the processors to the memory (Figure 1). To solve this issue, they changed the traditional monolithic memory approach of symmetric multiprocessing (SMP) servers and spread the memory among the processors to create the NUMA architecture (Figure 2).

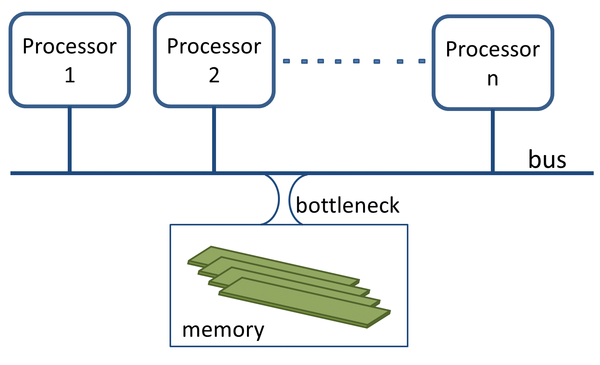
Figure 1: Traditional SMP architecture.
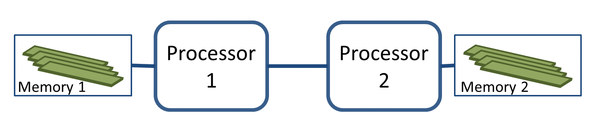
Figure 2: NUMA architecture.

The NUMA approach has both good and bad effects. A significant improvement is that it allows more processors with a corresponding increase of performance; when the number of CPUs doubles, performance is nearly two times faster. However, the NUMA design introduces different memory access latencies depending on the distance between the CPU and the memory location. In Figure 2, processes running on Processor 1 have a faster access to memory pages connected to Processor 1 than pages located near Processor 2.

With the increasing number of cores per processor running at very high frequency, the traditional Front Side Bus (FSB) of previous generations of x86 systems bumped into this saturation problem. AMD solved it with HyperTransport (HT) technology and Intel with the QuickPath Interconnect (QPI). As a result, all modern x86 servers with more than two populated sockets have NUMA architectures (see the "Enterprise Servers" box).

Enterprise Servers

The Xeon Ivy Bridge processor from Intel© can have up to 15 cores in its E7/EX variation. It has three QPI paths that lead to two NUMA nodes in a four-socket configuration. In other words, a fully populated four-socket server similar to the HP ProLiant DL580 Gen8 presents 60 physical cores to the operating system or 120 logical cores when hyperthreading is enabled but has only two NUMA hops.

Bigger systems with 16 interconnected Ivy Bridge-EX processors (480 logical cores) and more than 10TB of memory are expected to hit the market before the end of 2014. NUMA optimization will be critical on such servers, because they will have more than two NUMA hops.

Linux and NUMA

The Linux kernel introduced formal NUMA support in version 2.6. Projects like Bigtux in 2005 heavily contributed to enabling Linux to scale up to several tens of CPUs. On your favorite distribution, just type man 7 numa, and you will get a good introduction with numerous links to documentation of interest to both developers and system managers.

You can also issue numactl --hardware (or numactl -H) to view the NUMA topology of a server. Listing 1 shows a reduced output of this command captured on an HP ProLiant DL980 server with 80 cores and 128GB of memory.

Listing 1

Viewing Server Topology

01 # numactl --hardware
available: 8 nodes (0-7)
node 0 cpus: 0 1 2 3 4 5 6 7 8 9
node 0 size: 16373 MB
node 0 free: 15837 MB
node 1 cpus: 10 11 12 13 14 15 16 17 18 19
node 1 size: 16384 MB
node 1 free: 15965 MB
...
node 7 cpus: 70 71 72 73 74 75 76 77 78 79
node 7 size: 16384 MB
node 7 free: 14665 MB
node distances:
node   0   1   2   3   4   5   6   7
  0:  10  12  17  17  19  19  19  19
  1:  12  10  17  17  19  19  19  19
  2:  17  17  10  12  19  19  19  19
  3:  17  17  12  10  19  19  19  19
  4:  19  19  19  19  10  12  17  17
  5:  19  19  19  19  12  10  17  17
  6:  19  19  19  19  17  17  10  12
  7:  19  19  19  19  17  17  12  10

The numactl -H command returns a description of the server per NUMA node. A NUMA node comprises a set of physical CPUs (cores) and associated local memory. In Listing 1, node  0 is made of CPUs 0 to 7 and has a total of 16GB of memory. When the command was issued, 15GB of memory was free in this NUMA node.

The table at the end represents the System Locality Information Table (SLIT). Hardware manufacturers populate the SLIT in the lower firmware layers and provide it to the kernel via the Advanced Configuration and Power Interface (ACPI). It gives the normalized "distances" or "costs" between the different NUMA nodes. If a process running in NUMA node  0 needs 1 nanosecond (ns) to access local pages, it will take 1.2ns to access pages located in remote node  1, 1.7ns for pages in nodes  2 and 3, and 1.9ns to access pages in nodes  4-7.

On some servers, ACPI does not provide SLIT table values, and the Linux kernel populates the table with arbitrary numbers like 10, 20, 30, 40. In that case, don't try to verify the accuracy of the numbers; they are not representative of anything.

KVM, Libvirt, and NUMA

The KVM hypervisor sees virtual machines as regular processes, and to minimize the effect of NUMA on the underlying hardware, the libvirt API [2] and companion tool virsh(1) provide many possibilities to monitor and adjust the placement of the guests in the server. The most frequently used virsh commands related to NUMA are vcpuinfo and numatune.

If vm1 is a virtual machine, virsh vcpuinfo vm1 performed in the KVM hypervisor returns the mapping between virtual CPUs (vCPUs) and physical CPUs (pCPUs), as well as other information like a binary mask showing which pCPU is eligible for hosting vCPUs:

# virsh vcpuinfo vm1
VCPU:           0
CPU:            0
State:          running
CPU time:       109.9s
CPU Affinity:   yyyyyyyy----------------------------------------------
....

The command virsh numatune vm1 returns the memory mode policy used by the hypervisor to supply memory to the guest and a list of NUMA nodes eligible for providing memory to the guest. A strict mode policy means that the guest can access memory from a listed nodeset and only from there. Later, I explain possible consequences of this mode.

# virsh numatune vm1
numa_mode      : strict
numa_nodeset   : 0

Listing 2 is a script combining vcpuinfo and numatune in an endless loop. You should start it in a dedicated terminal on the host with a guest name as argument (Figure  3) and let it run during your experiments. It gives a synthetic view of the affinity state of your virtual machine.

Listing 2

vcpuinfo.sh

01 # cat vcpuinfo.sh
02 #!/bin/bash
03 DOMAIN=$1
04 while  [ 1 ] ; do
05     DOM_STATE=`virsh list --all | awk '/'$DOMAIN'/ {print $NF}'`
06     echo "${DOMAIN}: $DOM_STATE"
07     virsh  numatune $DOMAIN
08     virsh vcpuinfo $DOMAIN | awk '/VCPU:/ {printf "VCPU" $NF }
09     /^CPU:/ {printf "%s %d %s %d %s\n", " on pCPU:", $NF, "  ( part of numa node:", $NF/8, ")"}'
10     sleep 2
11 done

Locality Impact Tests

If you want to test the effect of NUMA on a KVM server, you can force a virtual machine to run on specific cores and use local memory pages. To experiment with this configuration, start a memory-intensive program or micro-benchmark (e.g., STREAM, STREAM2 [3], or LMbench [4]) and compare the result when the virtual machine accesses remote memory pages during a second test.

The different operations for performing this test are simple, as long as you are familiar with the edition of XML files (guest description files are located in /etc/libvirt/qemu/). First, you need to stop and edit the guest used for this test (vm1) with virsh(1):

# virsh shutdown vm1
# virsh edit vm1

Bind it to physical cores 0 to 9 with the cpuset attribute and force the memory to come from the node hosting pCPUs 0-9: numa node  0. The XML vm1 description becomes:

<domain type='kvm'>
....
  <vcpu placement='static' cpuset='0-9'>4</vcpu>
  <numatune>
    <memory nodeset='0'/>
  </numatune>
...

Save and exit the editor, then start the guest:

# virsh start vm1

When the guest is started, verify that the pinning is correct with virsh vcpuinfo, virsh numatune, or the little script mentioned earlier (Figure 3). Run a memory-intensive application or a micro-benchmark and record the time for this run.

Figure 3: NUMA dashboard for guest vm1.

When this step is done, shut down the guest and modify the nodeset attribute to take memory from a remote NUMA node:

# virsh shutdown vm1
# virsh edit vm1
...
<memory mode= 'strict' nodeset= '7'/>
......
# virsh start vm1

Note that the virsh utility silently added the attribute mode='strict'. I will explain the consequences of that strict memory mode policy next. For now, restart the guest and run your favorite memory application or micro-benchmark again. You should notice a degradation of performance.

Buy this article as PDF

Express-Checkout as PDF
Price $2.95
(incl. VAT)

Buy ADMIN Magazine

SINGLE ISSUES
 
SUBSCRIPTIONS
 
TABLET & SMARTPHONE APPS
Get it on Google Play

US / Canada

Get it on Google Play

UK / Australia

Related content

comments powered by Disqus
Subscribe to our ADMIN Newsletters
Subscribe to our Linux Newsletters
Find Linux and Open Source Jobs


Support Our Work

ADMIN content is made possible with support from readers like you. Please consider contributing when you've found an article to be beneficial.

Learn More”>
	</a>

<hr>		    
			</div>
		    		</div>

		<div class=