Lead Image © Sergey Jarochkin, 123RF.com

Lead Image © Sergey Jarochkin, 123RF.com

Automation with PXE Boot

Quick Setup

Article from ADMIN 24/2014
By
We show how to save time and stress by automating your system installations with PXE boot.

Sys admins know the key to being productive is coming to grips with the automation setup offered by an operating system. In this article, I cover creating a basic automation setup for Linux hosts. The tools used include PXE boot, web services, and DHCP. At the end of this article, you should have a complete, fully automated PXE boot and Kickstart system to install and configure a fully customized CentOS server.

PXE (or Preboot eXecution Environment) started in the early 1990s as an improvement to a series of protocols used to bootstrap diskless clients. The idea was to provide a complete boot configuration over the network, so a diskless client, or a computer with no operating system installed, could download a complete configuration at boot time (Figure 1).

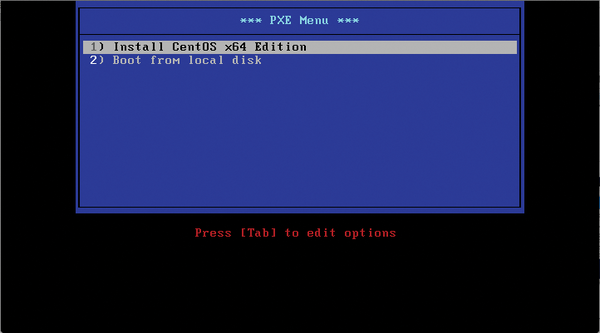
Figure 1: A working example of PXE boot.

Previous protocols, such as BOOTP, had similar goals; however, these tools were very error prone and brittle. The old tools also needed lots of customization, and different clients required different configurations. Intel addressed these issues in the late 1990s with its "Wired for Management" standard. Part of Intel's system was PXE. Other manufacturers later followed suit and adopted the PXE design.

Understanding PXE

Like its predecessors, the PXE protocol uses the Trivial File Transfer Protocol (TFTP) to transfer files and DHCP for delivering network configuration data, such as an IP address. PXE also mixes in additional components to create an easy-to-use infrastructure suitable for installing servers, as well as booting diskless clients.

When PXE initiates at boot time, it sends out a request for a DHCP server. The server then replies with a special option that points the machine to look at the TFTP server. The boot file is then pulled down via TFTP, and the system boots. Once the initial boot occurs, the server kickstarts an install using the configuration file built using the Kickstart Configurator (Figure 2).

Figure 2: Creating a Kickstart file allows fully automated deployments.

Getting Started

For this article, I assume all the work is performed in a discrete test lab that is not connected to any other production servers or clients. Automation done incorrectly or misconfiguration can end in tears! I also assume that because this is a test environment, any firewalls and SELinux are turned off or disabled.

The first step in setting up an automated deployment system is creating the master server that will provide all your required deployment services, such as DHCP, TFTP, and web services. A secondary guest machine is also required to test your PXE boot configuration and installation. Any configuration or setups on the guest machine will be overwritten. As noted previously, the test installation is using CentOS 6.5.

The first step is to install a base server with a static IP as you normally would. Installing the basic Desktop package is also required, because some steps will require it later for producing the Kickstart files. In a production environment, there's no need for the GUI. You do need a reasonable amount of disk space allocated to hold the installation files. Approximately 15GB of space should be sufficient for the lab. Everything in this tutorial is done using the root account.

Once the server is installed and configured, install the required packages for the automation experiment using the yum command:

yum -y install dhcp tftp tftp-server httpd syslinux

All the installation and configuration files for TFTP and CentOS will be stored in a discrete folder structure. In an ideal world, a separate dedicated partition would be used.

On the root folder, create a data directory with www and tftpd subdirectories. Next, assign the required rights to the root /data folder so that the files on the master server can be read by booting clients. You can do this with the following two commands:

mkdir -p /data/{www,tftpd,tftpd/x64}
chmod -R 755 /data

To populate the web server with the installation files, copy the CentOS DVD contents to the web server. You can copy directly from a physical DVD, but mounting a local ISO image is usually easier, especially in virtual environments. Do this with the command below, substituting the centos_dvd.iso for your CentOS ISO install file:

mount -o loop centos_dvd.iso /media

Once mounted, use:

cp -ar /media/. /data/www/

The installation files are being kept in an alternative location to the standard web root folder, so the httpd.conf file for Apache needs to be edited to reflect this alternative location. Use

vi /etc/httpd/conf/http.conf

to edit the file. Within this file, locate the [DocumentRoot] section of the httpd.conf file and edit DocumentRoot to /data/www.

Next, find the <Directory> statement and edit it to look like the following:

<Directory>
        Options Indexes FollowSymLinks
        Order Deny,Allow
        Deny from all
        Allow from 127.0.0.1 192.168.0.0/24
</Directory>

Once updated, save and exit (use :wq to exit and save changes or :q! to cancel without saving changes.)

Good practice dictates that you set the web server to start automatically using the command:

chkconfig --level 35 httpd on && service httpd start

The service should now start and will automatically restart on boot. Any errors will be shown on the screen. If you get an error stating that the folder must be a directory, SELinux may not have been disabled properly.

Now you can configure the TFTPD server. The TFTP service is managed by the xinetd service. All the files managed by xinetd are located in the /etc/xinetd.d folder, such as the one you are interested in: tftpd.

You need to configure only a few options with the TFTP server configuration file. The requirement is to edit just two lines, and you can do this using:

vi /etc/xinetd.d/tftp

Locate and edit the line server_args and change it to reflect your folder layout. For example, after editing, the file should look something like this:

server_args  = -s /data/tftpd

This argument points the TFTP service to use that directory as the root for files to serve up TFTP. Also, modify the argument disable to no as follows,

disable = no

then save the changes and exit.

The last change is to set xinetd to autostart using the command:

chkconfig --level 35 xinetd on &&  xinetd start

To check that TFTPD is working, use the command

lsof -i :69

to check for a response on the correct port. If all is well, you will see something like that shown in Listing 1.

Listing 1

Check TFTPD

[root@infra xinetd.d]# lsof -i :69
COMMAND  PID USER   FD   TYPE DEVICE SIZE/OFF NODE NAME
xinetd  1606 root    5u  IPv4  10816      0t0  UDP *:tftp

Once TFTPD is proven to work, you can copy the PXE boot files across to their new home. All of the TFTP boot files are to be stored in /data/tftpd/x64/. To be clear, these are the boot files that you use to boot the 64-bit installation.

As a tidy sys admin, it is a good idea to put all the files required at boot time into a dedicated folder. In this example, a folder called x64 was created that contains just the bare essentials to boot. Copy the PXE boot files into the folder using the command:

cp /data/www/images/pxeboot/* /data/tftpd/x64/

Finally, you need to copy the files that make up the boot menu and the bootstrap that PXE will use.

The files required by PXE must be copied to the correct folder location.

cd /usr/share/syslinux/
cp chain.c32 memdisk menu.c32 pxelinux.0 /data/tftpd/

The actual menu and installation configuration is housed in the folder called pxelinux.cfg with the standard name default. Later, I will create a very simple text-based menu.

To enable the system to boot in an automated fashion, the systems need to specify a Kickstart file to use after the initial PXE boot. In this example infrastructure, the Kickstart configuration program is installed before use. Install this with the command:

yum -y install system-config-kickstart.noarch

This is why I suggested earlier that you install at least the "Desktop" group of files. Once installed, a new menu item, Kickstart, appears under the System Tools menu.

The Kickstart configuration builder options are straightforward. Work through each menu, configuring the items and settings desired. Once complete, save this, using the Save menu, into the new web server root folder /data/www.

One tip I can offer is to add a line below the disk setup that just reads autopart. Without this line, the automation will not complete automatically.

A key component of the PXE environment is a DHCP server. To make PXE work, you need to set up additional configuration options within the DHCP server configuration (Figure 3). Assuming this is to be the only DHCP server on the network, copy the CentOS DHCP sample file across from /usr/share/doc/dhcp-4.1.1/dhcpd.conf.sample.

Figure 3: You will need to add options to DHCP conf.

Use the command:

cp /usr/share/doc/dhcp-4.1.1/dhcpd.conf.sample /etc/dhcpd/dhcpd.conf

It may request that you overwrite the original. Reply yes . You can make modifications to the system to make it suit your needs.

Open the file using the command:

vi /etc/dhcpd/dhcpd.conf

Before the subnet group of statements, additional DHCP option statements are required. Add these two statements near the top of the file:

option option-128 code 128 = string;
option option-129 code 129 = text;

Modify the option domain-name and domain-name-servers to reflect DNS servers you want to use for any client picking up a DHCP address.

Remove all the subnet range groups, except the one that includes the dynamic-bootp option. Modify the subnet to reflect your test lab, 192.168.0.0 with a netmask set to 255.255.255.0. Modify the range-dynamic-bootp statement to reflect the range of IP addresses you want to be available to your DHCP server. For the sake of argument, I'd use approximately 20 addresses. In a production environment, additional DHCP options need to be set to include DNS servers and a gateway address. Below this, add the lines:

allow booting;
allow bootp;
filename "pxelinux.0"

Once the DHCP has been configured, test your DHCP server by using:

chkconfig --level 35 dhcpd on && service dhcpd start

Last, you need to modify the PXE boot environment so you can automate your Kickstart environment.

In looking at the default file mentioned earlier, it should be obvious how this all fits together. Because you are using a fully automated installation, it is safer to err on the side of caution and have the default timeout revert to boot local disk. Failure to do this could result in tears, because the default install will wipe out any server that PXE-boots the install.

Setting up the file is trivially easy. On the command line, type:

vi /data/tftpd/pxelinux.cfg/default

To set up a minimum configuration file, and add the lines in Listing 2. Some of the file setup is obvious, such as ontimeout and menu title. Looking more closely at the label 1 entry, it is possible to see the layout. The second line refers to the Linux bootstrap copied into the x64 folder. Finally, the append passes additional command-line parameters. The ks argument should point to the Kickstart file you created earlier. Don't forget to substitute the IP address above for your server!

Listing 2

Set Up a Minimum Config File

default menu.c32
prompt 0
timeout 100
ontimeout local
menu title *** PXE Menu ***
label 1
menu label ^1) Install CentOS x64 Edition
kernel x64/vmlinuz
append initrd=x64/initrd.img ks=http://192.168.0.52/ks_desktop.cfg
label 2
menu label ^2) Boot from local disk
localboot

The second menu item – Boot from local disk – is easy enough to understand and can be copied and pasted directly into the default file.

The Author

Stuart is a Linux and virtualization specialist with a particular interest in automation and mass deployment.

Buy this article as PDF

Express-Checkout as PDF
Price $2.95
(incl. VAT)

Buy ADMIN Magazine

SINGLE ISSUES
 
SUBSCRIPTIONS
 
TABLET & SMARTPHONE APPS
Get it on Google Play

US / Canada

Get it on Google Play

UK / Australia

Related content

comments powered by Disqus
Subscribe to our ADMIN Newsletters
Subscribe to our Linux Newsletters
Find Linux and Open Source Jobs


Support Our Work

ADMIN content is made possible with support from readers like you. Please consider contributing when you've found an article to be beneficial.

Learn More”>
	</a>

<hr>		    
			</div>
		    		</div>

		<div class=