Lead Image © designpics, 123RF.com

Lead Image © designpics, 123RF.com

LXC 1.0

Lean and Quick

Article from ADMIN 30/2015
By
LXC 1.0, released in early 2014, was the first stable version for managing Linux containers. We check out the lightweight container solution to see whether it is now ready for production.

Linux containers have been fully functional since kernel 2.6.29. However, Linux has had containers in the form of Virtuozzo [1] and OpenVZ [2] for some time. The difference is that the Linux kernel now has all the necessary components for operating containers and no longer requires patches. Kernel namespaces isolate containers from each other and CGroups limits resources and takes care of priorities.

Solid Foundation

A first stable version of the LXC [3] userspace tool has been used to manage containers since February 2014. Ubuntu 14.04 has LXC 1.0 on board, which the developers recommend and will provide support for until April 2019 (Figure 1). If you want to install LXC in Ubuntu Trusty Tahr, you are best off using the v14.04.1 [4] server images. Kernel 3.13 (used here) has five years of LTS support; this doesn't apply to the kernels of newer LTS updates. You can get the LXC tools after installation by entering:

apt-get install lxc

The packages (among other things) listed in Table 1 will land on your computer.
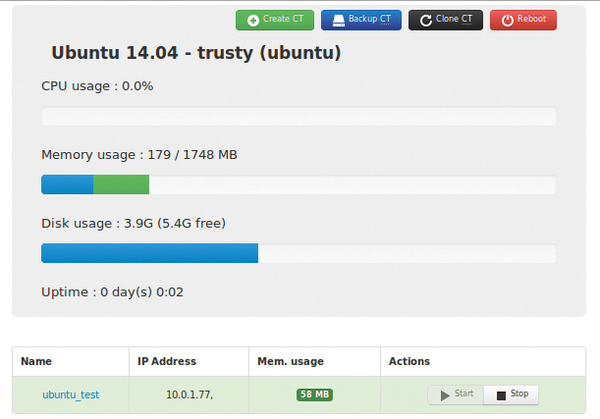
Figure 1: The container is being managed here with the help of LXC Web Panel [5].

Table 1

LXC Packages

Package Name Purpose
bridge-utils Generates the virtual network device (veth).
cgmanager Enables the management of CGroups via a D-Bus interface.
debootstrap Helps install Debian-based containers.
dnsmasq-base Enables a minimum out-of-the-box NAT network for containers (lxcbr0).
liblxc1 The new LXC API.
lxc-templates Templates that create simple containers.

First Container

After a successful installation, you can create the first container with a simple command:

lxc-create -t ubuntu -n ubuntu_test

Don't forget to obtain root privileges first, which you will need to execute most of the commands featured in this article. If you then call lxc-create for the first time for a particular distribution, the host system needs to download the required packages. It caches them in /var/cache/lxc/. If you enter the lxc-create command again, the system will create a container within a couple of seconds. If you type

lxc-create -t ubuntu -h

LXC shows you template-specific options. You can, for example, select the Debian or Ubuntu release or a special mirror using these options. The following call creates a container with Debian Wheezy as the basic framework:

lxc-create -t debian -n debian_test -- -r wheezy

By default, Ubuntu as the host system stores containers directly in the existing filesystem under /var/lib/lxc/<Container-Name>. At least one file called config and a directory named rootfs are waiting in the container subdirectory. Many distributions will also have the fstab file, which manages container mountpoints.

LXC 1.0 configures the container with the help of the config file. Container management also allows the use of includes in the configuration (via lxc.include), which makes it possible to have a very minimalist default configuration for containers (Figure 2).

Figure 2: The default configuration for an Ubuntu container.

If the container is on the disk, the host system will tell you what the default login is for Ubuntu (user: ubuntu , password: ubuntu ) or Debian (user: root , password: root ).

You can then activate the container using the following command, where the -d option ensures that it starts in the background:

lxc-start -n debian_test -d

Similarly, the lxc-stop command stops the container again. LXC usually sends a SIGPWR signal to the init process, which shuts down the container cleanly. You can force the shutdown using the -k option.

Containers usually start within a few seconds because they don't need a custom kernel. Using the first command below takes you to the login prompt, whereas the second command takes you directly to the console without a password prompt:

lxc-console -n debian_test
lxc-attach -n debian_test

The command shown in Listing 1 provides a decent overview of the available containers.

Listing 1

Display existing containers

root@ubuntu:/var/lib/lxc# lxc-ls --fancy
NAME          STATE    IPV4        IPV6  AUTOSTART
--------------------------------------------------
debian_test   RUNNING  10.0.3.190  -     NO
debian_test2  STOPPED  -           -     NO
ubuntu_test   STOPPED  -           -     NO

If a specific container should automatically start up when the base system is started, you can activate this in the container configuration (Figure 2):

lxc.start.auto = 1
lxc.start.delay = 0

As you can see, you could also include a start delay here.

Building Bridges

Perhaps you're wondering about the lxcbr0 device in the container configuration or about the IP from the container 10.0.3.0/24 network. This Ubuntu feature allows containers to connect automatically with the outside world via Layer 3 and is implemented by a unique network bridge called lxcbr0; other features include a matching dnsmaq daemon and an iptables NAT rule. The bridge itself doesn't connect an interface with the host. Listing 2 provides details.

Listing 2

The lxcbr0 LXC Bridge

root@ubuntu:~$ brctl show
bridge name     bridge id               STP enabled     interfaces
lxcbr0          8000.000000000000       no
root@ubuntu:~# cat /etc/default/lxc-net | grep -v -e "#"
USE_LXC_BRIDGE="true"
LXC_BRIDGE="lxcbr0"
LXC_ADDR="10.0.3.1"
LXC_NETMASK="255.255.255.0"
LXC_NETWORK="10.0.3.0/24"
LXC_DHCP_RANGE="10.0.3.2,10.0.3.254"
LXC_DHCP_MAX="253"
root@ubuntu:~# iptables -t nat -L POSTROUTING
Chain POSTROUTING (policy ACCEPT)
target     prot opt source               destination
MASQUERADE  all  --  10.0.3.0/24         !10.0.3.0/24
root@ubuntu:~# ps -eaf | grep dnsmas
lxc-dns+  1047     1  0 18:24 ?        00:00:00 dnsmasq -u lxc-dnsmasq --strict-order --bind-interfaces --pid-file=/run/lxc/dnsmasq.pid --conf-file= --listen-address 10.0.3.1 --dhcp-range 10.0.3.2,10.0.3.254 --dhcp-lease-max=253 --dhcp-no-override --except-interface=lo --interface=lxcbr0 --dhcp-leasefile=/var/lib/misc/dnsmasq.lxcbr0.leases --dhcp-authoritative

If a container uses the lxcbr0 network interface, the dnsmasq daemon on the host system allocates it an IP address when booting via DHCP. It then contacts the outside world using this address. However, you only have access to the container from the host system.

Thanks to iptables and some NAT rules, however, you can pass on individual ports from outside to the container if necessary. The following example shows how the host system forwards port 443 to the container:

sudo iptables -t nat -A PREROUTING -p tcp --dport 443 -j DNAT --to-destination 10.0.3.190:443

The lxcbr0 interface is great for testing. If, however, you are running multiple containers on a server, it can become complex and confusing. In such circumstances it is a good idea to use a separate bridge device without NAT. In this way, you can completely connects the veth devices in the containers on the Layer 2 level to the network. To do so, first set up a bridge in /etc/network/interfaces on the host system (see Figure 3).

Figure 3: A bridge device can be set up without NAT via the /etc/network/interfaces file.

Don't forget to comment out the existing eth0 interfaces. Then, enter the new bridge in the container configuration, which is called /var/lib/lxc/debian_test/config in the example:

lxc.network.link = br0

Containers either still get their IP via DHCP, or you can set up a fixed IP address. Although you can sort out the fixed IP address in the container configuration (lxc.network.ipv4), the better option would be to do it directly in the Debian or Ubuntu container itself in the /etc/network/interfaces file. In addition to the commonly used veth interface, you have other network options: none, empty, vlan, macvlan, and phys.

Buy this article as PDF

Express-Checkout as PDF
Price $2.95
(incl. VAT)

Buy ADMIN Magazine

SINGLE ISSUES
 
SUBSCRIPTIONS
 
TABLET & SMARTPHONE APPS
Get it on Google Play

US / Canada

Get it on Google Play

UK / Australia

Related content

comments powered by Disqus
Subscribe to our ADMIN Newsletters
Subscribe to our Linux Newsletters
Find Linux and Open Source Jobs


Support Our Work

ADMIN content is made possible with support from readers like you. Please consider contributing when you've found an article to be beneficial.

Learn More”>
	</a>

<hr>		    
			</div>
		    		</div>

		<div class=