Lead Image © Erwin Wodicka, Fotolia.com

Lead Image © Erwin Wodicka, Fotolia.com

Cross-platform database management with DBeaver

Data Director

Article from ADMIN 52/2019
By
Save time and effort rummaging through your databases.

Governing and taking care of databases is a specialized task that requires special system administrators who are commonly known as database administrators (DBAs). While their role encompasses all aspects of maintaining data integrity within an organization, some of it overlaps with the duties of a system administrator.

To save yourself time and effort when you are called to administer databases, you can use a graphical database management tool. There's no dearth of such tools, and some databases have their own in-house versions. What sets DBeaver [1] apart is that it works across platforms and supports a wide variety of database servers. Whether you are using relational databases like PostgreSQL and MariaDB, Hadoop-based ones like Apache Hive, graph databases like Neo4j, or even embedded ones like Firebird and SQLite, DBeaver can manage them all, as well as several others (Figure 1). Basically, if your database server has a JDBC driver, you can hook it up with DBeaver.

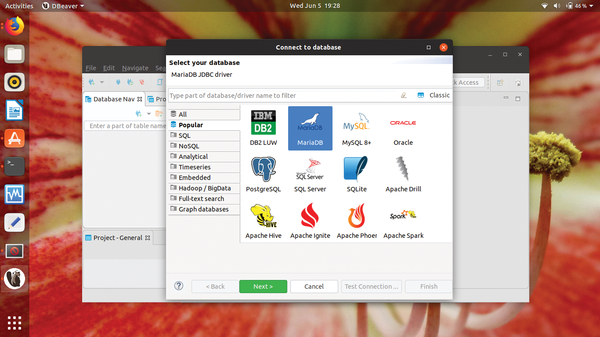
Figure 1: Besides DBAs, application developers and SQL programmers will find DBeaver useful.

DBeaver comes in two versions: DBeaver Community Edition (CE) and DBeaver Enterprise Edition (EE). The CE version discussed in this article is available under the open source Apache License. The proprietary DBeaver EE [2] is available under a subscription model and supports databases with non-JDBC drivers, as well, including NoSQL behemoths like MongoDB and Apache Cassandra. Refer to the "Enterprise Edition Features" box for information on the functionality you get with the proprietary version.

Enterprise Edition Features

While the open source CE version has plenty of features, it lacks some elements that make more sense in a data-intensive enterprise. For starters, the Mock Data generator is a very useful feature for populating a newly created database with thousands of rows of sample data. If you have a large database and complex relationships between the tables, you can use the Visual Query Builder tool, which is designed to aid even non-SQL users by helping them query the database without writing a single line of SQL.

Furthermore, DBeaver has tools that will help you keep an eye on interactions with the database server and even optimize it to be more efficient. The Session Manager tool monitors connections to the database and pinpoints sessions that consume too many resources, and the Execution Plan Analyzer, which is part of the Session Manager tool, helps dig out inefficient queries.

You can use DBeaver CE for a variety of common tasks, such as editing metadata, exporting/importing data, managing users, and a lot more. It includes an SQL editor, a query manager, and Entity Relation (ER) diagrams that help visualize the connections between the databases. You can also use DBeaver to manipulate the data housed inside the database by directly viewing and editing it.

DBeaver is written in Java and based on the Eclipse Rich Client Platform. DBeaver CE is available in the repositories of many distributions. I use Ubuntu; the Snap version in the repositories is outdated, so I suggest grabbing one from Flathub. To equip Ubuntu to install Flatpaks, first fetch the Flatpak plugin for Gnome Software with:

sudo apt install gnome-software-plugin-flatpak

This command automatically installs all the required components. Once it's done, add the Flathub repository [3] with:

sudo flatpak remote-add --if-not-exists flathub

Now your Ubuntu installation is all set to install Flatpak apps. If you aren't running Ubuntu, follow the instructions for your distribution on the Flatpak website [4] to enable it to install flatpaks.

Once your distribution is ready, you can search for DBeaver inside its graphical software manager or type

flatpak install flathub io.dbeaver.DBeaverCommunity

inside a terminal to install the app.

Initial Impressions

When you launch DBeaver for the first time, it will prompt you for details to connect to a database server. The first step is to select a database server to which you want to connect from the list of supported databases. You can use DBeaver to connect to databases on the localhost, as well as those on a remote machine over the network or across the Internet.

Different databases require different configurations, but generally speaking, you'll need to enter the database server's hostname and the administrator's username and password (Figure 2). You should use the Test Connection button to check the connection before exiting the wizard. Because this is a pristine installation, DBeaver will download the drivers it requires to communicate with your database.

Figure 2: A server can contain multiple databases, so you can specify the name of the one you want to access in the Connection Settings window.

Once it connects to the database server, DBeaver will take you to the main interface. Every connection you create shows up in the Database Navigator tab on the left in an expandable tree, which you can use to access the various database components (e.g., tables, indexes, views, etc.).

Double-clicking any component loads it in the Editor window on the right for manipulation. For instance, double-clicking on a table loads it in the Editor window and opens three tabs (Figure 3). The first tab, Properties , displays various bits of information about the table. The second tab, Data , displays the data in the table. The ER Diagram tab displays the entity relation between the various tables. This tab is more useful when viewing an entire database because it displays the foreign keys that link the various tables.

Figure 3: You can move the different components around the workspace and dock them in different positions.

Spend some time exploring DBeaver's interface. The app has very powerful and useful right-click context menus in the navigation window that offer all kinds of functionality. Right-click on a table to create a new one or even an entire database. Other options help you import and export data to and from a table (see the "Moving Data" box for details). If you select multiple tables, the menu also has an option to compare them by various parameters. One of the most useful options in the context menu is the Tools submenu that includes various helpful options. For instance, you can back up a database and analyze, repair, and optimize a table, in addition to other options. To help you write SQL queries, the menu also includes options to generate various kinds of SQL statements.

Moving Data

In addition to letting you connect to your database server and manipulate its structure and data, DBeaver also lets you import and export data. After you've established a connection to a database server, select a table and bring up the right-click context menu. The menu contains separate options to import and export data. Selecting either option launches the Data Transfer wizard, which assists you with the task. Using the Import Data option, you can bring data into a table from a CSV file or from another table. The wizard will take you through the steps involved in importing the data depending on the file type from which you are importing. On the other hand, if you want to export the data, the wizard will first prompt you to select the output file format. DBeaver supports various popular file formats, including CSV, HTML, JSON, XLS, and more. It can even export the data as a series of SQL INSERT statements, which makes it easier to import the database.

Useful Functions

DBeaver has some very useful tools to ease many of the routine database administration tasks. One of the most useful is the SQL Editor, which has many features you would expect in an IDE to ease writing SQL, such as autocompletion, autoformatting, templates, history, and more.

You can bring up the SQL Editor from the right-click context menu or by heading to SQL Editor | SQL Editor . Here, you can write the SQL queries either manually with the help of autocompletion or use assistance tools like SQL Templates, which insert frequently used SQL statements. You can also use the Generate SQL option from the right-click context menu to copy and paste common SQL queries.

Once you've written some SQL statements, you can use the Play button on the left side of the SQL Editor to run the currently selected statement. The query output will be displayed in the results window below the SQL Editor. What's more, you can edit the values in the results window and even insert new rows of data. When you make any changes in the Data Viewer, before you save them to the database, you can use the Script button to preview the SQL lines that will make the changes to the database.

In fact, the Data Viewer is another interesting feature of DBeaver. Besides letting you edit data inside a table, you can also use it to filter, sort, and colorize the data. These features help make sense of large quantities of data. The top toolbar contains buttons that you can use to apply custom filters to sort the data, depending on your needs (Figure 4). One of the easiest ways to filter data is to specify an SQL expression in the filter field above the table or pick one from the predefined templates.

Figure 4: DBeaver lets you review the changes before it commits them to the database.

ER diagrams (Figure 5) are the third important tool for helping visualize the connections between the various tables in the database. ER diagrams in DBeaver are read-only; you can move the elements and rearrange their layout, but these changes cannot be saved. If you want to make any changes or add new elements, DBeaver lets you create custom ER diagrams under New | ER Diagram . This sequence launches a wizard that prompts you to select the tables you want to include in the ER diagram; however, you can add more tables, even for different databases, once the initial diagram has been created. You can then use the diagram tools and add the connections you want between the tables.

Figure 5: You can rearrange the tables in the ER Diagram tab by dragging them around the workspace, although you can't save the changes.

Conclusion

As you can see, DBeaver is a very diverse tool that will make a DBA's life a lot simpler. The open source Community Edition supports a wide array of commonly used databases and rolls in quite a lot of functionality to take the pain out of managing databases in all types of environments. The project has ample documentation [5] on its wiki to help you orient yourself with the tool.

Infos

  1. DBeaver: https://dbeaver.io/
  2. DBeaver EE: https://dbeaver.com/
  3. Flathub repository: https://flathub.org/repo/flathub.flatpakrepo
  4. Flatpak website https://flatpak.org/setup/
  5. DBeaver Project documentation: https://github.com/dbeaver/dbeaver/wiki/

The Author

Mayank Sharma is a technology writer and you can read his scribblings in various geeky magazines on both sides of the pond.

Buy this article as PDF

Express-Checkout as PDF
Price $2.95
(incl. VAT)

Buy ADMIN Magazine

SINGLE ISSUES
 
SUBSCRIPTIONS
 
TABLET & SMARTPHONE APPS
Get it on Google Play

US / Canada

Get it on Google Play

UK / Australia

Related content

comments powered by Disqus
Subscribe to our ADMIN Newsletters
Subscribe to our Linux Newsletters
Find Linux and Open Source Jobs


Support Our Work

ADMIN content is made possible with support from readers like you. Please consider contributing when you've found an article to be beneficial.

Learn More”>
	</a>

<hr>		    
			</div>
		    		</div>

		<div class=