Creating KVM machines with BoxGrinder and VMBuilder
Virtualization technologies are supposed to make life easier for the administrator, but after converting a number of servers to a few dozen VMs, what was supposed to make things easier can quickly become a burden. Tools that facilitate the process of creating new virtual machines are therefore quite useful.
The fastest and easiest way to set up a new virtual machine is by cloning. To do this, you can run the virt-clone command in the shell:
virt-clone --original userver5 --name userver6 \
           --file /var/lib/libvirt/images/userver6.img
virt-clone creates a new XML definition file for the virtual machine, copies the image file for the virtual disk, and gives the network adapter a new, random MAC address. The remaining hardware components remain unchanged.
After cloning, however, much manual work is required: You need to modify the virtual machine’s network configuration and change the hostname. If the original virtual machine ran an SSH server, you also need to create a new SSH key for the new virtual machine.
BoxGrinder
The manual intervention required after cloning is prone to error, so why bother cloning if you can create virtual machines from scratch with a single command? In the Red Hat world, the BoxGrinder project can help you. With BoxGrinder, you can create virtual Fedora, RHEL, CentOS, and Scientific Linux machines in almost no time. Incidentally, BoxGrinder is not a KVM-specific tool: It can also cope with various other virtualization and cloud systems and – besides KVM – also supports VMware, Amazon EC2, and VirtualBox. Unfortunately, prebuilt BoxGrinder packages exist only for Fedora right now. The installation is straightforward:
yum install rubygem-boxgrinder-build
It looks like RHEL and CentOS users will have to wait for version 6.4 before official BoxGrinder packages become available. Even though you will probably not want to use Fedora as the KVM host in a production environment, this restriction is not as bad as it seems: For one thing, you can run BoxGrinder on Fedora to create, for example, a virtual CentOS machine and then install the VM on a KVM host running on CentOS. In other words, Fedora is only used as a vehicle for executing BoxGrinder, not as a virtualization system. Also, you can run BoxGrinder on the KVM host in a virtual machine. The BoxGrinder website even has a prebuilt image for this purpose.
Many BoxGrinder features are implemented as plugins, of which there are three types:
- OS plugins manage the OS-specific details of the virtual machines.
- Platform plugins are responsible for accommodating the special features of the respective virtualization system. If you do not use a platform plugin, virtual KVM machines are created.
- Delivery plugins are responsible for how the virtual machine is delivered – that is, how it is transferred to the virtualization host.
After installing BoxGrinder, you can run the
boxgrinder-build --version
command for an overview of the available plugins (Listing 1).
Listing 1: BoxGrinder Plugins
01 boxgrinder-build --version
02   BoxGrinder Build 0.10.2
03
04   Available os plugins:
05    - rhel plugin for Red Hat Enterprise Linux
06    - centos plugin for CentOS
07    - fedora plugin for Fedora
08    - sl plugin for Scientific Linux
09
10   Available platform plugins:
11    - vmware plugin for VMware
12    - ec2 plugin for Amazon Elastic Compute Cloud (Amazon EC2)
13    - virtualbox plugin for VirtualBox
14    - virtualpc plugin for VirtualPC
15
16   Available delivery plugins:
17    - s3 plugin for Amazon Simple Storage Service (Amazon S3)
18    - cloudfront plugin for Amazon Simple Storage Service (Amazon S3)
19    - ami plugin for Amazon Simple Storage Service (Amazon S3)
20    - sftp plugin for SSH File Transfer Protocol
21    - ebs plugin for Elastic Block Storage
22    - local plugin for Local file system
23    - elastichosts plugin for ElasticHosts
24    - openstack plugin for OpenStack
25    - libvirt plugin for libvirt Virtualisation API
The Appliance Definition File
Before you create your first virtual machine with BoxGrinder, you must describe the virtual machine in a text file known as the appliance definition file. This file might look something like Listing 2.
Listing 2: Application Definition File for CentOS
01 name: centos
02 summary: CentOS installation with BoxGrinder
03 os:
04   name: centos
05   version: 6
06 hardware:
07   partitions:
08     "/":
09       size: 4
10     "/home":
11       size: 1
12     "swap":
13       size: 0.5
14   cpus: 1
15   memory: 1024
16 packages:
17   - @core
18   - @mysql
19   - acpid
The only mandatory items are the name , the os/name , and os/version . If you specify rhel , centos , or sl (for Scientific Linux) as the operating system, you only need to specify 5 or 6 as the version number. BoxGrinder then automatically uses the latest version (currently version 6.3). Default values are used for all other parameters. In the os section, you can use password to specify the desired root password (by default, it is boxgrinder ).
The hardware section is where you partition the virtual hard disk. Enter the desired partition sizes in gigabytes and the mountpoint. If you want a swap partition, enter swap instead of the mountpoint. If the partition info is missing, BoxGrinder only sets up a 1GB root partition. Additionally, the hardware section defines the number of CPU cores (by default, 1 ) and the RAM size in megabytes (by default, 256 ).
The packages section determines which packages are installed on the virtual machine. Enter the desired packages line by line, starting each line with a dash. @name designates a package group.
The core package group is automatically selected. In Fedora and RHEL, this setup gives you a minimal, text-based installation (about 200 packages occupying 600MB). The names and scopes of the packages for Red Hat-based distributions are listed in the repodata/xxx-comps.xml file on the installation DVD. Additionally,
yum grouplist -v
provides a list of all groups, where the group IDs relevant for BoxGrinder are indicated in brackets. However, yum grouplist does not know about the minimum core group. Besides the keywords described here, you can use the appliance definition file to specify other package repositories (packages ), integrate other appliance files (appliances ), add individual files (files ), and run commands after completing the installation (post ). Detailed options are described on the BoxGrinder website.
Build a Box
In the simplest case, you can create the new virtual machine by a simple call to boxgrinder-build , where the only parameter you specify is the name of the appliance definition file:
boxgrinder-build centos.appl
Note that boxgrinder-build must be executed by root. The program will run for several minutes. The first time a distribution is generated, all required packages must be downloaded. BoxGrinder stores the packages in the /var/cache/boxgrinder/rpms-cache directory; after this, subsequent runs of the commands are processed more quickly.
By default, BoxGrinder stores the resulting files (i.e., a RAW file with the virtual disk and a libvirt XML file) in the following directory:
build/appliances/x86_64/<osplugin>/<osversion>/<name>/1.0/<osplugin>-plugin/
Using the appliance definition file from Listing 2 thus results in the following:
build/appliances/x86_64/centos/6/centos/1.0/centos-plugin/
BoxGrinder normally uses the RAW format for image files. If you prefer the QCOW2 format, run BoxGrinder as follows:
boxgrinder-build centos.appl --os-config: format:qcow2
On the virtual machine, only the root user is set up. By default, the root password is boxgrinder and should be changed immediately for security reasons when you first start the virtual machine.
Please note that, when executed, BoxGrinder tests whether a virtual machine with the specified name already exists. If so, the command does not create a new VM. This saves time but also means that changes to the appliance definition file are ignored. After each and every change to the file, you must explicitly tell BoxGrinder to set up the virtual machine using the -f (for force) option.
BoxGrinder and Libvirt
At this point, you could now manually install the resulting image file and the associated XML file on the virtualization host, but BoxGrinder can help you with this task, too. To begin, select a delivery plugin with the -d option. The libvirt plugin is best suited for KVM machines (i.e., you need -d libvirt ).
Without any other options, BoxGrinder will then copy the image file to the /var/lib/libvirt/images directory and add the virtual machine to the list of libvirt-managed machines. If the KVM host is running on a different machine, or if you want to put the disk image file in a different storage pool, you must specify two options: connection_uri for delivering the virtual machine description (XML file) and image_delivery_uri for transferring the image file:
boxgrinder centos.appl --os-config format:qcow2 -d libvirt \
   --delivery-config connection_uri:qemu+\
   ssh://root@kvmhost/system,image_delivery_uri:\
   sftp://root@kvmhost/var/lib/libvirt/images
This makes the BoxGrinder command quite confusing. As far as options for each BoxGrinder call are concerned, you will probably prefer to save them in /root/.boxgrinder/config . This file might look something like Listing 3.
Listing 3: Sample BoxGrinder Configuration
01 plugins:
02    fedora:
03      format: qcow2
04    centos:
05      format: qcow2
06    libvirt:
07      connection_uri: qemu+ssh://root@kvmhost/system
08      image_delivery_uri: sftp://root@kvmhost/var/lib/libvirt/images
09      bus: virtio
10      overwrite: true
11      domain_type: kvm
This again simplifies the BoxGrinder command line to:
boxgrinder centos.appl -d libvirt
Unfortunately, BoxGrinder applies some strange default settings to the virtual machines that it produces. For example, the virtual disks are IDE by default. You can change this using the bus:virtio option in /root/.boxgrinder/config , which switches to the Virtio drivers. If you set up the virtual machine as a QCOW2 image, the XML file for the virtual machine gives you the wrong format. You can correct this setting using virsh edit or in the Virt Manager (Figure 1).
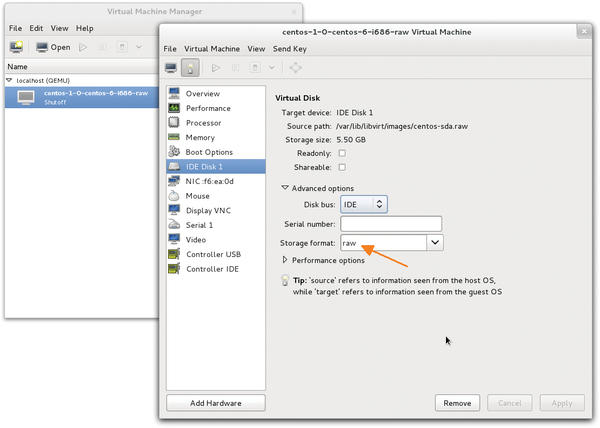 Figure 1: The disk storage format is wrongly preset for QCOW2 images.
Qemu is used instead of KVM as the hypervisor, which is also why the virtual machines run so slowly. The solution here is the domain_type:kvm option in /root/.boxgrinder/config .
Faster Networking
Also, network connectivity uses a RTL8139 adapter rather than Virtio. The network runs faster if you change the network card to virtio . Unfortunately, there is no corresponding option in the BoxGrinder libvirt plugin.
ACPI and APIC are disabled by default. ACPI lets you gracefully shut down or restart the virtual machine using an ACPI command. APIC stands for Advanced Programmable Interrupt Controller and is a schema for forwarding hardware interrupts to the CPUs. You will want to set both options in the Overview dialog of the Virtual Machine Manager (under Machine Settings ).
The virtual machine uses a US keyboard layout. To change this, you can set your preferred keyboard layout in the /etc/sysconfig/keyboard file. Also, the virtual machine uses the EDT (Eastern Daylight Time) time zone. If you live elsewhere, copy the appropriate time zone file from /usr/share/zoneinfo to /etc/localtime . You will still need to modify the network settings manually on the virtual machine.
Of course, you always run the risk that some of these options will be overlooked, and the virtual machine will thus run less efficiently than it should. It is hard to understand why the default settings are not defined to be more meaningful from the outset. Because of the need to manually adjust various settings, very little of the time saved by BoxGrinder remains when setting up virtual machines. Scripts that modify the XML file of the new virtual machine on the KVM host and change various settings on the virtual machine (e.g., keyboard layout, time zone) can help.
Future versions of BoxGrinder will also have a graphical front end called BoxGrinder Studio, which uses a REST interface to collaborate with the build tools (Figure 2).
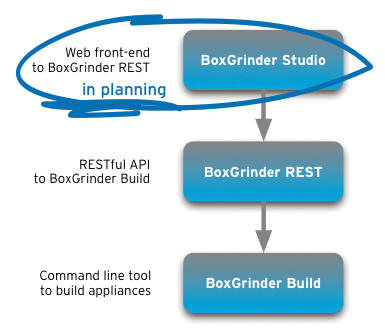 Figure 2: BoxGrinder Studio is a graphical front end used to facilitate the creation of virtual machines with BoxGrinder.
VMBuilder
The Ubuntu-specific counterpart to BoxGrinder is VMBuilder. It helps you set up virtual Ubuntu machines with minimal effort. Besides supporting KVM/libvirt virtualization systems, it also supports Amazon EC2, VirtualBox, VMware, and Xen. VMBuilder is implemented as a Python script in the python-vm-builder package:
apt-get install python-vm-builder
The man page for VMBuilder command unfortunately provides very little help. The
vmbuilder kvm ubuntu --help
command provides a list of options, and the Ubuntu Server Guide has a VMBuilder section. VMBuilder must be run as root or with sudo . In a minimalist scenario, the syntax is:
vmbuilder kvm ubuntu --suite precise --libvirt qemu:///system
The first parameter specifies the desired virtualization system, and the second parameter specifies the distribution. The --suite option determines the Ubuntu version, where precise is the code name for Ubuntu 12.04. Finally, the --libvirt <uri> option specifies the KVM host on which VMBuilder should set up the virtual machine.
VMBuilder always performs a minimal installation comprising approximately 190 packages and occupying 500MB of space on the hard disk. The installation does not include a graphical desktop.
VMBuilder creates the image file for the virtual disk in the ubuntu-kvm subdirectory relative to the current working directory. If you want to save the virtual machine in another location, change directory before running VMBuilder and use the --dest option to specify the destination directory. VMBuilder creates the target directory itself, so it must not already exist! If this is the case, VMBuilder returns an error message – but, annoyingly, only at the end of the build process.
A number of default settings exist for the virtual machines created by VMBuilder. For example, it uses the same CPU architecture as the computer on which you run VMBuilder. So, if you run VMBuilder on 64-bit Ubuntu, it also installs a 64-bit version of Ubuntu on the virtual machine. The virtual machine uses one CPU (core) and 128MB of RAM.
The filesystem is created as a QCOW2 image file of 4GB. Of these, 3GB are reserved for the system partition and another 1GB for swap. The image file is stored in the KVM-ubuntu directory and not transferred to a libvirt storage pool. The image file is passed to the virtual machine via the IDE driver (i.e., not by the more efficient Virtio driver). In contrast, the network adapter uses the Virtio driver. The virtual machine, on which the ubuntu user account is set up with a password of ubuntu , resides on the default network of the libvirt tools. The host name is also ubuntu . If you want to change any of these key settings, you must specify corresponding options (Table 1).
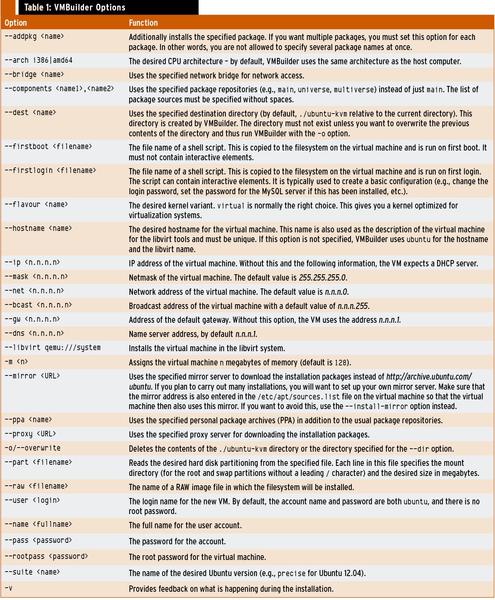
This makes the command line for VMBuilder quite confusing.
Listing 4 shows a real Ubuntu server installation.
Listing 4: Virtual Ubuntu Server with VMBuilder
vmbuilder kvm ubuntu --suite precise  --libvirt qemu:///system  \
   --mem 512 --user kofler  --dest /var/lib/libvirt/images/firma-abc.de \
   --hostname firma-abc.de --bridge br0  --ip 79.47.194.162 \
   --mask 255.255.255.248 --net 79.47.194.160  --gw 79.47.194.166 \
   --dns 213.211.98.98  --addpkg openssh-server --addpkg acpid  -v
If you configure these options (note --dest and --hostname in particular), vmbuilder generates the following files, where xxxxxx is a random string:
/etc/libvirt/qemu/firma-abc.de.xml
/var/lib/libvirt/images/firma-abc.de/xxxxxx.qcow2
The first line is the XML file for libvirt, and the second line specifies the image file.
VMBuilder Peculiarities
Unfortunately, VMBuilder also has some quirks. It refuses to set up the new virtual machine in Libvirt Manager if you already have a machine of the same name. This makes sense to a certain point, but it would be friendlier to run the corresponding test at the beginning of the build process, rather than after completing it. In other words, you should always state a unique name for --hostname that is not only used as the hostname, but also as the name for the libvirt tools.
VMBuilder creates the kvm-ubuntu directory to create virtual machines but does not delete it later, not even if the directory is empty (thanks to the --dest option). The next time you run VMBuilder, the script outputs an error message telling you ubuntu-kvm already exists . The solution is to delete the directory manually.
VMBuilder selects less than optimum hardware components for the virtual machine. In particular, hard disk access via a virtual IDE controller slows down the VM. If you want to use the faster Virtio driver, replace /dev/sda with /dev/vda in /etc/fstab on the virtual machine and then shut down the virtual machine. Then, in the virtual machine configuration, change IDE to Virtio (the easiest way to do this is to use Virtual Machine Manager).
The acpid package is not installed automatically. The virtual machine thus does not respond to ACPI events (e.g., shutdown requests sent by Virtual Machine Manager). To solve this problem, you can install the acpid package or enter the --addpkg acpid option when you set up the virtual machine.
The virtual machine uses a US keyboard layout by default. To change this, you can run the
dpkg-reconfigure keyboard-configuration
command. VMBuilder installs GRUB 0.97 as the bootloader on the virtual machine – not version 2, which is normally used by Ubuntu.
In contrast to BoxGrinder, VMBuilder does not use a cache for the required installation packages. Thus, all required packages must be downloaded again for each installation. It therefore makes sense to set up an APT-proxy (e.g., using approx or apt-cacher-ng ). When you call VMBuilder, you need to specify the proxy address for the --install-mirror option.
Conclusions
BoxGrinder and VMBuilder can save you a huge amount of time if you set up virtual machines regularly. However, both of these tools are quirky, and both are designed for professional administrators. For KVM users who occasionally need to create a new virtual machine, the effort is just not worthwhile.
The Author
Michael Kofler is a freelance computer book author and trainer. He recently published the Addison-Wesley book KVM for Server Virtualization in collaboration with Ralf Spenneberg.
Related content
-
Creating KVM machines with BoxGrinder and VMBuilder
 Creating a virtual machine manually is straightforward but too time consuming if you regularly need to set up many virtual machines. The BoxGrinder and VMBuilder programs let you automate this process.
Subscribe to our ADMIN Newsletters
Subscribe to our Linux Newsletters
Find Linux and Open Source Jobs
Most Popular
Focus On Self-Hosting
• Self-Hosted Collaboration with Forgejo
• Self-Hosted PaaS with Coolify
• Build and Host Docker Images
• Self-Hosted Pritunl VPN Server with MFA
• Self-Hosted Chat Servers
Support Our Work
ADMIN content is made possible with support from readers like you. Please consider contributing when you've found an article to be beneficial.
