Intruder Detection with tcpdump
Tcpdump is a widely used and powerful tool that captures, parses, and analyzes network traffic. Created by the Network Research Group at Lawrence Berkeley National Laboratory, Berkeley, California, tcpdump (http://www.tcpdump.org) is deployed with libpcap (a C/C++ library for network traffic capture) and maintained by the libpcap developers (http://sourceforge.net/projects/tcpdump/). With tcpdump, you can analyze large binary files that are too large to view casually with a tool like Wireshark by whittling your file down to only the information pertinent to your investigation. Most distributions have tcpdump installed by default, but if not, use your distro’s package manager. The SourceForge link above has project information as well as the code.
Tcpdump runs locally on your machine and can read or write network traffic information to a file. A basic capture uses the syntax
tcpdump -n -i <interface> -s <snaplen>
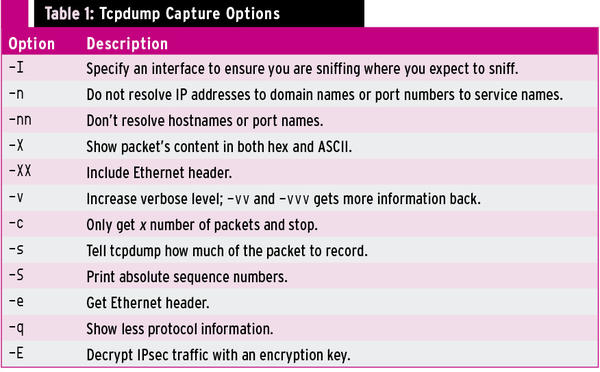
where -n means tcpdump should not resolve IP addresses to domain names or port numbers to service names, -i <interface> is the interface to use, and -s specifies how much of the packet to record – I use 1515 , which is sufficient for most cases, but if you don’t specify a size, it will only capture the first 68 bytes of each packet. Except in older versions of tcpdump, a snaplen value of 0 uses a length necessary to capture whole packets. Figure 1 dissects the output of a sample dump, and Table 1 shows more examples of tcpdump options and when to use them.
 Figure 1: Output from tcpdump.
File Read and Write
Tcpdump allows you to write to a file with the -w option and read from a file with the -r option:
$ sudo tcpdump -i wlan0 -w dumpfile001
$ sudo tcpdump -r dumpfile.pcap
If you want to see the files as they are captured and save them to a file, use the following options:
tcpdump -n -i eth1 -s 1515 -l | tee output.txt
This command tells tcpdump to line-buffer its output, and by piping to the tee utility, it sends output to the screen and output.txt simultaneously, but not in binary format. The best way to do that is run a second instance of tcpdump.
Timestamps
When tcpdump captures packets in libpcap format, it adds a timestamp entry to the record in each packet in the capture file. Monitoring software like tcpdump uses libpcap to capture packets traveling over a network, read saved capture files, and analyze them, and you can augment that data with the -tttt flag, which adds a date to the timestamp (Figure 2).
 Figure 2: Intercepting packets over a network and stamping them with a time and date.
If you are not sure you understand the time differences reported and need to be absolutely sure of time, use the -tt option to show seconds and microseconds since the beginning of the Unix epoch (00:00:00 UTC on January 1, 1970) (Figure 3).
 Figure 3: Reporting time since the beginning of the Unix epoch.
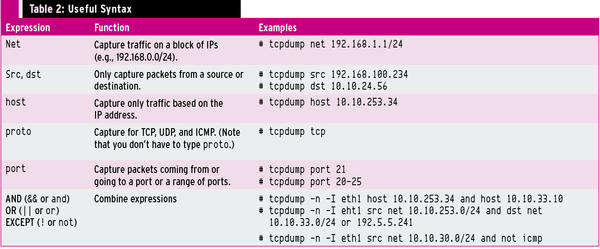
The useful expressions in Table 2 can help you cut the amount of traffic down to just what you need.
Related content
-
Intruder detection with tcpdump
 Tcpdump is a general-purpose packet sniffer and incident response tool that should be in your toolshed.
 -
Wireshark
Troubleshoot network problems with this popular protocol analyzer.
-
Network Grep
Ngrep is a pattern-matching tool that sorts the wheat from the chaff and doubles as a lightweight packet sniffer.
Subscribe to our ADMIN Newsletters
Subscribe to our Linux Newsletters
Find Linux and Open Source Jobs
Most Popular
Focus On Self-Hosting
• Self-Hosted Collaboration with Forgejo
• Self-Hosted PaaS with Coolify
• Build and Host Docker Images
• Self-Hosted Pritunl VPN Server with MFA
• Self-Hosted Chat Servers
Support Our Work
ADMIN content is made possible with support from readers like you. Please consider contributing when you've found an article to be beneficial.
