Linux for Windows Admins: Doing the Samba Shuffle
As promised in part two of this Linux for Windows Admins series, in this article, I focus on advanced file editing, file manipulation, and more advanced concepts related to interoperability between *nix systems and Windows systems. You’ll learn these techniques while also learning how to connect the two systems to each other via Samba. Yes, *nix systems can map drives to Windows systems and Windows systems can map drives to *nix systems using this unique and extremely versatile protocol.
The Samba Protocol
Windows administrators know Samba, or SAMBA, by other names, such as NETBIOS, LanManager, or for those of you who like history, Server Message Block (SMB), which is the origin of the term Samba. These days, Samba is better known as the Common Internet File System (CIFS). It is free, open source software released under the GNU Public License version 3 (GPLv3). Whatever name you know it by, it is the Windows file and printer sharing protocol developed to share resources between Windows computers, much like the Network File System (NFS) protocol popular in *nix systems. Although most *nix and Windows administrators use all of these terms interchangeably, the correct term for the protocol is now CIFS, which covers the protocol for all operating systems.
Setup and Configuration
On Windows systems, to set up file sharing, click on Control Panel | Network and Sharing Center | Sharing and Discovery | File Sharing | Turn on File Sharing | Apply . Now, you may share folders with individual users, groups of users, or everyone (not recommended).
Setting up file and printer sharing on *nix – in this case, Ubuntu Server 10.04.4 LTS – is a bit more involved but really no more difficult: Log in to your Linux system and become root or use sudo to issue commands a s the root user.
$ sudo apt-get install samba samba-common system-config-samba
The system will install the samba packages and any dependencies (required software packages related to samba ). The system might prompt you for permission to proceed with the installation. If it does, type Y at the prompt and press the Enter key to continue. After a few minutes, your system will have all the files it needs to participate in Windows-compatible file sharing.
Before your Linux system is ready, you have to take a few actions. The first is to edit the main Samba configuration file (/etc/samba/smb.conf ) and make some changes to its global settings.
$ sudo vi /etc/samba/smb.conf
The vi editor is the classic *nix editor and is the mainstay of every *nix administrator. It has its own quirks and navigation style, but once you learn it, you might never use another command-line editor, although it is a matter of personal preference. You can find vi cheat sheets throughout the Internet.
Once inside vi, use your keyboard’s arrow keys to navigate down the file until you see a line containing the [global] entry. The Samba config file contains instructions for every setting, but you only need to change a few right now. When you’re more familiar with the *nix implementation of Samba, you can tweak the settings to control every aspect of Samba behavior.
Navigate to the line containing workgroup = WORKGROUP with your arrow keys, position the cursor on the W of WORKGROUP , type R (replace), and type in your workgroup or domain name (unless your workgroup or domain name is WORKGROUP , in which case, leave it as is). If your workgroup name contains fewer characters, press the Esc key (enter command mode), press the lowercase l (ell) key once (move right), and then press the lowercase x key (delete) until only your workgroup name remains.
Next, use your Down arrow key to navigate down the file until you see the line security = user . If this line contains a semicolon (; ), remove it by placing your cursor over the semicolon and press the lowercase x key once. The semicolon and the hash (# ) are *nix comment marks inside files.
Continue to move down the file to the line encrypt passords = true and remove the semicolon if it exists. Do the same for the line unix password sync = yes . To save and exit the file, press ZZ .
If, during your editing, you make a mistake, the lowercase x deletes a character, lowercase i places you into insert mode, and pressing the Esc key places you back into command mode. It takes a bit of practice, but you’ll get used to it.
Now that you’ve made all the necessary changes to the smb.conf file, restart the Samba services.
$ sudo restart smbd
$ sudo restart nmbd
The services will restart and your newly edited smb.conf will be read by the system.
Now you’re ready to add Samba users to the Samba password database. Perform the following for any user who needs file sharing capability:
$ sudo smbpasswd -a <username>
New SMB password:
Retype new SMB password:
Users can synchronize their *nix and Samba passwords by issuing the smbpasswd command themselves. From now on, when users change their *nix passwords, their Samba passwords will update accordingly. Also, using the configuration shown, when you create new *nix users, their accounts will be added to the Samba user database as well.
Map a Drive to Your Home Directory
Using a default configuration, users will be able to map to their respective Home directory on the remote *nix system, just as they would from any Windows computer to any share.
C:> NET USE X: \\SERVERNAME\SHARE

C:> NET USE X: \\ASPEN\KHESS
The command completed successfully.
The user might also map the drive using the Map Network Drive link in Windows Explorer.
Mounting Windows Shares from Linux
The same rules apply to shared folders regardless of operating system. A user account must exist on the remote system with permission to connect to the shared resource. For Windows systems, this can be a domain or a local account.
Connecting to a Windows share is easy from your Linux system. The basic syntax is similar to Windows but different enough to cause some confusion for first-time users. On *nix systems, you must mount remote shares to a local directory because there are no drive letters in *nix. The /mnt directory is the standard location for mounting remote directories on *nix systems, but it doesn’t have to be /mnt . You can create a new directory and mount the shared folder there.
Don’t mount to any directory that isn’t empty. When you mount a remote share to a local directory on *nix systems, the contents of that local directory are “masked” from view, and if you were to use a system directory, it would have disastrous results. For now, I’ll use the traditional /mnt directory.
On my Windows system (KEN ), I have a folder shared as VM. To mount that directory (map a drive to the remote share), I use the following generic syntax:
$ sudo smbmount //SERVER/SHARE -o username=<Windows username>
All *nix systems have a mount command, but for simplicity, the smbmount “command” provides the necessary information to the system to mount a Samba share. I placed the command in quotes because smbmount is actually a link (shortcut) to a special mount command, mount.smbfs .
The command to mount the Windows share (\\KEN\VM ) from my Linux system is:
$ sudo smbmount //KEN/VM /mnt -o username=khess
Password:
ls /mnt
Test_Results
Remember that *nix systems aren’t “chatty” like Windows systems are. When you perform some action, no response generally means success. If you encounter an error condition, such as no permission or no such share name, you’ll receive a corresponding message to inform you of the problem.
Note that the \ marks are reversed to / in *nix Samba mounts. The -o switch means options . I also showed you the contents of the shared directory with the ls command. You can cd to any mounted directory, traverse the remote share, edit files (with proper permissions), and perform any functions that you would on any local directory.
To disconnect the remote share, you use the umount command.
$ sudo umount /mnt
But, you won’t be able to unmount the remote share if anyone, including you, is in that directory. If anyone has changed directory to that share, you’ll receive a Device or resource busy message. Otherwise, the umount command will disconnect the remote resource with no message.
Creating Samba Shares Graphically
Editing files at the command line might be painful for some Windows users. Fortunately, Linux developers are somewhat sympathetic to our graphical world. In the “Samba Setup and Configuration” section, I issued the command
$ sudo apt-get install samba samba-common system-config-samba
to download and install Samba packages. The third Samba package is the graphical Samba Server Configuration utility (system-config-samba ). I have used others with mixed results,but this one has never failed me and feels more “native” to the operating system than many of the others. Figure 1 shows the new (default) view of this utility after installation.
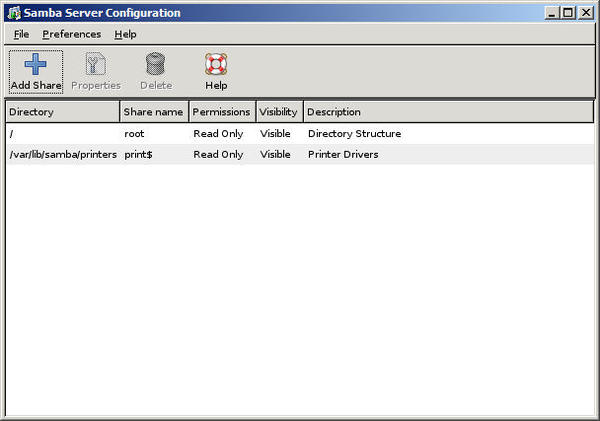 Figure 1: Samba Server Configuration utility (default settings).
To add a new directory share, click the Add Share icon to launch the Create Samba Share dialog, as shown in Figure 2.
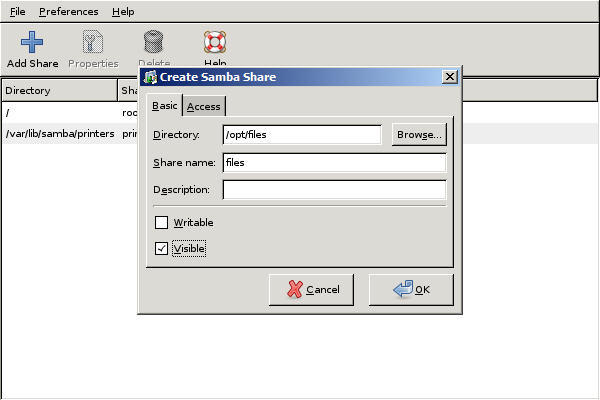 Figure 2: Entering basic share information into the Create Samba Share utility.
Enter or browse to the directory you want to share, enter the share name, and select whether you want the share to be Writable and Visible (Browsable). Click the Access tab (Figure 3) to restrict access to specific users. Click the OK button when finished.
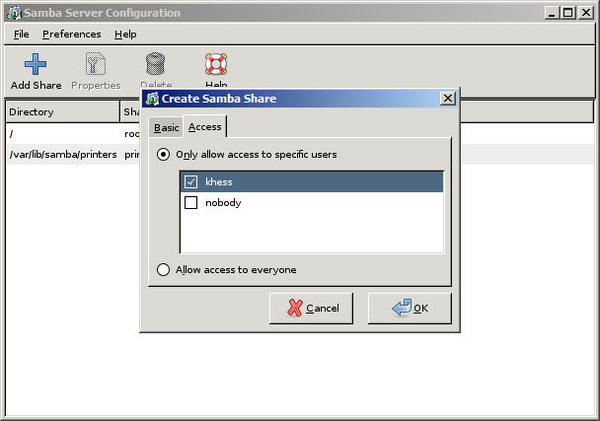 Figure 3: Defining user restrictions to the new share.
Figure 4 shows the new share.
 Figure 4: New Linux Samba share created successfully.
Note that the permissions on this share are Read Only. In Figure 2, I selected Visible , but I didn’t select Writable ; therefore, the shared directory is read only.
Map the Remote Linux Share
On your Windows computer, open Computer , click Map Network Drive and Browse for the Share , as shown in Figure 5.
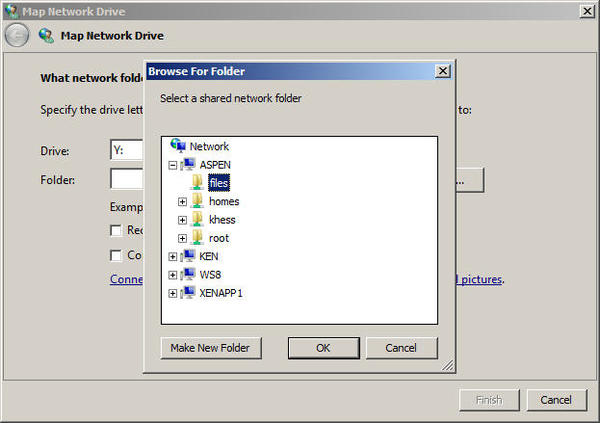 Figure 5: Mapping a shared Linux folder from Windows.
Select the share and then click OK to map the drive. In Figure 6, you see that the remote share has been mapped and opened on the Windows system with contents displayed. To disconnect the mapped drive, right-click the drive letter and click Disconnect .
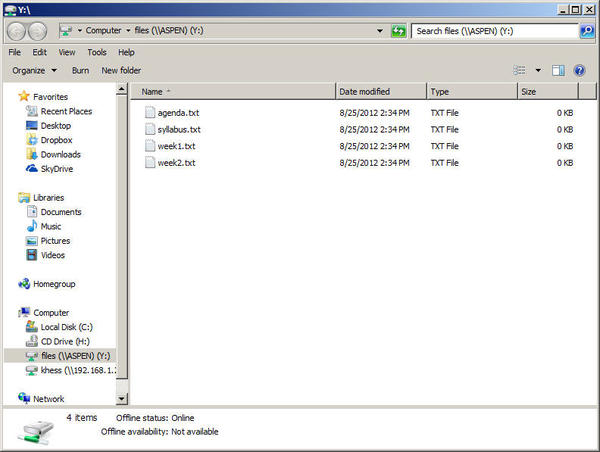 Figure 6: Display of contents from mapped remote Linux share.
Summary
Samba provides interoperability between disparate operating systems so that users can share files and administrators can back up data and easily copy data from one system to another. Using Samba, Linux systems can log on to a Windows domain, automatically map drives, use a roaming profile, and connect to domain resources, just as Windows computers do. Sharing files and disk resources between systems is something that isn’t new for either Windows or *nix, but Samba brings the two together seamlessly and with ease.
Related content
-
Samba 4 appliances by SerNet and Univention
 Shortly after the Samba team finalized Samba 4 in December 2012, SerNet and Univention integrated the new Samba into their appliances that give administrators an easy way to set up and test a Samba 4-based Active Directory domain controller.
 -
Save money with Samba as the domain controller on a legacy Windows NT-style domain
 Samba can act as a PDC or BDC on a Windows NT4-style domain. Compared with a Windows-only solution, Samba saves money on licensing, and users can log in from Linux or OS X.
 -
On the CD

-
Samba domain controller in a heterogeneous environment
 The open source Samba service can act as an Active Directory domain controller in a heterogeneous environment.
 -
What's new in Samba 4
 In December 2012, the open source world received the first, and very long awaited, release of the Samba 4.x series.
Subscribe to our ADMIN Newsletters
Subscribe to our Linux Newsletters
Find Linux and Open Source Jobs
Most Popular
Focus On Self-Hosting
• Self-Hosted Collaboration with Forgejo
• Self-Hosted PaaS with Coolify
• Build and Host Docker Images
• Self-Hosted Pritunl VPN Server with MFA
• Self-Hosted Chat Servers
Support Our Work
ADMIN content is made possible with support from readers like you. Please consider contributing when you've found an article to be beneficial.
