King of Computers: Managing Computers with Rex
Rex gives administrators the ability to manage all the machines on a network from a central location. The only precondition is that all of the computers must be reachable via SSH, and the admin computer also needs to have a Perl environment installed. On your own computer, you can then define a task that selected computers, or all of them, will run.
In this way, you can retroactively install and delete programs, handle maintenance, change the configuration of all your workstations uniformly, distribute documents, or simply query health state information for your systems.
With a correspondingly formulated task, you can simply issue, for example, the rex apache2 command to install apache2 on all your web servers and kit them out with the appropriate configuration files at the same time.
By the way, if you ask the programmer, Rex should actually be called (R)?ex. But, because this is difficult to read, write, and pronounce, I will simply use Rex in this article.
Freedom of Choice
Rex can manage computers running the Linux distributions CentOS 5 and 6, Debian 5 and 6, Fedora, Gentoo, Mageia, openSUSE, RHEL 5 and 6, Scientific Linux, and Ubuntu 10.04, 11.04, and 12.04. Additionally, it can handle Solaris (SunOS) and BSD systems. Although Rex does not actively block other Linux distributions, you should keep your fingers crossed when you activate a task.
Rex itself is only needed on the administrator’s own machine, which even can be a Windows or Mac OS X machine; the only important thing is that you have a Perl environment in place. To install Rex, first pick up the git versioning tool (using the package manager on Linux) and add the make tool. Then, access GitHub and create the Makefile you will need for the installation:
git clone https://github.com/krimdomu/Rex.git
cd Rex
perl Makefile.PL
Very likely at this point, you will see a few missing Perl modules scroll across the screen – on Linux, you can typically install them with the package manager. Then, you can launch into the actual installation with the commands:
make
sudo make install
Typing rex -version should now output a version number. If not, something has gone wrong with the installation, probably because some required Perl packages are not in place.
For all supported Linux distributions, the developers also provide repositories with prebuilt Rex packages. How you bind the repositories depends on your distribution. If you are unlucky, this approach will involve more typing than installing directly from the sources as presented here. On the upside, Rex is kept up to date automatically – well, more or less. When this issue went to press, the contents of the repositories lagged behind the Rex version from GitHub. Anyone who would like to use the repositories can find the installation instructions online.
As soon as Rex is ready for use, you should briefly check that all the machines on the network are reachable via SSH. If you can log on to any computer with the same user credentials, this will make writing the tasks much easier.
Mileage
For a first, short test, Rex can determine how long a computer on the network has been running. For example, to check the uptime for two computers named marvin and zaphod , you would enter:
rex -e "say run 'uptime'" -H "marvin zaphod"-u hans -p 123456
The -e parameter is followed by the command to be run in quotes. run 'uptime' tells rex to start the uptime program on the remote computer. The say to the left of this ensures that the uptime output is sent to the administrator’s terminal. The -H parameter lists all of the affected computers in quotes. Instead of using the hostnames, you can use the IP addresses as shown in Figure 1. The username required to login to both computers follows -u and the password -p .
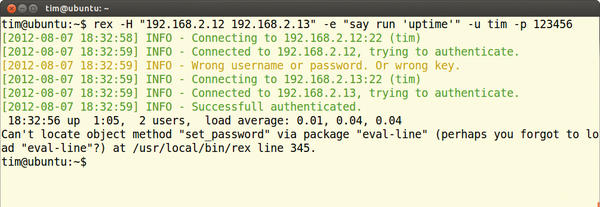 Figure 1: On the first computer, the login fails, which leads to the cryptic error message at the end of the results, among other things. However, the second computer reveals its uptime.
To avoid excessive typing in the case of more complex tasks, you can also place all of the necessary information in a text file, known as the Rexfile. To query the uptime, you would fill the file with the content from Listing 1.
Listing 1: A Rexfile with a Task
01 user "Hans";
02 password "123456";
03
04 desc "Uptime estimate";
05 task "uptime", sub {
06    say run 'uptime';
07 };
At the start of the listing, after user and password , you can see the username and password in quotes; the administrator uses these credentials to log on to all the machines via SSH. The task definition follows, and what the task does is shown in the short human-readable description in quotes that follows desc . The task line assigns a unique name to the task – in Listing 1, it is simply named uptime .
Listing 2: Extended Rexfile for uptime
01 user "hans";
02 password "123456";
03
04 group "intranet" => "192.168.2.12", "192.168.2.13";
05 group "accounting" => "192.168.2.14", "192.168.2.15";
06
07 logging to_file => "rex.log";
08
09 desc "Uptime estimate";
10 task "uptime", group => ["intranet", "accounting"], sub {
11    say run 'uptime';
12 };
What Rex needs to do when the task is called is stated between the curly brackets. In Listing 1, run starts the uptime program on the external computers and sends the output to the administrator’s terminal (say ). The end of each line or instruction is marked by a semicolon.
You can run the defined task with the following command:
rex -H "marvin zaphod" -f uptime.rex uptime
The -H option is again followed by the computers on which the uptime task is to be run. rex expects the task definition in a file called uptime.rex . If you rename uptime.rex to Rexfile , you can save the bother of specifying the -f parameter.
Without the -H parameter, rex would run the action locally, that is, on the administrator’s machine. This means you could also misuse Rex for automating local tasks, such as building a program or compiling documentation. All parameters for rex must always be entered before the task name (in the example above, before uptime ). Otherwise, rex ignores them.
Security-aware administrators will be up in arms when they look at Listing 1. The Rexfile really does contain the username and the password in plain text. If you leave them out, you need to pass them into rex again with the parameters -u and -p . The version of rex that was available when this issue went to press didn’t always reliably interpret these two parameters. As another alternative, you can also use SSH keys to authenticate. The following lines handle this:
user "hans";
private_key "/path/to/private.key";
public_key "/path/to/public.key";
You need these lines at the start of the Rexfile with the appropriate paths. If the keys are in the default directories (below $HOME/.ssh ), it is sufficient to specify the user .
Groups
If you have to manage many computers, you can group them in the Rexfile:
group "intranet" => "marvin", "zaphod";
This line must occur before the first task. This example creates a new group called intranet , which contains two computers: marvin and zaphod. If the hostnames contain a sequential number, such as client01 through client05 , you can use a shorter notation:
group "intranet" => "client[01..05]";
When you call rex , you just need to specify the group:
rex -G "intranet" uptime
for all the computers to run the uptime action. You could also leave this detail out if you restrict the uptime task to the intranet group in the Rexfile:
task "uptime", group => "intranet", sub { ...The reduced-to-the-max command line is now: rex uptime . Multiple groups are listed in square brackets:
task "uptime", group => ["intranet", "accounting"], sub { ...Instead of listing groups, you can do:
task "uptime", "marvin", "zaphod", sub { ...to simply list the affected computers.
Verbose
Rex is quite chatty and writes each of its actions to the terminal. To help you keep track, the following statement tells Rex additionally to write all the messages to a file,
logging to_file => "rex.log";
or to the syslog:
logging to_syslog => "local0";
You need to add one of the two lines to the Rexfile before the first task. A word of caution: In both cases, only the messages generated by Rex itself end up in the logfiles. The returned uptime is only written on the terminal – that is, on the standard output device (Figure 2).
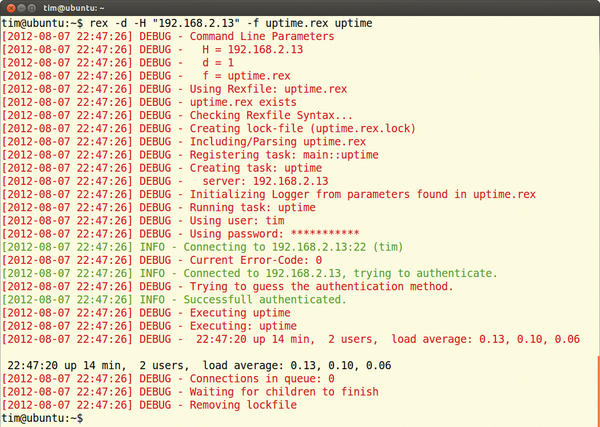 Figure 2: rex logs all of its actions on request, as shown here in the syslog. However, this does not include the output from the executed programs. Depending on the scope of the task, rex can swamp the syslog.
The Rexfile, extended with all of the features discussed here, is given in Listing 2.
Package Service
Listing 3 defines two tasks. The first, apacheinstall , installs the Apache web server on all servers (install package ) and starts it ( service ... "start" ).
Listing 3: Rexfile for Setting Up Apache
01 user "root";
02
03 Desc "Apache installation";
04 task "apacheinstall", sub {
05
06    install package => "apache2";
07    service "apache2" => "start";
08
09 };
10
11 Desc "Upload and sync configuration";
12 task "apache", sub {
13
14    apacheinstall();
15
16    file "/etc/apache2/httpd.conf",
17        source => "/templates/httpd.conf",
18        on_change => sub { service httpd => "reload"; };
19
20 };
It makes no difference which Linux distribution is running on the target system and which package manager it uses. Rex detects the system and automatically installs the package with the correct commands.
Note that, on all your target systems, the package with the web server must be titled apache2 . If one package manager calls the package apache-2 , this will lead to an error message. In heterogeneous network environments, you will thus typically need to define multiple tasks for different distributions or operating systems.
Checks Advisable
The second task in Listing 3, apache , enables the previously defined apacheinstall task. Thus, it ensures that the web server is properly installed in each case. It then copies the /templates/httpd.conf file to /etc/apache2/httpd.conf on each server. If the configuration file has changed in the meantime (and really only then), Rex automatically restarts Apache on the server. This is ensured by on_change .
Armed with this pair of tasks, the command line is quite simple:
rex -H "marvin" apache -p <root_password>
This command installs the Apache web server on the computer marvin and also injects the customized configuration file, /templates/httpd.conf . On the same principle, you can keep the configurations of all other computers on the network up to date.
In Listing 3, Perl aficionados should feel like they are on home ground. And, in fact, a Rexfile is simply a Perl script. Each task is a function you can call in other tasks – which explains the call to apacheinstall() in Listing 3. If you are not familiar with the Perl scripting language, you will find a quick introduction on the Rex homepage. The information there is fine for writing Rexfiles, so you don’t have to become a Perl guru (Figure 3).
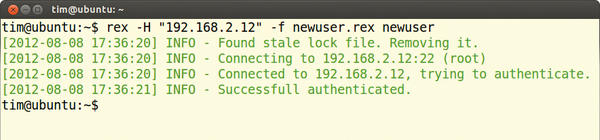 Figure 3: To troubleshoot errors in your own Rexfile, you can switch rex to debug mode with the -d parameter. This option tells the tool to log each and every action meticulously.
Personnel File
Along with the actions already presented, Rex includes many more. You can use them to, among other things, tinker with the network settings, kill running processes, and even access the Amazon Cloud. The developers have grouped thematically related functions in Perl modules, some of which are included by default. This includes, for example, the file upload in file from Listing 3. Others, such as the user management features, first must be added manually. Listing 4 shows an example.
Listing 4: Creating a New User Account
01 use Rex: :commands: :User;
02
03 user "root";
04 password "123456";
05
06 Desc "Create user";
07 task "newuser", sub {
08         create_user 'klaus' => {
09         home => '/home/klaus',
10         comment => 'Account for Klaus',
11         password => '123456',
12    };
13 };
To start, it binds the module Rex::Commands::User and reveals (for simplicity’s sake) the login credentials for the root user. Next, it creates a new user called Klaus on all of the remote machines (Figures 4 and 5).
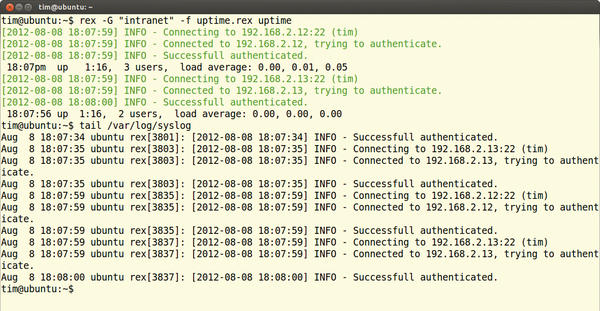 Figure 4: rex creates a user by calling the appropriate task from Listing 4, as …
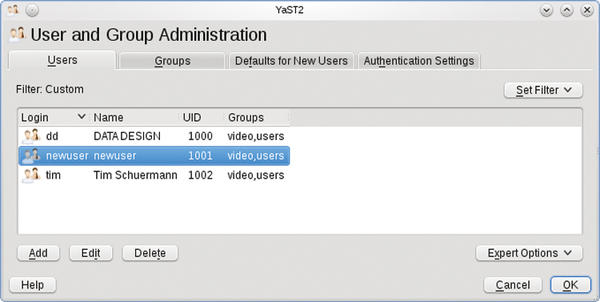 Figure 5: … user management on the client goes to prove.
To do this, it only needs to write the required information in a hash. For example, the line:
home => '/home/klaus',
shows the name of the future home directory. In addition to the hash entries shown in Listing 4, there are others, including:
expire => '2012-11-30',
You should be able to define the validity period for the account in this way, but in the Rex version current at the time of going to press, this action reproducibly threw a fault.
Here, create_user creates a new user, and delete_user deletes an account:
delete_user "klaus", {
   delete_home => 1,
};
The delete_home => 1 line additionally dumps the home directory into a black hole.
Annexed
The task in Listing 4 is tied to the user Klaus and is therefore anything but flexible. A more convenient approach would be to pass in the username when calling the task:
rex -H "marvin" newuser --username=klaus
Again, this is no problem, as Listing 5 shows.
Listing 5: Evaluating Parameters
01 user "root";
02 password "123456";
03
04 Desc "Create user";
05 task "newuser", sub {
06
07         my ($params) = @_;
08         run "useradd -m " . $params->{'username'};
09
10 };
The my ($params) = @_ line first grabs all additional parameters passed into rex in $params . The value of the username parameter is then stored in $params->{'username'} .
Listing 5 meaningfully passes this into the useradd command, which in turn creates the appropriate user account. In a similar style, you can add arbitrary additional parameters and queries. Incidentally, it is mandatory for these parameters to follow the task name in the call to rex (as in the example above).
Just as with useradd , some commands need to be root on the remote machine. To do this, the administrator can log in as root, as shown in the listings. However, some distributions, such as Ubuntu, disable the root user account.
To handle this, rex can, on request, issue each command as a sudo . You only need to add -s to the rex command line and pass in the required password with -S ,
rex -H "marvin" -s -S 123456 newuser --username=klaus
as shown here.
Conclusions
If you are fluent in Perl, Rex gives you a powerful and extremely flexible remote administration tool. The learning curve for the system is easily negotiated, and the remote machines only need an SSH server. Annoyingly, when writing tasks, you continually trip up over minor shortcomings, such as the non-functioning expire in user administration.
The documentation consists essentially of a still sparsely populated wiki and a few how-tos. However, Perl speakers should quickly feel at home and can plunge right into the function references.
Related content
-
Managing computers with Rex
 Just as subjects must obey their king, all the computers and servers in an organization should follow the administrator's commands. With Rex, you don't even need to leave your admin throne to organize this.
Subscribe to our ADMIN Newsletters
Subscribe to our Linux Newsletters
Find Linux and Open Source Jobs
Most Popular
Focus On Self-Hosting
• Self-Hosted Collaboration with Forgejo
• Self-Hosted PaaS with Coolify
• Build and Host Docker Images
• Self-Hosted Pritunl VPN Server with MFA
• Self-Hosted Chat Servers
Support Our Work
ADMIN content is made possible with support from readers like you. Please consider contributing when you've found an article to be beneficial.
