


Linux small business servers compared
Out of the Box
ClearOS Community
The setup routine of the Community version is based on Red Hat's Anaconda installer and requires only a little input from the user, such as a password for the root account. After the reboot, ClearOS presents an info page on which to select a standard browser or goes to the specified URL (https://<ClearOS-Server>:81 ) to log on to the web interface. A direct terminal login with the administrator account is also possible with Go to Command Line . The root account is also required to log on to the web interface, which welcomes the admin with a "Get Started Guide." Then, a wizard guides you through the most important basic settings, such as whether ClearOS is to be operated in Server (without a firewall), Public Server, or in Gateway Mode – reminiscent of ClearOS's origins as a router system. After the wizard completes its work, which basically takes care of the configuration of the network interface (Figure 4), the system then requests installation of available updates, which at the time of this test was limited to a few packages for the new version 6.3.
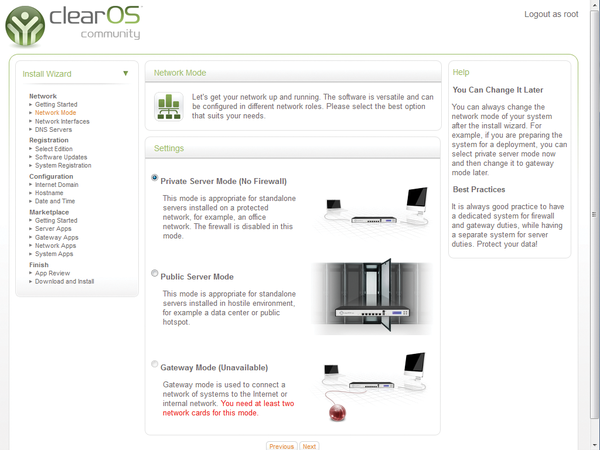 Figure 4: A configuration wizard guides you through important steps for a basic configuration of ClearOS – above all, the Network Mode.
Mandatory Registration
Once this is completed, the Community version requires the administrator to register the installation with a ClearCenter account; otherwise, no further components can be installed. In the process, the server name must be specified; however, in contrast to previous versions, it is no longer forced to include the poweredbyclear.com domain. Instead, the next step allows admins to choose freely the name of the DNS domain – called Internet Domain in ClearOS.
After specifying the time zone, the setup wizard automatically jumps to the Marketplace | Server Apps menu to allow installation of Apps from the ClearCenter Marketplace. This way, admins can add the functions of their choice to the basic package, which, in contrast to Zentyal, is much more limited (Figure 5).
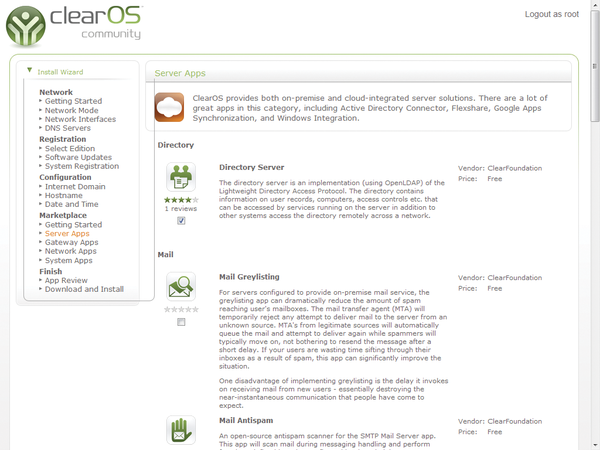 Figure 5: ClearOS follows the trend and packs its features in apps, which you can install from the marketplace.
The Clear Marketplace, whether the Community version or a commercial version has been installed, offers a rich range of free and paid apps. However, some – such as Windows Networking, FTP Server, Print Server, or SMTP Server – are basic functions. Apparently, many basic functions from previous versions have been moved to the marketplace.
The "Flexshares" app (Figure 6) is recommended. It not only helps make a shared directory accessible via SMB or FTP but also as a dropbox via the web server. However, this requires that the "Account Manager" be installed first, which in ClearOS is based on your choice of either OpenLDAP (built-in) or Active Directory. ClearOS offers to install the Active Directory Connector app from the marketplace, which requires that an Active Directory server is running (Figure 7). The configuration of OpenLDAP only requires the desired base domain to be specified.
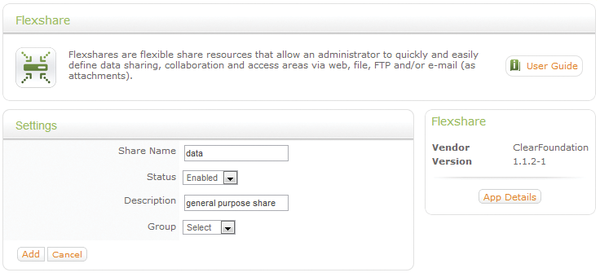 Figure 6: The Flexshare makes a shared directory accessible via SMB or FTP or as a Dropbox via the web server.
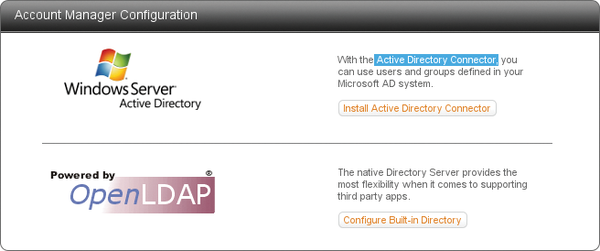 Figure 7: ClearOS supports OpenLDAP and Microsoft's directory service with the help of the Active Directory Connector commercial app.
Modern GUI
System administration is usually done via the web interface, but it is also possible on the server monitor, called the "graphical console" in ClearOS.
Compared with Zentyal, the ClearOS web interface looks more modern. At the top of the screen are links to the Dashboard, to the Marketplace, and for Login/Logout. The Dashboard displays current memory usage and provides functions for shutting down and rebooting the server. Navigation through the installed components and function groups can be done either on the navigation panel on the left or with the appealing drop-down menus along the top. The categories Server, Network, Gateway, and System are somewhat more coherent than in Zentyal.
Almost all functions in ClearOS 6.3 are available as apps, which fits well into the GUI concept. Each app shows its icon at the top of the main window of the web interface next to a short explanation, and to the right of that is a User Guide button, which calls up more detailed information. In the space below, the app shows the settings or status of the respective service. An area to the right shows the name of the app, as well as the manufacturer and version number; below that, a note listing Recommended Apps, which lists apps other admins have installed in addition, as well as app dependencies. A click on one of these names is enough to start installing the recommended app.

Buy this article as PDF
(incl. VAT)
Buy ADMIN Magazine
Related content
-
Linux infrastructure servers for small and midsize businesses
 Specialized Linux distributions are available for small and midsize businesses that promise economical and easy management of server applications and entire IT infrastructures. We looked at four of the best known candidates: ClearOS, NethServer, Zentyal, and Univention Corporate Server.
-
openSUSE LEAP 42.1 and ClearOS 7.2
The openSUSE community offers the "first Linux hybrid distro," which combines source from SUSE Linux Enterprise (SLE) with community contributions in an effort to provide a balance between innovation and maturity. ClearOS, also known as the Next-Generation Small Business Server, is an IT solution for homes, small to medium-sized businesses, and distributed environments.
-
ClearOS 7 Community Edition and Kali Linux
ClearOS provides a simple and easy-to-use platform for all layers of the IT environment. Offensive Security bills Kali Linux 2017.1 as their “most
advanced penetration testing distribution, ever”. -
Server distributions for small businesses tested
 Six all-in-one Linux server distributions and a NAS system for small businesses and workgroups feature comprehensive feature sets, simple administration, and services. Are these distributions worthwhile?
-
Zentyal Server 3.5
 Some users may struggle when setting up various services, such as web servers, email servers, firewalls, and the like. Zentyal simplifies configuration of all those things, thanks to its intuitive user interface.
Subscribe to our ADMIN Newsletters
Subscribe to our Linux Newsletters
Find Linux and Open Source Jobs
Most Popular
Focus On Self-Hosting
• Running Your Own Matrix Server with Synapse
• Reliable Network Storage with TrueNAS Community Edition
• Self-Hosted File Syncing with Seafile
• Wiring the Modern Stack with Node-RED
• Self-Hosted Collaboration with Forgejo
• Self-Hosted PaaS with Coolify
• Build and Host Docker Images
• Self-Hosted Pritunl VPN Server with MFA
Support Our Work
ADMIN content is made possible with support from readers like you. Please consider contributing when you've found an article to be beneficial.