Optimizing Windows 10 for SSDs
Ready for Takeoff
Many users find flash memory appealing, thanks to steadily falling prices and good performance. If you use solid state drives (SSDs) on computers, you should check some of the configuration options to be sure they make best use of the disks and to avoid premature failure. Windows 7 is the first Microsoft operating system to support SSDs correctly. Windows 8/8.1 and Windows 10 have extended this support.
Drivers and BIOS Settings
To make optimal use of SSDs, enable Advanced Host Configuration Interface (AHCI) mode in the BIOS/UEFI. This is not only faster than IDE mode, but also provides additional features, such as native command queuing. Thus, commands can be better managed and run because the tasks can be performed by the SSD itself. Of course, Windows also requires the matching driver for the SSD, which must be enabled for the controller to which you have connected the SSD; you can check this in the Device Manager (Figure 1):
1. Open the Device Manager by running devmgmt.msc.
2. Navigate to the driver for the controller and invoke its properties.
3. Switch to the Driver tab.
4. Click on Driver Details .
5. Load the driver with "ahci" in its name.
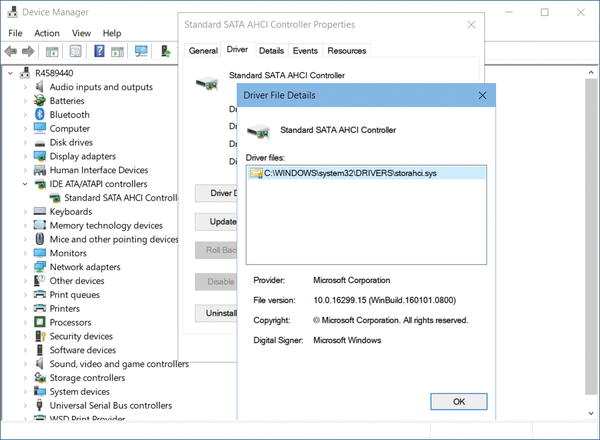 Figure 1: The driver for the SSD controller must support AHCI.
Buy this article as PDF
(incl. VAT)
Buy ADMIN Magazine
US / Canada
UK / Australia
Related content
-
Tuning SSD RAID for optimal performance
 Hardware RAID controllers are optimized for the I/O characteristics of hard disks; however, the different characteristics of SSDs require optimized RAID controllers and RAID settings.
 -
Redo Backup
 Redo Backup backs up complete hard drives locally or over a network. The focus is on simple operation and high reliability in a variety of deployment scenarios.
 -
Storage pools and storage spaces in Windows
 Storage spaces and storage pools combine a variety of storage technologies into a single logical unit, ensuring high availability and a choice of resiliency capability.
 -
TKperf – Customized performance testing for SSDs and HDDs
 SSD manufacturers try to impress customers with performance data. If you want to know more, why not try your own performance measurements with a standardized test suite that the free TKperf tool implements.
 -
The Benefit of Hybrid Drives
 People still use hard disks even when SSDs are much faster and more robust. One reason is the price; another is the lower capacity of flash storage. Hybrid drives promise to be as fast as SSDs while offering as much capacity as hard drives. But can they keep that promise?
Subscribe to our ADMIN Newsletters
Subscribe to our Linux Newsletters
Find Linux and Open Source Jobs
Most Popular
Support Our Work
ADMIN content is made possible with support from readers like you. Please consider contributing when you've found an article to be beneficial.
