« Previous 1 2 3 4 Next »
Secure access to Kubernetes
Avoiding Pitfalls
The first time you roll out a Kubernetes test cluster with kubeadm, superuser certificate-based access is copied to ~/.kube/config on the host, with all options open. Unfortunately, it is not uncommon for clusters used in production to continue working this way. Security officers in more regulated industries would probably shut down such an installation immediately. In this article, I seek to shed some light on the issue and show alternatives.
Three Steps
Kubernetes has a highly granular authorization system that influences the rights of administrators and users, as well as the access options to the running services and components within the cluster. The cluster is usually controlled directly by means of an API and the kubectl command-line front end. Access to the kube-apiserver control component is kept as simple as possible by the Kubernetes makers. Developers who want to build more complex services in Kubernetes can take advantage of this system.
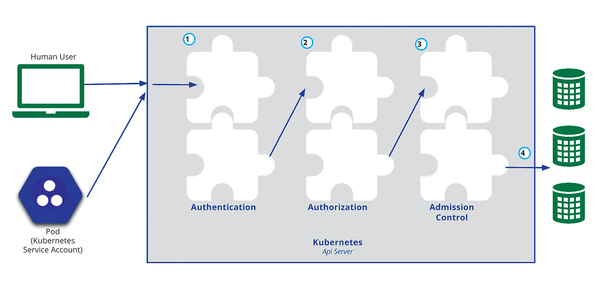
The official Kubernetes documentation is a useful starting point [1] if you want to understand the access control strategies that Kubernetes brings to the table. Figure 1 shows the different components and their interaction within a cluster. All requests run through the API server and pass through three stations: authentication, authorization, and access control.
Buy this article as PDF
(incl. VAT)
Buy ADMIN Magazine
Related content
-
Linking Kubernetes clusters
 When Kubernetes needs to scale applications, it searches for free nodes that meet a container's CPU and main memory requirements; however, when the existing hardware is at full capacity, the Kubernetes Cluster Federation project (KubeFed) takes the pain out of adding clusters.
 -
Monitoring container clusters with Prometheus
 In native cloud environments, classic monitoring tools reach their limits when monitoring transient objects such as containers. Prometheus closes this gap, which Kubernetes complements, thanks to its conceptual similarity, simple structure, and far-reaching automation.
 -
Run Kubernetes in a container with Kind
 Create a full-blown Kubernetes cluster in a Docker container with just one command.
 -
Kubernetes clusters within AWS EKS
 Automated deployment of the AWS-managed Kubernetes service EKS helps you run a production Kubernetes cluster in the cloud with ease.
 -
KubeVirt integration in OpenShift and Rancher
 We describe how OpenShift and Rancher use their different architectures to integrate KubeVirt, an extension used by Kubernetes to operate virtual machines in addition to containers.
Subscribe to our ADMIN Newsletters
Subscribe to our Linux Newsletters
Find Linux and Open Source Jobs
Most Popular
Support Our Work
ADMIN content is made possible with support from readers like you. Please consider contributing when you've found an article to be beneficial.
