A GUI for Warewulf 4
I think virtually everyone in HPC knows the Warewulf open source cluster provisioning and management tool. I wrote about Warewulf starting with Warewulf 3, followed by a series on Warewulf 4. Since the beginning of the Warewulf 4 series, Greg Kurtzer, the original developer of Warewulf, formed the company CIQ to develop and support many products, such as Rocky Linux and Fuzzball, but I’m focusing on Warewulf. As of the writing of this article (May 2025), Warewulf version 4.6.1 is current.
Warewulf has proven to be very popular, with installations at hundreds of research universities, national laboratories, and commercial environments. It is easy to use, has great flexibility, and is stateless (no installation on a drive in each node). You can use it to boot groups of nodes with a particular distribution and kernel, or install certain packages on these groups of nodes, or do both. If you update the distribution, kernel, or package list of a group of nodes, you can just reboot those nodes, which then get the latest version of that distribution and kernel combination, or you can reboot a node and have it boot with a new image, perhaps with a different distribution.
Traditionally, Warewulf has been a command-line tool, which allows it to be incorporated into scripts that run from a terminal. However, for a while, people have asked about a graphical user interface (GUI) to use and manage Warewulf. Back in the Warewulf 3 days, Doug Eadline, Glen Otero, and I talked about an Enterprise Edition of Warewulf that would have included a GUI, but in the 24 years Warewulf has been around, no GUI has really appeared, until now.
CIQ just announced a GUI for Warewulf 4 for provisioning and managing nodes and gave a webinar about the new web user interface (UI). Very soon you will be able to sign up for a tech preview.
Why a UI?
Traditionally Warewulf has been a command-line tool, so why would a UI be useful? Those people who have not used Warewulf before might find that a UI makes the toolkit more approachable (i.e., like other tools they're used to) for getting started, before they move on to use the command line in the future.
Also, at some point in the future, the UI could be integrated into an overall cluster tool or integrated into other tools from CIQ partners. A simple example would be to combine virtual machine management and Warewulf into a single UI so that the creation of a virtual machine within a cluster would add it to Warewulf and then allow it to be managed from the Warewulf UI. In addition to integrating Warewulf into a larger UI, more automation could be brought in, as in the previous example of creating a VM on a Warewulf node and bringing that into Warewulf.
A UI also allows a Warewulf cluster to be more discoverable, wherein the UI reads the Warewulf configuration and then presents it to the user. Moreover, if you have a complex configuration, the UI will present the total configuration to you.
Before creating a UI, particularly a web UI, Warewulf needed a REST (representational state transfer) API.
REST API
A REST API is a set of rules and guidelines for building web services that use HTTP requests and responses to communicate between the client and server. This API is a companion to Warewulf and is released under an open source license. Because it is still under development, it can change and evolve; however, it is complete enough for CIQ to offer a tech preview of the web UI. Warewulf version 4.6.1 is the first version to contain this REST API.
Right now, the REST API is disabled by default because it exposes some privileged operations (root-level operations and commands). Therefore, because you have to pay attention to enabling these operations, it’s not a feature that is enabled without your knowledge; rather, it is enabled in the Warewulf configuration file (/etc/warewulf/warewulf.conf ). You then add a section to the configuration file:
api:
  enabled: true
  allowed subnets:
    - 127.0.0.1/8
    - ::1/128
    - 192.168.64.1/32
(Note: This code is from the webinar.)
By default, the API once enabled, is only accessible from the Warewulf server itself (the first two lines of the subnets). The third subnet allows the API to be available outside of the server – in this case, the 192.168.64.1/32 network. You could even add individual servers.
The next step is to authenticate for access to the API, which occurs in the Warewulf configuration file /etc/warewulf/auth.conf , and define users who can access the API (please don’t give access to all users). If you watch the webinar, you will see how to add users to the authentication file.
If you want or need to, you can go to a specific URL (e.g., rocky.local:9873/api/docs#/ ) to get a list of the available Warewulf APIs (Figure 1). Clicking the expand arrow to the right of an item shows an explanation of the API function of interest.
 Figure 1: Warewulf API list (used with permission from CIQ; All Rights Reserved).
The documentation also presents some sample code for using a specific API function. From within the documentation, you can execute a command to access that API, and it will produce JSON output to a small window for inspection (Figure 2). The documentation is quite good and includes live documentation rather than lots of static examples that cannot be tested.
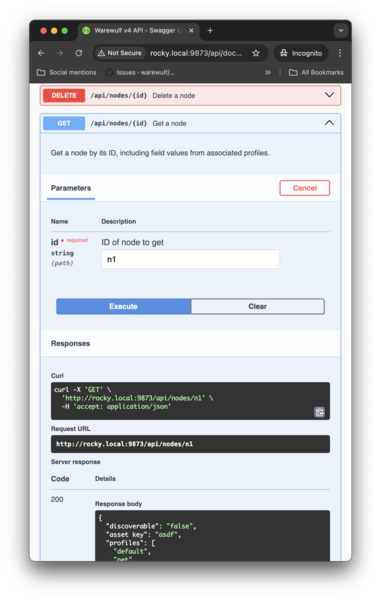 Figure 2: Warewulf GET node API documentation (used with permission from CIQ; All Rights Reserved).
In this screenshot, the GET node API documentation has been expanded, showing a quick explanation and the parameters used by the API (input and output) as you move down the image. Next is an example of how the API can be used with a curl command and the requested URL for the n1 node information. Part of the output of the command can be seen in the dark window at the bottom. This live session lets you try different commands to interact with the API.
Web UI
With so many options for creating a web interface, you could drive yourself mad trying out even just a fraction of them. Some options are fairly easy to use, and others are complicated (e.g., assembly code for web interfaces). CIQ chose a very practical route for the web UI and uses Cockpit.
Cockpit
Cockpit is a Red Hat (IBM)-sponsored web UI project for Linux servers to manage and monitor common tasks or services. On the website, you will see the tasks and services down the left-hand side. At the top, the Apps heading has a short menu, usually with Image Builder as the only entry, assuming you have installed Image Builder and integrated it with Cockpit.
Continuing down the left side is another section, System, with system functions such as,
- Logs
- Storage
- Networking
- Podman containers (if you installed Podman)
- Virtual machines
- Accounts
- Services
- Navigator
as well as a list of Tasks, including:
- Applications
- Development
- Diagnostic reports
- File browser
- Kernel dump
- SELinux
- Software updates
- Terminal
You can control many things in Cockpit, but you must configure them. It’s not difficult.
CIQ takes advantage of Cockpit’s extensibility by adding Warewulf to the list of system functions. Other advantages of Cockpit include:
- faster UI development
- no need to introduce a completely new daemon, new interface, and new paradigm
- encouragement of its use as a kind of side benefit
What Does the Web UI Do?
To get to Cockpit, open it in a browser (e.g., rocky.linux:9090/ for a Rocky Linux installation on a Warewulf server – you should start on a Warewulf server). After clicking Warewulf on the left-hand side of the screen, you see four tabs (Figure 3):
- Nodes : systems provisioned by Warewulf
- Profiles : categories of nodes with a shared configuration
- Images : operating system payloads for deployment
- Overlays : built-in and site-specific customizations layered onto provisioned nodes
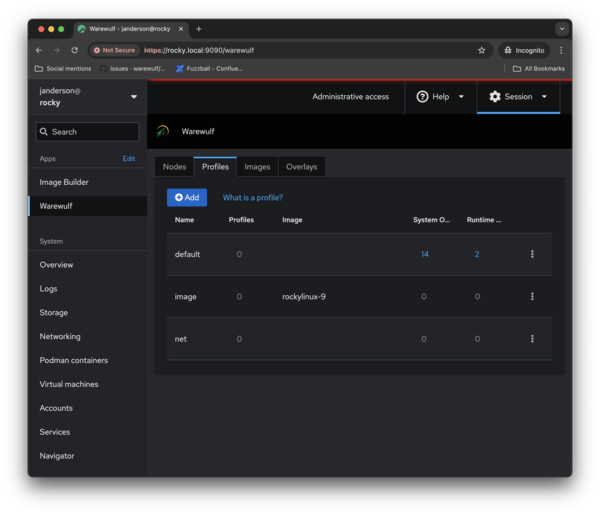 Figure 3: Warewulf web UI tabs (used with permission from CIQ; All Rights Reserved).
I will switch between light and dark themes in the figures to show you a couple of options you can use. For this image, the Profile tab has been chosen in the dark theme.
When the Nodes tab is clicked, it creates a list of the nodes in the specific Warewulf cluster with information in the Name, Profiles, Image, and Overlays columns (the four major food groups in Warewulf, so to speak; Figure 4).
 Figure 4: Warewulf web UI Nodes tab (used with permission from CIQ; All Rights Reserved).
The web UI also allows you to change the node parameters for a specific node (Figure 5), and you can discover the profile list by clicking on the Profile tab. If you go back to Figure 3, you see what the profile tab initially presents.
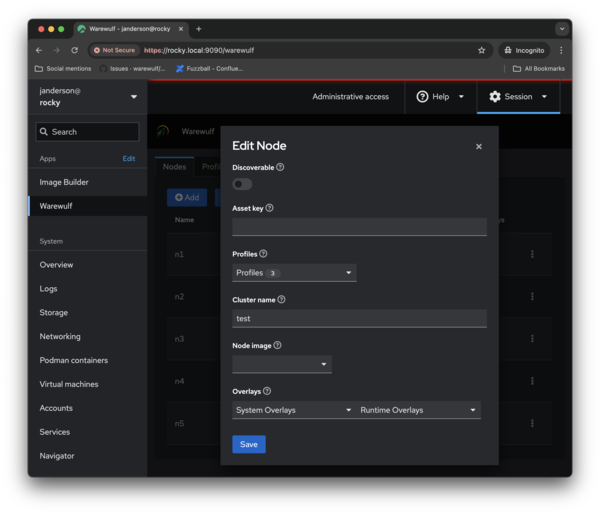 Figure 5: The Warewulf web UI lets you edit the parameters of a specific node (used with permission from CIQ;All Rights Reserved).
The images used in Warewulf can be discovered, created, changed, removed, and updated from within the GUI. Figure 6 shows a list of images within Warewulf, even if they aren’t used by any nodes. Perhaps more importantly, it shows the build date and time of a specific image. To the right is a vertical ellipsis that brings up a dialog box with details for that image.
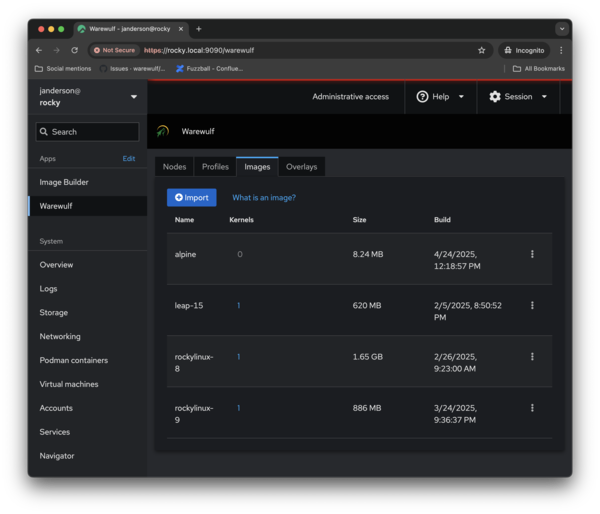 Figure 6: Warewulf web UI Images tab (used with permission from CIQ; All Rights Reserved).
The last tab in the web UI is Overlays , which allows you to customize any node under the control of Warewulf. As shown in Figure 7, some overlays are defined as falling under the NetworkManager , debin.interfaces , or debug categories.
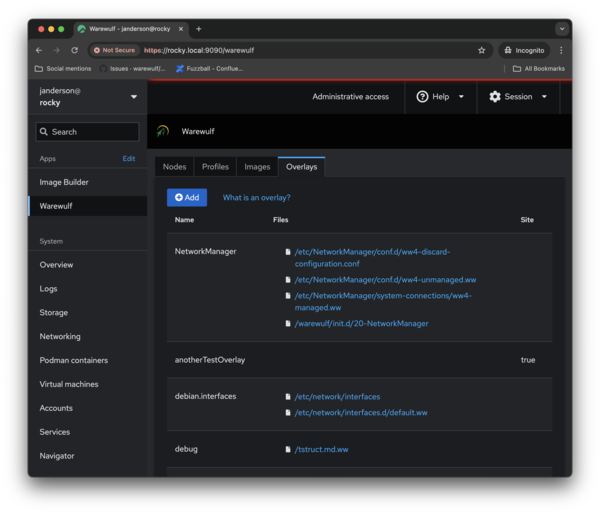 Figure 7: Warewulf web UI Overlays tab (used with permission from CIQ; All Rights Reserved).
In Figure 8, you can see how an overlay can be rendered for a node (in this case node n1 ).
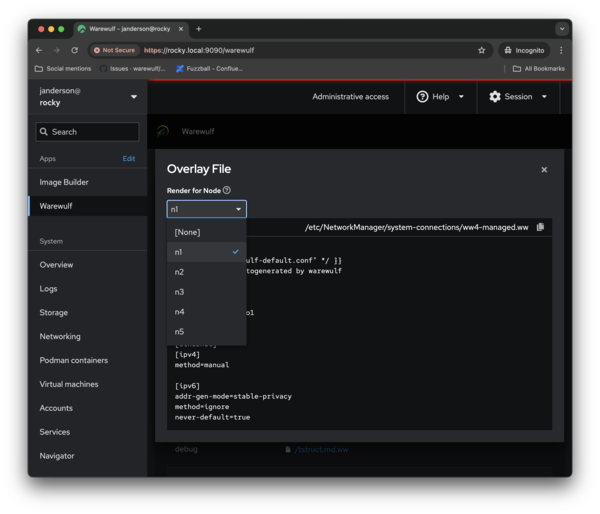 Figure 8: Warewulf web UI Overlays tab (used with permission from CIQ; All Rights Reserved).
Summary
Traditionally Warewulf has been a command-line tool; however, this arrangement sort of limits the applicability of Warewulf to admins comfortable at the command line. By creating a web UI, the community and market is expanded, allowing beginners come up to speed more quickly with Warewulf. Perhaps they will commute to the command-line interface as they become more proficient, but they can do everything they need to do in the web UI.
As mentioned, the web UI will soon be in tech preview, which presents an opportunity for you to use and provide feedback on the web UI. Plus, you can help Warewulf in general with the API feedback (don’t skip looking at the API): Just go to the CIQ web page and navigate to Warewulf under Products to see the sign-up page.
After the tech preview, the web UI will become a CIQ value-add product. The Warewulf project has invested resources in developing the GUI, and they need to monetize the results to keep the UI going. Most importantly, this product will allow Warewulf to continue and continue improving. No details have been released on how the final web UI will look, but keep in touch with CIQ to learn its future.
Related content
-
Warewulf 4

Warewulf 4 is ready to help you build an HPC cluster.
-
Warewulf 4 – Python and Jupyter Notebooks

Interactive HPC applications written in languages such as Python play a very important part today in high-performance computing. We look at how to run Python and Jupyter notebooks on a Warewulf 4 cluster.
-
Warewulf Cluster Manager – Master and Compute Nodes

The Warewulf stateless cluster tool is scalable and highly configurable, and it eases the installation, management, and monitoring of HPC clusters.
-
Warewulf 4 – GPUs

Install NVIDIA GPU drivers on the head and compute nodes.
-
News for Admins
In the news: IBM and AMD Partner on Quantum-Centric Supercomputing Initiative; Python Documentary; NVIDIA Announces Spectrum-XGS Ethernet; Rackspace Adds AI Security Engine to Its Cyber Defense Center; Microsoft Contributes DocumentDB to the Linux Foundation; OCCTET Project Created to Simplify CRA Compliance; Debian Announces Version 13 "Trixie"; CIQ Announces General Availability of Warewulf Pro; TuxCare Radar Vulnerability Scanner; CISA Releases Thorium for Automated Malware Analysis; Stack Overflow Survey: 66% of Developers Frustrated by AI Inaccuracy; and Intel Shuts Down Clear Linux OS.
Subscribe to our ADMIN Newsletters
Subscribe to our Linux Newsletters
Find Linux and Open Source Jobs
Most Popular
Focus On Self-Hosting
• Self-Hosted PaaS with Coolify
• Build and Host Docker Images
• Self-Hosted Pritunl VPN Server with MFA
• Self-Hosted Chat Servers
• Self-Hosted Remote Support with RustDesk
Support Our Work
ADMIN content is made possible with support from readers like you. Please consider contributing when you've found an article to be beneficial.
