« Previous 1 2
Setting up MariaDB replication with the help of XtraBackup
Double Protection
Data is valuable, and owners want to protect it against loss. The first choice is usually a backup; however, the disadvantage of the classic periodic backup is that data that has changed after the last backup is lost. A potential solution is replication – that is, transferring all the changes to a storage location that is a copy of the working infrastructure. This approach also supports load balancing if the second system is made available to users for read-only access. To define the terms, I'll conduct a brief tour through the different types of replication (Figure 1).
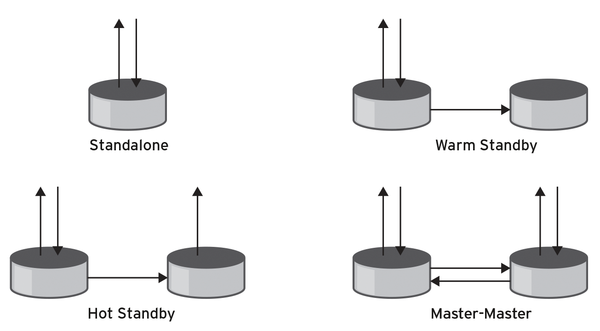 Figure 1: The different types of standby solutions depend on whether and to what extent the second node can be used.
Variants
In a "standalone" instance, nothing is replicated, and "cold standby" means that the backup system only starts up after its counterpart has failed. Here, too, it is not absolutely necessary to replicate; it is sufficient if the backup system can access a storage medium that it shares with the primary system.
A "warm standby" has a primary machine that handles all the write and read operations, with a secondary machine also running and continuously
...Buy this article as PDF
(incl. VAT)
Buy ADMIN Magazine
Related content
-
MySQL is gearing up with its own high-availability Group Replication solution
 Oracle recently introduced Group Replication as a trouble-free high-availability solution for the ubiquitous MySQL.
 -
MariaDB MaxScale: A smart proxy for MySQL
 MaxScale by MariaDB is a smart proxy server for MySQL that speaks the same protocol as the database server. The manufacturer claims solid high availability and horizontal scalability.
 -
Galera Cluster for MySQL
 The longer a MySQL database is in use, the less you can do without it, so as your organization grows, you will eventually face the question of availability. Galera Cluster for MySQL is one possible answer.
 - TokuDB v6.0 Released
-
New features in MariaDB 10.3
 What lacked maturity in MariaDB 10.2 has now been sorted out in version 10.3. We look at the benefits you can reap now.
Subscribe to our ADMIN Newsletters
Subscribe to our Linux Newsletters
Find Linux and Open Source Jobs
Most Popular
Support Our Work
ADMIN content is made possible with support from readers like you. Please consider contributing when you've found an article to be beneficial.
