Keeping it simple – the Ansible automator
The Easiest Way
The Ansible IT automation tool makes it easy to introduce automation into your environment. In this article, I introduce Ansible and its basic capabilities and how to use them, and I discuss which components in the Ansible camp make an admin's life easier. Toward that end, I venture a look at Ansible's future under the current owner Red Hat.
Early Steps
In 2014, the world of automation on Linux was very different from today. I had just started a job in Berlin that involved building an OpenStack platform. Puppet fans set the tone in the company, so the idea was for the OpenStack cloud to be something for the Puppet players, too. However, OpenStack was far removed from its current level of maturity at the time, and the modules offered by the developers were more of a big mess than a solution that could be used in production. What this meant in terms of daily development of the platform soon came to light in an extremely unpleasant way.
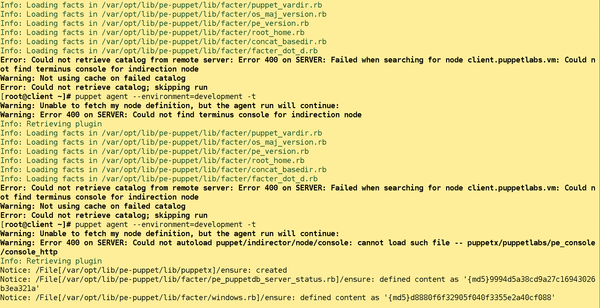
The Puppet usage that the OpenStack developers specified was inefficient and slow. Before Puppet even started to change anything on the systems, several minutes could pass. In the worst case, the process ended up producing an error that kicked an entire hour of Puppet runtime into the gutter (Figure 1). Puppet offered little comfort because the OpenStack developers did not have a handle on versioning their modules but allowed the individual modules to reference each other wildly.
...
Buy this article as PDF
(incl. VAT)
Buy ADMIN Magazine
Related content
-
The 10 best tricks for taming Ansible
 Ansible is considered by far the most practical automation tool, but in many places, quirks make life with the tool unnecessarily complicated. We reveal the 10 best tricks for Ansible on Linux.
 -
Jira, Confluence, and GitLab
 Jira, Confluence, and GitLab are very popular DevOps tools and often form the basis for agile work flows. With the right Ansible playbooks, Ubuntu can be turned into an agile work center.
 -
Ansible as an alternative to the Puppet configuration tool
 Automation is part of life in the data center, and Puppet is commonly regarded as the King of the Hill, but some users prefer the lean alternative Ansible.
 -
Quick patches with Ansible
 Ansible has earned an excellent reputation as a tool for configuration management. Thanks to playbooks, updates are more or less child's play.
 -
DebOps delivers easy Ansible automation for Debian-based systems
 Ansible is a simple and sensible automation solution, except for the time needed to create new roles and playbooks. The DebOps collection of Ansible playbooks for Debian-based Linux systems solves this problem.
Subscribe to our ADMIN Newsletters
Subscribe to our Linux Newsletters
Find Linux and Open Source Jobs
Most Popular
Focus On Self-Hosting
• Self-Hosted Collaboration with Forgejo
• Self-Hosted PaaS with Coolify
• Build and Host Docker Images
• Self-Hosted Pritunl VPN Server with MFA
• Self-Hosted Chat Servers
Support Our Work
ADMIN content is made possible with support from readers like you. Please consider contributing when you've found an article to be beneficial.
