OpenCL
Getting Started
To demonstrate OpenCL in action, I will start with a simple example to solve a parallelizable problem with OpenCL on a video card. The starting point is a C++ implementation that convolves a grayscale image.
Convolution [11] is a mathematical operation performed on two functions to produce a third function. In this case, the components consist of an input image, a second matrix known as the convolution kernel, and an output image. Applications for this technique include image manipulations, such as Gaussian blurs, sharpening, motion blur, and gradients.
Figure 2 shows examples of various convolutions based on the input image shown in Figure 1.
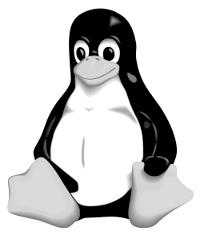 Figure 1: The input image: Larry Ewing's Tux.
 Figure 2: Convolutions of Tux.
The first step is to store the grayscale image in a simple structure whose height, width, and data are stored in a uchar array (Listing 1, lines 1-5). The *data field concatenates the data values of the lines. The following image:
A B C
D E F
would thus be represented as width = 3, height = 2, data = {A, B, C, D, E, F}. The convolution kernel is similarly structured but uses float instead of uchar, as you can see in line 10 of the listing. The convoluting process doesn’t require much code, as you can see in line 26 of Listing 1.
Listing 1: CPU Solution
 01 typedef struct {
 02     uint width;
 03     uint height;
 04     uchar *data;
 05 } grayImage;
 06
 07 typedef struct {
 08     uint width;
 09     uint height;
 10     float *data;
 11 } convolutionKernel;
 12
 13
 14 /**
 15  * Clamp value to limits of uchar.
 16  */
 17 uchar clampuchar(int value)
 18 {
 19   return (uchar) std::min((int) std::numeric_limits<uchar>::max(), std::max(value, (int) std::numeric_limits<uchar>::min()));
 20 }
 21
 22 /**
 23  * Convolve a grayscale image with a convolution
 24  * kernel on the CPU.
 25  */
 26 grayImage convolve(grayImage in, convolutionKernel kernel)
 27 {
 28   grayImage out;
 29   out.width = in.width ‑ (kernel.width ‑ 1);
 30   out.height = in.height ‑ (kernel.height ‑ 1);
 31   out.data = new uchar[out.height * out.width];
 32
 33   // Iterate over all pixels of the output image
 34   for(size_t y = 0; y < out.height; ++y)
 35   {
 36     for(size_t x = 0; x < out.width; ++x)
 37     {
 38        float convolutionSum = 0.0f;
 39
 40         // Iterate over convolution kernel
 41         for(size_t ky = 0; ky < kernel.height; ++ky)
 42         {
 43             for(size_t kx = 0; kx < kernel.width; ++kx)
 44             {
 45                // Add weighted value to convolution sum
 46                convolutionSum += in.data[(y + ky) * in.width + (x + kx)] * kernel.data[ky * kernel.width + kx];
 47             }
 48         }
 49         // Clamp values to {0, ..., 255} and store them
 50         out.data[y * out.width + x] = clampuchar((int) convolutionSum);
 51     }
 52   }
 53   return out;
 54 }
You probably immediately noticed that the convolution process involves four nested for loops. The two outer loops in lines 34 and 36 iterate over all the pixels in the target image. The two inner loops in lines 41 and 43 iterate over all kernel positions and weight the pixels of the input image with the kernel values. The weighted values are added and written to the pixels (x, y) of the output image (lines 46, 50). In this case, the width and height of the output image are kernel.width ‑ 1 and kernel.height ‑ 1. To maintain the size of the input image, you need to enlarge the outer pixels of the input image in the outward direction, but this action means more side effects, which could compromise clarity.
The clampuchar(int value) method (line 50) prevents values outside of the uchar definition ({0, …, 255}) from creating under- or overflow; instead, they are mapped to the extremes (0, 255). clampuchar(260) == 255, clampuchar(‑5) == 0, and clampuchar(14) == 14 are just a few examples.
Parallelizable?
If you look at the structure of the convolution, you will see that exactly the same instructions are performed for each pixel in the output image, but for neighboring data.
If you want to execute the convolution kernel in parallel for each pixel of the output image, the pseudocode would look something like Listing 2. Basically, you just replace the two outer loops with a fictive “do in parallel … .”
Listing 2: Pseudocode for Execution in Parallel
 01 // Do in parallel
 02 for all y in {0, ..., out.height ‑ 1} and all x in {0, ..., out.width ‑ 1}
 03 {
 04     float convolutionSum = 0.0f;
 05
 06     // Iterate over convolution kernel
 07     for(size_t ky = 0; ky < kernel.height; ++ky)
 08     {
 09       for(size_t kx = 0; kx < kernel.width; ++kx)
 10
 11       {
 12         // Add weighted value to convolution sum
 13         convolutionSum += in.data[(y + ky) * in.width + (x + kx)] * kernel.data[ky * kernel.width + kx];
 14       }
 15     }
 16     // Clamp values to {0, ..., 255} and store them
 17     out.data[y * out.width + x] = clampuchar((int) convolutionSum);
 18 }