Virsh Libvert Tool

The libvirt project has set the objective of creating a standardized management center for a variety of virtualization solutions and hypervisors. Many administrators in production environments only know it as the colorful virt-manager front end, which manages virtual machines on Qemu/KVM. However, virt-manager isn’t even part of the libvirt project, which only provides a handful of command-line programs, one of which is the overlooked but essential virsh .
Building Blocks
Like any other libvirt tool, virsh relies on the libvirt library, which in turn provides the interface to the libvirtd daemon. The daemon runs on the machine hosting the virtual machines, also known as a node, and controls the hypervisor operations (Figure 1), making libvirtd basically indispensable to administrators.
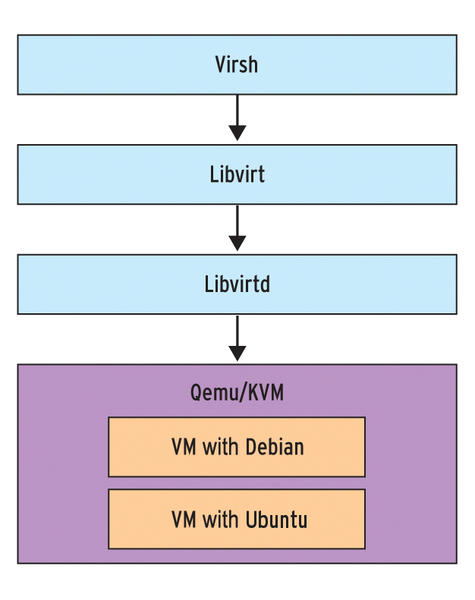 Figure 1: Virsh passes the commands on to the other libvirt package components.
After installing libvirt , you can immediately start using virsh – at least normally you can. Many distributions, two of them being Debian and Ubuntu, have offloaded the libvirt tools into a separate package. In this case, you need to install virsh by installing the libvirt-bin package: The counterpart on openSUSE goes by the name of libvirt-client .
To make sure the program in place on your disk is working, just type virsh version . If you see an error message, you need to become root and try your luck again. If virsh tells you something about a connection error, you need to enable the libvirtd . Most distributions will launch the daemon automatically after you install the libvirt packages, but some manual attention is required in some cases – on openSUSE 11.3, you would issue the rclibvirtd start command, for example. After doing this, virsh version should output the version numbers of the components involved and then wait for more commands.
URIs
Typing the line
virsh -c qemu:///system list --all
connects Virsh (-c for connect) with Qemu on the current system and lists all existing virtual machines, including those running and paused (--all ). The cryptic qemu:///system is a Uniform Resource Identifier (URI; Table 1) that allows virsh to state the virtualization solution in use.
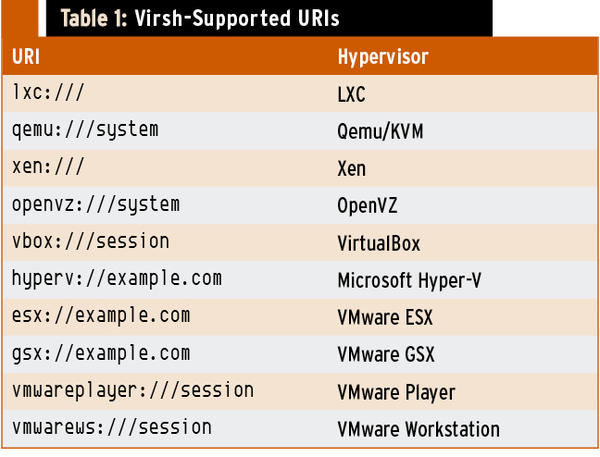
In this example, it is Qemu/KVM. Table 1 lists other supported URIs. Libvirt, and thus also virsh, can basically control virtual machines on Qemu/KVM, Xen, LXC, OpenVZ, VirtualBox, Microsoft Hyper-V, and VMware ESX, GSX, Workstation, and Player.
For this to work, libvirt needs to be built with the corresponding support enabled (or the corresponding drivers in place). The libvirt packages provided by some distributions are versions that can only cooperate with Qemu/KVM. The following examples thus focus on this virtualization solution.
If the virtual machine is running on a remote machine, you need to integrate the IP address or domain name into the URI. The command
virsh -c qemu://example.com/system list --all
lists all the virtual machines running on host example.com . If needed, you can stipulate the connection type:
virsh -c qemu+ssh://admin example.com/system list --all
Here, virsh opens a connection to the host named example.com and the user admin using a secure SSH connection to do so. For more examples of the URI structure, see the libvirt hypervisor web page.
To save typing, you can store the URI in the VIRSH_DEFAULT_CONNECT_URI environment variable and then do without it for future calls to virsh:
export VIRSH_DEFAULT_CONNECT_URI=qemu:///system
virsh list --all
The following provides information on the debian virtual machine (see Figure 2),
virsh -c qemu:///system dominfo debian
and
virsh -c qemu:///system nodeinfo
returns the current status of the guest.
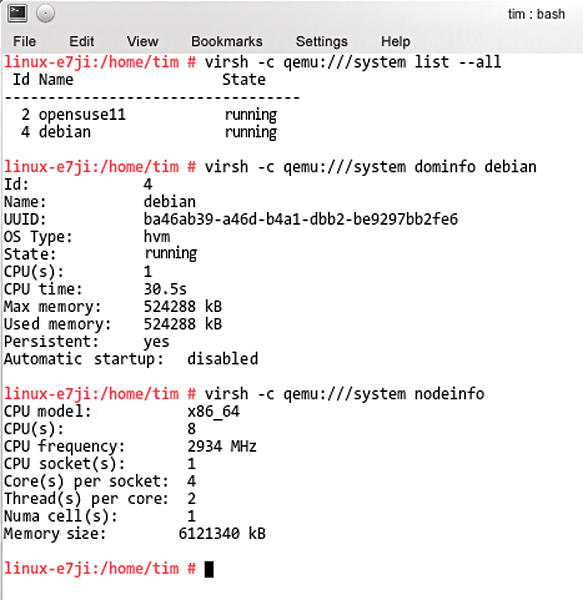 Figure 2: Two virtual machines are running on this host; the machine named debian only uses one CPU, although the physical processor could give it more. The information is sent to standard output and can be dissected with grep.
Executed
The following command uses ACPI to shut down a virtual machine named debian , which is currently twiddling its thumbs:
virsh -c qemu://system shutdown debian
If the virtual machine doesn’t respond, you can also force this by issuing the
virsh -c qemu:///system destroy debian
command. To view and modify the configuration of the virtual machine, whichever way it was switched off, you can type:
virsh -c qemu:///system edit debian
This launches Vim and opens the matching XML file. If the Vim editor is too spartan for your liking, you can dump the XML into a text file with,
virsh -c qemu:///system dumpxml debian > /tmp/debian.xml
modify the file manually, and use it to create a new virtual machine:
virsh -c qemu:///system create /tmp/debian.xml
At first glance, this kind of management might seem more complex than a graphical interface; however, you can add the commands to a (Bash) script and thus semi-automatically start a number of virtual machines or change their configurations, retrospectively.
Tweaking and Tinkering
To modify memory use and the number of processors available to a virtual machine, you don’t need to access the XML file. Instead, each tweak has a practical and short command. For example,
virsh -c qemu:///system setmem debian 250000
assigns 250,000KB of memory to the debian virtual machine, and the following command assigns two virtual CPUs:
virsh -c qemu:///system setvcpus debian 2
The migrate command moves a virtual machine to another host:
virsh -c qemu:///system migrate --livedebian qemu://example.com/system
This moves the debian virtual machine to the example.com machine, with --live forcing the migration.
Shell
Virsh also supports an interactive mode. If you leave out the parameters, you automatically enter this mode, as in:
virsh -c qemu///system
In the virsh shell, you also can run the commands mentioned previously, such as list --all ; quit takes you back to the operating system shell. If needed, you can even type
virsh -c qemu:///system console debian
to access the console on an active virtual machine.
Conclusions
Although virsh syntax can be difficult to grasp, you will find yourself integrating the tool into your own Bash scripts after a short learning curve. After doing so, a short status report on your active virtual machines is a one-liner – and much quicker than clicking you way through the statistics tabs in virt-manager. Virsh supports more even commands (Table 2) and actions (see the “Top Tool!” box).

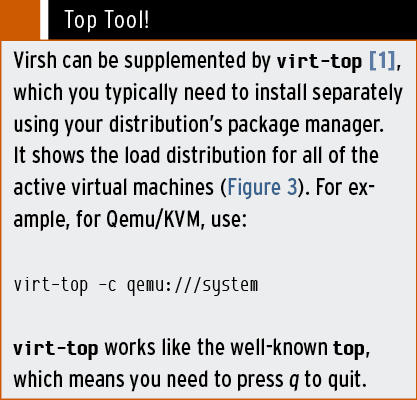
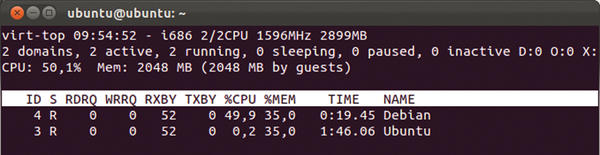 Figure 3: The virt-top tool shows the load distribution for all the active virtual machines.
For an initial overview, just type virsh help or consult the incomplete virt-top reference.
Info
[1] virt-top
Related content
-
Remotely controllingvirtual machines with virsh
 With the command-line tool virsh, a part of the libvirt library, you can query virtual machines to discover their state of health, launch or shut down virtual machines, and perform other tasks – all of which can be conveniently scripted.
 -
Live snapshots with Virtual Machine Manager
 In the scope of developing Fedora 20, the live snapshot function, which has long been supported by libvirt, was integrated with the graphical front end. If you prefer to avoid command-line acrobatics à la Virsh, you can now freeze your virtual KVM and Xen machines in VMM at the press of a button.
 -
Secure Your KVM Virtual Machines
 A common misconception posits that software cannot cause mischief if you lock the system away in a virtual machine, because even if an intruder compromises the web server on the virtual machine, it will only damage the guest. If you believe this, you are in for a heap of hurt.
 -
Managing virtual machines
 With just a couple of command-line tools and DIY scripts, you can easily clone and manage your virtual machines. Dynamic DNS updates ensure that your virtual servers are immediately accessible on the network.
 -
Building Virtual Images with BoxGrinder and VMBuilder
Creating a virtual machine manually is straightforward but too time consuming if you regularly need to set up many virtual machines. The BoxGrinder and VMBuilder programs let you automate this process.
Subscribe to our ADMIN Newsletters
Subscribe to our Linux Newsletters
Find Linux and Open Source Jobs
Most Popular
Focus On Self-Hosting
• Self-Hosted Collaboration with Forgejo
• Self-Hosted PaaS with Coolify
• Build and Host Docker Images
• Self-Hosted Pritunl VPN Server with MFA
• Self-Hosted Chat Servers
Support Our Work
ADMIN content is made possible with support from readers like you. Please consider contributing when you've found an article to be beneficial.
