© Alessandro Russo, 123RF.com

© Alessandro Russo, 123RF.com

Changes in Exchange Server 2013

New Clothes

Article from ADMIN 13/2013
By
Exchange Server 2013 sees Microsoft complete the latest version of its groupware solution. In this article, we introduce new features in the server and reveal which features have been eliminated.

During the installation of Exchange Server 2013 [1], you will notice that the new server offers far fewer options. Microsoft has dumped the Hub Transport and Unified Messaging server roles. The functions of these two roles are handled by the Mailbox server and the Client Access server in the new version.

Email transport in Exchange Server 2013 is handled by three services: the Front End Transport Service (FET), the Hub Transport Service (HT), and the Mailbox Transport Service (MT), which now belong to the Mailbox server role. The transport services are also responsible for implementing the improved transport rules (Figure 1). The latter go by the name of Data Loss Prevention (DLP) and are designed to prevent sensitive data from leaving the corporate network. Also, Exchange Server 2013 integrates an antivirus scanner. The servers scan all incoming and outgoing email for viruses. Companies that rely on third-party antivirus scanners can disable this feature, of course.

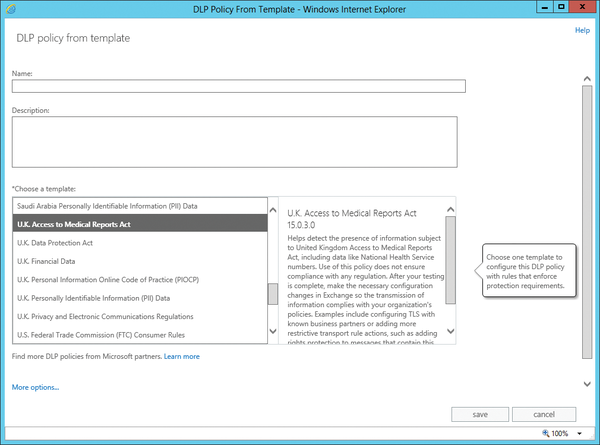
Figure 1: The new transport rules help harden Exchange Server 2013.

Although Exchange Server 2013 can generally be installed in existing organizations with Exchange Server 2007/2010, you will need SP3 for Exchange Server 2010 and a hot fix for Exchange Server 2007. Older versions such as Exchange Server 2000/2003 cannot be run with Exchange Server 2012.

Public folder databases no longer exist in the familiar form in Exchange Server 2013, but, of course, public folders are still available. Shared content is now published via special mailboxes, which are in turn secured by database availability groups (DAGs) to improve availability. These groups are still available in the new version. Public folders are thus mapped in Exchange Server 2013 to a mailbox in the mailbox database. To use public folders, create a mailbox for public folders and then put the public folders in this mailbox.

Exchange Admin Center

Management of the Exchange infrastructure is increasingly taking place in advanced and web-based Exchange Admin Centers (EACs). There is still the Exchange Management Shell, which is now based on PowerShell 3.0. The Exchange Management Console no longer exists in Exchange Server 2013. After installation, the EAC is accessible on https://<Servername>/ecp (Figure 2). You also have the option of connecting Office 365 to this console. In the new version, communication of Outlook and Exchange uses HTTP(S); MAPI is no longer used. For this reason, only Outlook 2007/2010 and 2013 can connect to Exchange Server 2013. Older versions (e.g., Outlook 2000/2003) are no longer supported.

Figure 2: Management of Exchange Server 2013 is web based.

DAGs already exist in Exchange Server 2010. They required Windows Server 2008/2008 R2 Enterprise/Datacenter as the operating system. Because the Standard/Datacenter editions are identical in Windows Server 2012, and there is no Enterprise edition, DAGs can also be used with Windows Server 2012 Standard edition. DAGs are also part of the of Exchange Server 2013 Standard edition.

Microsoft has also improved the process of moving mailboxes to Exchange Server 2013. You can move more mailboxes at the same time and also move email notifications. In case of problems, you can re-run the wizard, and mailboxes can be prioritized. You also have the option of keeping access locked after the move until you have reviewed the results.

Installing Exchange Server 2013

To install Exchange Server 2013, you will need the following items on the server:

  • Microsoft Unified Communications Managed API 4.0 extensions
  • Core Runtime 64 bit [2]
  • Microsoft Office 2010 Filter Packs – Version 2.0 [3]
  • Microsoft Office 2010 Filter Packs – Version 2.0 – Service Pack 1 [4]

You need to install these preconditions manually, but you can leave everything else to the Exchange Installation Wizard.

The new version is only available as a 64-bit system. Although the domain must be based on domain controllers, which can run 32-bit versions of Windows Server 2003, Microsoft recommends also installing the domain controllers as 64-bit systems. Microsoft recommends at least 8GB free memory for mailbox servers and at least 4GB for Client Access servers. You cannot install Exchange on a Core server; you need a full installation of Windows Server 2008 R2 or preferably Windows Server 2012. You can also install the Exchange Server 2013 management tools on workstations with Windows 7/8.

Before installing Exchange Server 2013, it makes sense to install the Remote Server Administration Tools for Active Directory on the Exchange server via Server Manager. Then, launch the Active Directory Schema snap-in and open a connection to schema master by pressing the right mouse button. Like each new Exchange version, Exchange Server 2013 also extends the schema.

For a clean installation of Exchange Server 2013, enter the command:

setup /prepareAd /IAcceptExchangeServerLicenseTerms/OrganizationName: <organization name>

so that the wizard can extend the Active Directory schema. Besides schema extensions, these commands create a new OU with the appropriate security groups. The command setup /PrepareAllDomains prepares all domains in the forest for Exchange.

You should preferably perform the schema extensions directly on the schema master. To find out which machine this is, type:

dsquery server -hasfsmo schema

In some cases, a schema extension error with the number 8224 appears  – this is especially true of virtual servers. The problem is due to TCP Chimney Offload and Receive-Side Scaling because the functions here are computed for the CPU, not the network card. You can resolve the problem by disabling the two functions; you can do this at the command line with the following commands:

netsh int tcp set global rss=disabled
netsh int tcp set global chimney=disabled

The command netsh int tcp show global shows you the status.

Configuring Email Delivery and Reception

Reception and delivery of email is composed of different areas. After the install, you initially cannot receive and send email with Exchange Server. You first need to configure some settings in the Exchange Admin Center. Note that Microsoft has revised the nested structure of the old Exchange Management Console and integrated the necessary commands in a common area: By default Email Reception – Exchange initially only accepts email for domains defined in the mail flow | accepted domains feature (Figure 3).

Figure 3: You can manage the email flow centrally in the Exchange Management Console Message Flow feature.

For an Exchange Server to be able to accept email, you must create a Receive Connector and configure it to accept email from sending servers. You will find Receive Connectors in mail flow | receive connectors . By default, Exchange sets up some connectors.

For Exchange Server to be able to deliver email internally, the email address must exist in the Email attribute for the organization. To discover which email addresses the server distributes to the users, go to the email address policies tab in the mail flow section. You can create mailboxes for users via the recipient | mailboxes feature. At this point, you can also set up new user accounts in Active Directory.

For Exchange to be able to send email externally, you must at least create a Send Connector. You will find this configuration in the mail flow section send connectors tab. After the installation, you still do not have a Send Connector.

SMTPDiag is an important diagnostic tool for mail flow that you can download from the Microsoft website [5] free of charge. With this tool, you can diagnose problems with SMTP delivery at the command line and thus test the Send Connectors on the server. The installation files for SMTPDiag contain a detailed Word document that explains its use.

The tool checks whether an email can be delivered via SMTP. The command form is:

smtpdiag <sender address> <target address>

The tool then verifies that the server can deliver the mail via DNS resolution and gives you detailed reports in case of problems. You can see from the output whether the server accepts connections and then specifically troubleshoot the appropriate servers.

You can test the connection between your Exchange organization and the Internet via the Microsoft site [6]. The tool is used to test connections for Outlook, smartphones, or Office 365. After selecting the desired test, enter the data for the Exchange Server you want to test and the user data with which you will be opening the connection. The tool then tests the connection and indicates whether the configuration works (Figure 4).

Figure 4: Microsoft helps you diagnose connections.

Buy ADMIN Magazine

SINGLE ISSUES
 
SUBSCRIPTIONS
 
TABLET & SMARTPHONE APPS
Get it on Google Play

US / Canada

Get it on Google Play

UK / Australia

Related content

comments powered by Disqus
Subscribe to our ADMIN Newsletters
Subscribe to our Linux Newsletters
Find Linux and Open Source Jobs


Support Our Work

ADMIN content is made possible with support from readers like you. Please consider contributing when you've found an article to be beneficial.

Learn More”>
	</a>

<hr>		    
			</div>
		    		</div>

		<div class=