« Previous 1 2 3 4 Next »
Remote access with Tactical RMM
Spy Story
Firewall
Once the DNS configuration is complete, you will have a few prepping tasks for the would-be target systems on your to-do list. It is good system administrative practice to update the respective system to the latest version first with
apt update
apt dist-upgrade
Tactical RMM also needs a separate local user account, which you can create with
useradd -m -G sudo -s /bin/bash tactical
passwd tactical
The usual rules apply for the password you choose.
On Debian systems in particular, you need to install a few additional packages because they are not included in the default installation. The command
apt install -y wget curl sudo ufw
fetches all the required software. The Ubuntu firewall is entirely optional. If you want to store your firewall rules on other systems or do not want any on the system itself because a firewall sits in front of your IT landscape, you can leave out the ufw option. If you want to use the Ubuntu firewall, after installing the package, enter
ufw default deny incoming
ufw default allow outgoing
ufw allow https
to ensure incoming packets are always dropped and that only port 443 is open. If you also want to be able to log in to your server with SSH, you need to enter
ufw allow ssh
ufw enable && ufw reload
to enable the firewall with its updated ruleset.
Installing Tactical RMM
Working as the admin user, type
su - tactical
wget https://raw.githubusercontent.com/amidaware/tacticalrmm/master/install.sh
chmod +x install.sh
./install.sh
to become the tactical user, download the setup script from Tactical RMM, make it executable, and call it locally. If you want to make sure the developers are not trying to trick you, view install.sh in your choice of editor before you execute it. I don't say this to give you the impression that the developers are up to no good; however, many administrators now quite rightly regard as bad practice downloading a script from the Internet and executing the script without checking it first.
Immediately after launching, the installation script prompts you for a mass of details. For example, you need to specify the subdomain for the back end (api.example.net
), for the front end (rmm.example.net
), and for MeshCentral (mesh.example.net
). The wizard also prompts you for the parent root domain (example.net
) and wants you to supply an email address that will be stored on the system as a contact point for the administrator. The script then asks whether it can add local entries for the specified hosts to the /etc/hosts file; you will want to confirm this by pressing y
.
If you have decided to use Let's Encrypt, an additional intermediate step requires further intervention with your DNS service because Tactical RMM configures Let's Encrypt to use a TXT entry in the DNS to check the ownership of the (sub)domain. To let you do this, the Tactical RMM installation script shows you a matching TXT entry, which you simply need to add to your own domain's DNS configuration. Depending on your DNS provider, it can take a while for new DNS entries to propagate throughout the entire DNS system. Once the TXT entry for Let's Encrypt becomes available, the certificate you need is issued and the installation script continues without error.
Once this step has completed, the rest is very quick: The wizard prompts for a login and password for the web interface. In the next step, the login screen for MeshCentral comes up as the front end for Tactical RMM. The wizard also quits after this step; if it has not displayed an error message in the meantime, you can assume that the Tactical RMM installation including MeshCentral is working. To confirm, you can log in to MeshCentral with the username and password combination you just created.
Setting Up Tactical RMM
After the initial installation of Tactical RMM and your initial login to MeshCentral, the first task is to create a basic configuration. Internally, the tool is organized by sites and hosts – that is, by the locations and systems you want to manage (Figure 1). Correct host-to-site mappings are important because batch operations that affect all the hosts belonging to a site can be defined for a site.
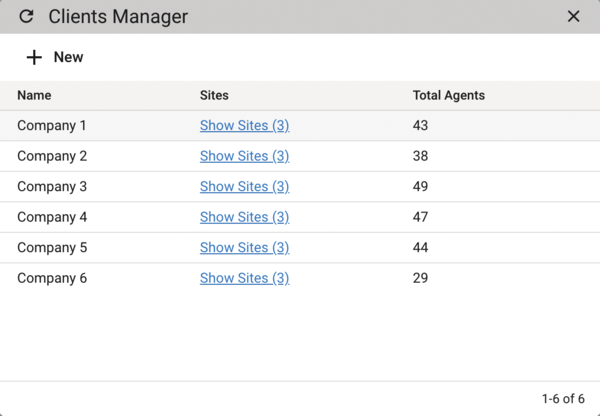 Figure 1: Tactical RMM is divided internally into sites and hosts. Sites are also assigned to clients – the tool is therefore fundamentally capable of multiple clients.
What's more, Tactical RMM can have multiple tenants. In other words, the tool can manage sites belonging to several organizations, which makes it particularly practical for service providers. Anyone managing systems with RMM on behalf of their customers only needs one Tactical RMM installation, because the setup can be mapped in a meaningful way by entering the required data in Tactical RMM. To do so, first select Settings | Clients in the MeshCentral tenant manager and create the customers you want to manage when you get there.
Your customers are then listed in the drop-down menu on the left. Now right-click to open the context menu with the Add Site item, where you can add sites for each customer. When you add agents, it also makes sense to create a Default site in Tactical RMM. This can be combined later with a deployment. In Tactical RMM-speak, a deployment is the list of all tasks to be carried out for a specific site belonging to an individual customer in order to deploy the agent to all systems there.
Deployments have an expiry time after which they need to be renewed. However, you can freely define the time after which a deployment expires, which will be important later when deploying the Tactical agent.
« Previous 1 2 3 4 Next »
Buy this article as PDF
(incl. VAT)
Buy ADMIN Magazine
US / Canada
UK / Australia
Related content
-
Open source forensics for adaptive detection of threats on CRITIS networks
 The open source tool Velociraptor is at the heart of a solution that automatically detects cyber threats in industrial environments, offering a defensive strategy and protecting critical infrastructures.
 -
A service mesh for microarchitecture components
 Istio facilitates communication between the many small microcomponents that need to communicate with each other in modern applications.
 -
Acquiring a Memory Image
 Be ready before disaster strikes. In this article we describe some tools you should have on hand to obtain a memory image of an infected system.
 -
Monitor your network
 Use the open source Pandora FMS monitoring server to keep an eye on all the computers and network devices in your realm.
 -
Secure status and event monitoring of tier 0 systems
 We show you how monitoring your sensitive IT systems can be a more secure experience.
Subscribe to our ADMIN Newsletters
Subscribe to our Linux Newsletters
Find Linux and Open Source Jobs
Most Popular
Support Our Work
ADMIN content is made possible with support from readers like you. Please consider contributing when you've found an article to be beneficial.
