


« Previous 1 2 3 Next »
Managing virtual infrastructures with oVirt 3.1
New Host
What's New in oVirt 3.1
For those who tested oVirt 3.0 on CentOS 6.3 or Fedora 17, the new features in the current version 3.1 will be of interest [4]. For example, the oVirt engine now supports Red Hat's Directory Server or IBM's Tivoli Directory Server for authentication. Additionally, oVirt 3.1 supports the ability to create and clone live snapshots and hotplugging virtual machines. It can also mount external block devices on virtual machines as local disks, and you can configure storage clusters with oVirt 3.1.
A particularly interesting feature is the new installation mode "All-In-One," which allows administators to configure a Fedora host optionally as a management machine or hypervisor. Further innovations include support for mounting any POSIX-compliant filesystem, importing virtual machines, integration of the above-mentioned Python SDKs, and the command-line interface. Developers will also look forward to the extensions to the REST API with JSON and session support.
oVirt on Fedora
In this article, I'll demonstrate the basic principle of deploying the back end on a management machine. A detailed documentation of the solution is available online [5]. The oVirt engine presupposes a Java Runtime Environment and the JBoss server 7 application server. Because oVirt stores all of its data in a database, the setup also requires a PostgreSQL database.
Fedora 17 and CentOS 6.3 include the first stable oVirt version 3.0 out of the box. The recently published second stable oVirt version 3.1 can be installed on Fedora 17 via the Fedora – x86_64 Test Updates package source. Fedora 17 then offers the new oVirt version 3.1 as an update (Figure 1).
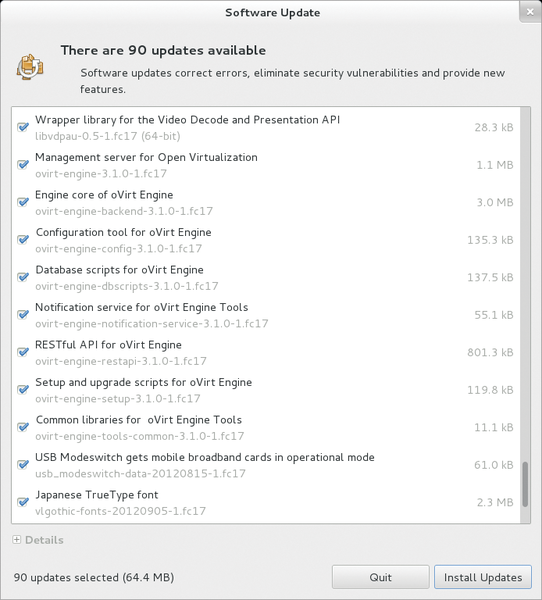 Figure 1: Although oVirt 3.1 is available as an update, you still need to remove oVirt 3.0 manually if you have it installed.
A direct upgrade of an installed oVirt version 3.0 is not possible on Fedora. As stated in the release notes for the current version, you must remove the previously installed oVirt v3.0, exporting any existing virtual machines beforehand, then update the package repositories in Fedora 17, update to oVirt 3.1, and re-import the virtual machines. The Fedora version announced for November 18 should include oVirt 3.1 by default.
Optionally, you can handle the update of the package sources required for oVirt 3.1 via the Yum repository:
yum localinstall http://ovirt.org/releases/ovirt-release-fedora.noarch.rpm
oVirt itself can then be installed in the form of a series of packages belonging to the framework via the package manager. For example, the engine core is found in the ovirt-engine package. Installing this with yum install ovirt-engine automatically installs the other required packages, such as the oVirt Engine Backend
and the Configuration Tool for Open Virtualization Manager
. The following packages are also installed: Database Scripts for Open Virtualization Manager
(which writes the required tables and configurations to the PostgreSQL database), ISO Upload Tool for Open Virtualization Manager
, Log Collector for Open Virtualization Manager
, Notification Service for Open Virtualization Manager Tools
, and Open API for Red Hat Enterprise Virtualization Manager
.
The other mandatory packages are Setup and Upgrade Scripts for Open Virtualization Manager
and Common Libraries for Open Virtualization Manager Tools
. The JBoss application server, the JRE (OpenJDK version 1.7.0 ), the PostgreSQL database (9.1.3), and various other components, such as VDSM, are also automatically installed. If you install oVirt on the hypervisor host, you only need the ovirt-node* packages.
Start Your Engines
The ovirt-engine-setup-3.1.0-1.FC17 package provides the engine-setup script, which you need to run as root. The script itself requires at least 2GB of free memory. If you have already used engine-setup for installing and testing oVirt 3.0, you must run engine-cleanup to remove any remains of an old installation, close any open database connections, delete tables, and so on.
The script prompts for a number of important parameters, including the password for the administrator (admin), the web application (Admin Portal
), and the database. It shows you the respective default values in the square brackets, which you can accept by pressing Enter. Additionally, engine-setup asks you for your company name and the default storage back end. You have a choice of iSCSI, Fibre Channel, and NFS. The latter is good for a quick test run, and the script offers to create an NFS share as an ISO domain on the local server, where you can specify the desired mountpoint.
The script then configures the iptables firewall and lists all of the settings before it starts on the oVirt setup. During this step, it also generates the required certificates and creates the database tables. Incidentally, you can specifically feed parameters into engine-setup. The engine-setup -help option provides information about this.
Afterward, the oVirt interface is available on http://<management server> and, optionally, via HTTPS. Note that the oVirt framework requires at least 4GB of RAM; otherwise, the web interface will not start.
Now you can log in to the User Portal, Administrator Portal, or Reports Engine. The account for the Admin Portal is admin with the password set during the configuration.
« Previous 1 2 3 Next »

Buy this article as PDF
(incl. VAT)
Buy ADMIN Magazine
Related content
-
Managing Virtual Infrastructures
Version 3.1 of the oVirt management platform for virtual infrastructures has recently become available. On Fedora 17, the new release is easy to install and deploy.
-
Open Source VDI solution with RHEV and oVirt
 Red Hat introduces a management system for KVM-based virtualization based on Red Hat Enterprise Virtualization and open source project oVirt. Now, solutions for desktop virtualization can be implemented without using proprietary software.
-
Live migration of virtual machines with KVM
 Live migration of virtual machines is necessary when you need to achieve high-availability setups and load distribution.
-
Alternative virtualization solutions when OpenStack is too much
 OpenStack is considered the industry standard for building private clouds, but the solution is still far too complex and too difficult to maintain and operate for many applications. What causes OpenStack projects to fail, and what alternatives do administrators have?
-
Fedora 18 for Admins
Fedora is a trend-setting distribution that sets the pace for future developments of Red Hat Enterprise Linux. Administrators, regardless of whether they use Fedora, are well advised to look at the newest innovations of the Fedora distribution.
Subscribe to our ADMIN Newsletters
Subscribe to our Linux Newsletters
Find Linux and Open Source Jobs
Most Popular
Focus On Self-Hosting
• Running Your Own Matrix Server with Synapse
• Reliable Network Storage with TrueNAS Community Edition
• Self-Hosted File Syncing with Seafile
• Wiring the Modern Stack with Node-RED
• Self-Hosted Collaboration with Forgejo
• Self-Hosted PaaS with Coolify
• Build and Host Docker Images
• Self-Hosted Pritunl VPN Server with MFA
Support Our Work
ADMIN content is made possible with support from readers like you. Please consider contributing when you've found an article to be beneficial.